- June 5, 2020
- Tools and equipment
- Igor Nezhvinsky
The quality of the tool always plays an important role, and especially when working with wood. Wood is a soft and warm material, responsive to handwork. The market offers a wide range of machines for precise and high-quality wood processing, but to this day only the hand of a master can create a masterpiece.
The art of wood carving has a long history that has given the world unique works of art. Working with wood and creating beautiful things is easy. All you need is patience, perseverance and a good tool. Experience and knowledge will come with time.
The beginning of time
The woodworking master begins with a wooden block, which for an unexpected and incomprehensible reason attracted his attention, and a sharp kitchen knife. The situations can be very different:
- needed a spice rack in the kitchen;
- the door fell off the closet in the bedroom;
- you need to make a rack for children's toys;
- decorate a jewelry box with an ornament;
- you need to put a lock on the front door, etc.
Such tasks are not wood carving, but you will have to cut, drill, saw, sand, etc. If the result is in demand and it has captured the attention of the beginner, then a new star lights up in the sky, and the young master begins his journey of transforming wood into unique and practical products.
Carving tools
General principles
Wood carving is a fairly popular technique for decorating various products.
As a rule, the process itself follows this scheme:
- First, a blank is made from wood, be it a flat board, a block or a figured blank.
Note! Sometimes undisturbed parts of trees are decorated with carvings. In this case, a fragment is selected whose shape has maximum decorative potential.
- Then a rough leveling of the surface of the workpiece is performed, during which all defects are removed from it.
A variety of tools are used for figured carving
- After this, the surface is processed with special cutters, with the help of which a part of the wood is selected. Due to this, a decorative relief is formed.
- After the actual carving is completed, finishing is carried out - grinding the cut areas, impregnation with protective compounds, full or partial painting, varnishing, etc.
The most important tools in this process are the wood carving cutters. In addition to the skill of the carver himself, it is the quality and correct selection of the cutter that determines how clean the ornament or plot image on the wood will be.
That is why below we will look at the main types of such tools and describe where and how they are used.
Main types of incisors
Chisel profiles
To create three-dimensional images, craftsmen use a variety of types of wood cutters. In principle, if you have the skill, you can do without some of the products listed below, but to achieve the best result, it is better to collect as extensive a set as possible and use each device for its intended purpose.
Cranberries with blades of different shapes
The main types of cutters are presented in the table below:
| Variety | Application at work |
| Blunt knives |
|
| Chisels | The most common type of incisors. A typical chisel is a long rod with a cutting edge formed at the end. Depending on the shape of the chisel edge, there are:
Wood chisels of most varieties can be produced with both straight and curved shafts. In the first case, the design of the tool allows it to be used together with a mallet, in the second, the carving is carried out solely by muscular force. |
| Klukarzy | Clukars are special chisels that are characterized by a strong bend in the working part. Clukarza is usually used for finishing carvings with strong penetration, which allows the formation of a clear relief. Generally, these tools are classified by blade shape:
|
| "Goat's legs" | This variety is a chisel, the blade of which is curved in the shape of a step. This design allows for deep cutting without affecting the surface layers of the wood. |
| Spoon cutters | As the name suggests, these devices are used in the manufacture of wooden spoons. The working part of the spoon cutter is a ring or half-ring, the sharpening of which is applied to one of the side faces. The main function of this device is to remove wood cleanly and in large volumes. |
Spoon cutters of different shapes
Additional accessories
However, a master carver, in addition to chisels and knives of various shapes and sizes, also requires other tools.
The required minimum additional equipment includes:
- Wood saws (hacksaw or reciprocating saw for rough work, bow saw for finishing work).
- Jigsaws.
- Drills and rotators.
- Planers for leveling planes.
- Set of wood files (rasps).
- Mallet for processing hard wood with cutters.
- Devices for sanding wood.
Teslas of different sizes
If the master works with fairly large structures, then in addition to simple cutters he may also need figured hatchets - the so-called adzes. According to the principle of operation, they are similar to cutters (naturally, adjusted for the scale and purity of the work).
Tips for choosing
If you are planning to master the technique of wood carving with your own hands, then you need to start by selecting the appropriate tool. And here we are faced with a dilemma: really high-quality cutters are quite expensive, but if you buy a set for beginners “on the cheap,” then working with inconvenient and constantly losing sharpness devices will discourage you from engaging in this type of creativity for a long time.
Ready set of tools
The optimal solution would be to buy several good cutters, and then, if necessary, expand your toolkit. To begin with, we will need at least one medium-sized blunt knife, as well as four to five chisels: one flat, several corner and semicircular ones with different blade curves.
High-quality products from a foreign manufacturer
As for specific instances, you need to pay attention to the following features:
- The blade must be durable and well-hardened, free from rust and other defects.
- The cutting part must be securely, without play, fixed in the handle.
Note! This does not apply to knives with replaceable blades - in any case, they will have minimal play that you will have to put up with.
- Handle material: wood or durable plastic. However, the second option is still somewhat worse, since the wooden handle fits much more comfortably in a sweaty hand.
- Naturally, the handle should be even and smooth, without burrs or cracks.
Products with mushroom-shaped handles
- If we talk about the shape of the handle, the most common are cylindrical options (suitable for impact carving with a mallet), conical and mushroom-shaped models.
- Some manufacturers produce chisels and jambs with anatomically shaped handles equipped with finger grips, but many novice craftsmen have complaints about their convenience.
- The manufacturing company also plays an important role: today on the market you can find both domestic and foreign forms that produce products of quite decent quality. But what you should refuse are the frankly cheap Chinese and some domestic cutters: yes, you will save on the purchase, but even if you cut these products, they won’t last long.
Main tool
A kitchen knife can easily cut out a whistle, a simple toy or a spoon. Many people start with a pocket knife for the purpose of carving a spoon. This is not woodworking or creativity - this is a memorable beginning. Tools for wood carving need special and, most importantly, sharp ones.
A beginner can start his practice only with this instrument. This is a blunt knife. If you want to cut out simple designs or give the desired shape to a wooden surface, this knife will help you do it perfectly. You don't need to specially learn to work with it. Once in your hand, this knife “will show you” how and what to do. There are only two conditions for the first tool:
- very sharp made of high quality steel;
- fits very comfortably in the hand.
There is no need to think about what tools are needed for wood carving and spend money on beautiful sets at the very beginning of practice - they will all be waiting in the wings. One sharp corner knife with a straight blade is enough.
Instrument care
You should periodically inspect your tools and wipe them with an oily cloth to prevent them from rusting. Store tools in individual compartments or wrapped in cloth to protect them and reduce sharpening time.
TOOL SHARPENING
Make sure your tools are always sharp and stop working from time to time to sharpen them. All the carvers I know have developed their own dressing system; everyone found their own procedure that was convenient for them personally. Some use whetstones with oil, others with water, and others use electrical devices.
The first step is to sharpen the blade using a fine-grained abrasive such as diamond chips or sandpaper. First, one side is processed until burrs appear on the metal, then the other. At the next stage of editing, the surface irregularities that arose initially are eliminated. Finally, you should polish the blade with a special compound to a mirror shine, reducing friction between the blade and the wood.
How can you tell if a blade is sharp enough? Take a piece of scrap wood and run a knife across the grain. If a smooth mark remains, then the blade is sharp. If the fibers stick out in different directions and the mark is rough, then you need to sharpen the blade more.
Chisels and mallet
A set of chisels and a good mallet increase the capabilities of a novice craftsman. When choosing a set, you need to pay attention to the material of the blade and the quality of the handle. These are essential wood carving tools for beginners and professionals.
Having chisels of different shapes is an opportunity to make ornaments, cut grooves, make straight lines, and select recesses of the desired shape.
A mallet is a special hammer. It can be rubber or wood. It is recommended to have both options in your arsenal. A metal hammer will quickly destroy chisels.
The handle of a chisel does not necessarily have to fit well in your hand. But when working with a chisel, the hand must be protected, and it would not be superfluous for a beginner to have a robe made of durable fabric that protects the body from a sharp object. For example, a leather apron or a regular robe inlaid with leather, plastic or other inserts.
When working with wood, movements are often directed towards oneself or the auxiliary hand. To avoid scratches and puncture wounds, it is advisable to protect yourself.
Tools for work
Truly high demands are placed on specialized carver tools. The skill of the performer plays an important role. But only with correctly selected and carefully sharpened tools will a master be able to demonstrate his skills in full force.
And if a professional easily and at first glance determines the quality of devices for work, then a beginner is invariably lost and can make a mistake.
First of all, you should purchase:
- quality knives;
- chisels (several pieces);
- needle files;
- hacksaws cutting metal;
- clamping device;
- sandpaper of different grain sizes;
- drill and several types of drills;
- wooden bars.
Knives
It is best to buy knives in a specialized store of goods for creativity and hand-made goods. They must be made from high quality steel. If funds are limited, you can temporarily buy simpler knives, but sharpen them well.
Experts speak positively about tools from the Tatyana, Narex and Kogatana brands.
Chisels
At first, instead of chisels, you can use a sharpened screwdriver and file.
When purchasing chisels, pay attention to the following types:
- Flat - a chisel in the shape of an elongated rod with a cutting edge at the end; it is needed during the initial processing of wood.
- Semicircular is one of the most popular types; it can be of varying degrees of roundness: medium, round or sloping.
- V-shaped - necessary when making geometric threads.
Machine
Carving on a machine has enormous potential, simplifying this work and turning it into pleasure. Modern models are not cheap at all, but professionals characterize them from the best side.
The machines can simplify many labor-intensive operations familiar to carvers:
- surface treatment at different angles;
- drilling recesses, grooves and grooves;
- milling;
- the actual carving.
There are huge differences in the sizes of machine models and in the technology of their operation:
- manual;
- milling and engraving;
- laser;
- CNC machines.
To simplify many operations of artistic carving, professionals advise purchasing a CNC machine. But if a novice craftsman just wants to try himself and see if this hobby is suitable for him, a manual machine is quite enough.
Lessons from a recognized master
Meeting an experienced carver is a rare success. Just one visit to a professional carver’s workshop leaves a lasting impression on a beginner. The workshop has everything: from the smell of wood to a clear understanding of what tools are needed for wood carving. The first impression falls on the subconscious, and the beginning carver “already knows” what and when he should purchase or make.
A professional does not use standard sets of tools. He prefers to make his own instruments. This point is important to keep in mind. No manufacturer will make what you need. Any tool on the market is a tribute to established traditions, the shape of blades, handles, and accessories.
If you have a chance to become an apprentice to an experienced carver, this is a rare success. You can learn not only the technique of wood carving, but also the logic of making a tool, and master important rules for sharpening and using it.
Manufacturing and service
Making the cutter yourself
Many craftsmen, either wanting to save money or not trusting third-party manufacturers, prefer to use homemade carving tools. In principle, making a knife or chisel is quite simple, the main thing is to choose the right material.
The photo shows a hacksaw blade and a simple jamb knife made from it
The raw materials for our design can be used:
- A saw blade for wood or metal is an almost ideal blank for a jamb knife. During the manufacturing process, we cut off a piece of blade on a machine or simply break it off at the angle we need, and then form a cutting edge.
- The wood saw blade also has acceptable characteristics. The carbon steel used to produce such saws holds an edge well, which means that the cutter will not become dull even when working with hard wood.
- Before making a semicircular chisel, you can look “in the bins” for an unnecessary punch. To make a tool, we will only need to cut off part of the wall diagonally - and we will get a very convenient device for sampling wood.
An important part of any cutter is the handle.
The instructions for its manufacture are also not complicated:
- We take a block of hardwood and cut a handle out of it.
- We make a hole at the end of the handle, the shape of which corresponds to the shape of the shank of the metal part.
Gluing the blade into the handle
- We glue the cutting part into the handle, and then clamp the structure with a metal ring.
Note! Sometimes the handle is made of two halves. In this case, the blade can be additionally secured with screws or rivets, and gluing should be done in a vice or clamps.
Sharpening cutters
You can only get a decent result if you work with a perfectly sharp tool. And since even the softest wood dulls the blade quite quickly, sharpening wood cutters is definitely included in the “minimum program” of training for a novice carver.
To perform this operation we will need:
- Bars of different grain sizes - from coarse to fine.
- Old leather belt for straightening.
- GOI paste (or similar composition).
Rough sharpening
We do the work like this:
- First, we moisten a coarse-grained block, place the cutter on it at the selected angle and sharpen it using pressure from ourselves.
- We switch to a block with medium abrasive grain and repeat the operations until a clearly defined sharpened edge appears.
- We carry out the finishing on a diamond stone, removing the metal chamfer that appears on the tip of the cutter.
- Then we apply a layer of GOI paste (a composition based on chromium oxide) to the belt and polish the working part to a mirror shine.
Editing on the belt
Advice! Finishing on the belt can be done more often than the main sharpening - this way we can correct a slightly dull blade.
It’s easy to check the quality of our work: if the cutter cuts the newspaper without effort, it means we’ve done everything correctly, and we can start working on the workpiece.
Wood surface and sanding
Depending on the item being manufactured, one or another surface treatment is required. A shelf or rack for the kitchen, a table or bedside table for the bedroom requires a perfectly flat and smooth surface. A toy figurine, panel or box does not need sanding, but a drawing made with a chisel cannot be sanded at all.
Cutting wood with a knife and shaping the surface with a chisel does not require preliminary sanding, and once the work is completed, the surface simply cannot be sanded.
In the creative process of wood cutting, the idea often arises: not to cut out what you want, but to refine a natural solution. When a fancy piece of wood (a branch, a stump, a trunk) falls into the hands of a craftsman, the idea arises of adding to it rather than cutting it out.
Universal chisel
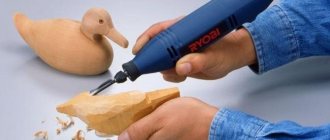
Just a few years ago, work with wood was carried out using hand tools, but today there are devices, for example, an electric chisel, that make it possible to significantly facilitate the work of the master, as well as increase the speed of work while maintaining high quality.
An electric chisel is called universal because it allows you to carry out a wide range of work. High-power chisel models can cope with the removal of old parquet boards or rough processing of a large piece of wood, removing knots and other hard inclusions. It is impossible to cope with such work using only hand tools.
This tool is considered universal because it has many attachments of different shapes and sizes. For example, small semicircular and straight 4 mm bits will help you make patterned carvings or engrave the master’s initials, while more massive tools, up to 5 cm wide, are designed for removing wide chips and roughing.
Work surface and vice
Wood carving tools should be within easy reach. The desktop must have a perfectly flat, horizontally leveled surface. At least one vise must be firmly fixed to the workbench.
A metal corner, a level, clamps, and wood glue must be purchased immediately, and they should always be at hand.
Auxiliary equipment is a sharpening machine, a hand-held circular saw with the possibility of stationary installation, a grinding machine, and an electric jigsaw. A hand jigsaw, a set of needle files and files will come in handy.
Additional equipment and tools are not associated with wood cutting, but without this you will have to spend time doing auxiliary work elsewhere.
A good master should have everything at hand.
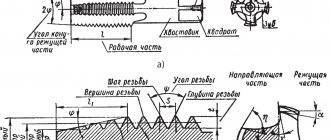
Types of knife blades
A classic jamb knife can have blades of different widths, blade angles and a conveniently shaped handle for a specific type of work. The blade of the knife can be made in the form of a triangle (the flag knife is very popular) or have another shape.
The knife can have different sharpening options, smooth or sharp cutting edge shapes. Understanding which blade is needed depends on the specific type of work, the design being performed and the experience of the craftsman.
As in the case of a blunt knife, the prerequisites for the quality of a knife with any blade shape are the sharpness of the blade and the comfort of the handle. The attachment of the knife blade to the handle must be perfect and reliable.
Bogorodsk knife “Tatyanka”
The name “Tatyanka” and the Bogorodsk knife were formed historically. They are associated with carving with only one cutter by hand. This knife works on soft wood for cutting small sculptures and figure cutting.
Bogorodskaya carving came out of peasant craft. Her most recognizable scene is "man and bear", and her carving technique is often called power. One knife, one workpiece. A carver of this style is a unique master. He doesn't wonder what tools are needed for wood carving. He just takes his knife and makes unique things with it.
There are many options for making a Bogorodsk knife. There are many options on the market, even a folding product. The best will always be your own.
Power carving with one knife is creativity, and creativity never fits into the framework of a standard manufacturer. When a beginner decides to devote himself to Bogorodsk carving, he will not have a question about what tools are needed for wood carving, he will not have a desire to purchase them, but he will have a clear understanding of how to make his own version of a knife.
Household ornament and “kitchen” cutting
The kitchen is the most popular place in the house. The whole family often gathers here, friends come here, and the interior of the kitchen should always be at its best. A kitchen tool is important for a good housewife, and its quality should be better than others.
To decorate a shelf, rack or cutting board, there is no need to perform figured cutting. Household ornaments should be beautiful, simple and easy to clean quickly. Here it is necessary and sufficient to have a simple set of wood carving tools.
As a rule, a set of chisels will be enough to give a unique look to any wooden item for use in the kitchen. Any surface in the kitchen must be clean. From this point of view, it is more convenient to use an electric tool for wood carving - this will allow you to get straight and smooth lines, an easily cleaned ornament and avoid grooves and recesses in which dirt can accumulate.
The choice between manual work and the use of a machine is up to the master, but the cleanliness and “cleanability” of the product should be in the foreground.
Wood carving for beginners
In order to master the skill of turning objects from ordinary wood into works of art over time, you need to gradually go through lessons, moving from simple to complex.
To learn how to create decorative wooden elements, you need to know the technology of work and possess the necessary tools, without neglecting safety precautions.
Masters advise beginners, especially children, to first master the basics of contour carving. For it you will need:
- wooden canvas or object for decoration;
- set of chisels;
- blunt knife;
- pencils;
- sketch (drawing);
- sandpaper.
First, using a sample, you need to check how to work with each of the chisels, see what it is needed for, and practice.
Then the sketch from the paper needs to be transferred to the workpiece.
Only after studying the basic principles of working with the tool can you proceed to testing the products.
The most common are sketches with images of flora and fauna, and landscape sketches.
After applying the pattern, the wood must be sanded and varnished.
Children's room and bedroom
The surfaces of shelves, cabinets, tables, chairs are smooth and even. This does not apply to legs, arms or ornaments. As a rule, artistic cutting can be applied along the edge of the surface of a table or bedside table, but most often it consists of making additional elements.
A carved handle for a cabinet door, a carved leg for a table or a horse chair for a child will require a simple tool. For example, a set of chisels of various shapes can be used to mark a horse’s mane or make a tail.
Types of tools and wood carving for household use is a technique of personal creativity. A person does not set himself the goal of creating a masterpiece. In his opinion, a masterpiece will be a children's room in which his child will feel comfortable; a set of simple wooden toys that will develop motor skills and imagination. The bedroom will be decorated with a unique lamp made from a tree stump modified with a Bogorodsk knife or a book shelf with a light ornament.
Wood cutting for the interior of a living space is significantly different from cutting figurines, sculptures or artistic paintings. Everything here is simple and easy to use: the most affordable materials and tools. Wood carving in everyday life is the art of designating, clarifying, and decorating.
For a beginner, “household cutting” is an excellent school of skill.