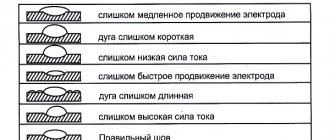
On the modern market, building materials for renovation are presented in a wide range. Let's look at how to putty corners and properly prepare the work site. Let's get acquainted with the features of the devices used, when they are best and how to use them correctly. Read to the end and you will learn about the intricacies of the formation of external and internal turns, depending on their nature and initial state.
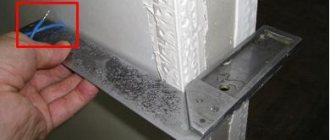
Angle-forming trowel for external corners Source info-bestlife.ru
How to putty external and internal corners
First, let's look at the process of leveling external corners in the case of plasterboard walls:
1. A wedge is cut between the sheets of plasterboard at an angle of 45 degrees for better adhesion of the putty.
2. The mixture is applied with a flat spatula 8-10 cm wide, filling this wedge evenly.
3. When the entire seam is filled from top to bottom, apply pressure to the protruding putty with a metal or plastic perforated corner under the putty, which is selected to the required length, and if not, then cut with metal scissors.
Article on the topic: Stages of preparing walls for wallpaper and features of the work
4. Next, use a spatula to smooth out the putty that has come out through the perforation and level the corner and the wall or ceiling. If there is not enough putty somewhere, apply it additionally and continue to level it.
5. Upon achieving a satisfactory result, the putty is allowed to dry for 24 hours, after which it is treated with a sanding mesh until the wall and corner become one with the required shape and surface quality.
On video: tips for puttying corners.
How to putty the inner corners of walls? Puttying the inner corner of the drywall follows the same procedure, only without the use of a perforated corner. Instead of a corner, use a serpyanka mesh 90 mm wide. This mesh is made of an artificial material obtained by stretching a melt of ordinary quartz glass.
Leveling process:
- Using a flat spatula up to 10 cm wide, apply putty from top to bottom onto the surface of the inner corner. This is done first on the right side and then on the left.
- A sickle mesh is immersed under pressure onto the applied putty.
- Next, use the same spatula to level the putty along the walls. If the walls are difficult to remove with a regular spatula, then use a corner metal spatula for internal corners; it differs from a corner spatula for external corners in the position of the handle. How to putty the inner corners of a wall can be clearly seen in the example below.
Problems with puttying corners
Let's start by listing the main difficulties associated with leveling corners with putty. Knowing these points will help you avoid many common mistakes.
- Adjacent walls forming a corner do not correspond to the vertical level, and their deviations may be directed in different directions or simply differ in angle. Because of this, the internal and external corners will have an irregular shape, which will complicate the installation of subsequent finishing. However, such a problem practically does not interfere with forming the exact edge of the outer corner, while on the inner corner during plastering, due to the deviation of the adjacent wall, it is more difficult to correctly establish the rule, which is why the edge “floats”, becoming an uneven line. From here we can derive the first rule, which states that the geometric correctness of the angle is determined by correctly installed plaster beacons.
Beacons around the inner corner
- Plaster beacons are installed crookedly - this means that the guide element was deformed before or during installation, which means that the plastered wall will receive the same shape. The consequences are approximately the same as in the previous case, but with the addition of difficulties when installing the finishing on the walls themselves - it is almost impossible to obtain a flat surface.
- Adjacent walls are not at right angles to each other - this problem does not play any role for external corners, but for internal ones the situation is critical. If there is an acute angle between the walls, then the attached rule with a blade will not reach the corner, which means it will not be able to remove excess mixture and fill the voids. You can get out of the situation by cutting off the end of the rule at the desired angle
The following set of errors is associated with incorrectly applied plaster, namely:
The rule must not bend
- During puttying, the plaster mixture was poorly trimmed, which is why uneven sagging material formed in the corner. This leads to a violation of the geometry, even despite the correctly installed beacons. This problem is especially critical when drawing external corners. To prevent anything like this, it is necessary to constantly ensure that the top of the lighthouse is always in sight.
- The plane of the walls is rounded towards the corner - this happens as a result of excessive pressure on the rule when cutting and when the beacons are too far apart from each other. In both cases, the rule begins to sag, which is why the plane of the wall is cut unevenly - differences can reach 5 mm, which is critical when corners are brought together.
- The space between the outer beacon and the corner is poorly filled with plaster mixture, that is, there are small voids that are quite difficult to fill with a rule. The reason is that this is the most problematic place to put the mixture, and beginners often make mistakes. To avoid this, it is necessary to install the outer beacon as close to the corner as possible, and the next one after it at a distance of 1-1.2 m. Thanks to this, the rule will not sag, and you can spread the mixture by scraping it off the spatula directly on the outer beacon.
- When applying plaster in a corner, the end can usually damage the already leveled adjacent wall, removing the material and leaving scratches on it - all this also forms unevenness. To prevent this from happening, you must either be careful or first plaster the opposite walls, allowing the mixture to harden normally. The remaining walls should be started from the corners that were made first. If the room is large, then this approach will be sufficient, but if not, then a pause of several hours should be made between aligning adjacent walls.
If you avoided all of the problems listed above when applying plaster, then leveling the corners with putty will not be difficult, although errors may occur at this stage. Let's consider several situations:
- More often in rooms there are internal corners in which it is not easy to apply putty in an even thin layer. The first thing that can get in the way is a poorly cleaned corner, in which small particles of plaster and small sagging consistently remain. Before applying finely ground putty, you need to take a sharp, hard spatula and remove everything named with it. You can also take coarse sandpaper and do a little sanding.
- Secondly, you need to constantly ensure that the putty is applied in a thin, even layer. The blade of the spatula with the mixture must be placed exactly in the corner, and then pull the tool along the wall being treated.
- Small irregularities in the inner corners are not critical for any finishing material - the main thing is to avoid sudden changes. They are difficult to notice with the naked eye, and the installation of reinforcing elements is not required.
- External corners with properly aligned walls will have a clear geometry, and covering them with putty is as easy as shelling pears, especially if you use a corner trowel, but perfectly straight walls are rare, and this corner has one weak point. We are talking about its fragility - when it collides with various objects, chips form. To correct both points, the external corners are reinforced with a plastic or metal reinforcing insert in the form of a perforated corner.
Corner made of galvanized steel for putty
Technically, this product acts as a beacon along which you can pull a spatula, which means the angle should turn out nice and even. But in reality everything is somewhat different. Firstly, during installation it is necessary to press the part as tightly as possible against the wall so that no gaps are formed, that is, the corner will repeat the shape of the curved corner. Or the corner is installed evenly, but then thick layers of putty will have to be applied to the plaster to even out the resulting differences.
Secondly, pay attention to the profile of the corner. Some models have a rounded corner, due to which a protrusion of 2-3 mm is formed, taking into account the thickness of the product itself and the putty on which it will be installed. Thus, even when installed at an ideal angle, curvature is formed. Of course, it will be difficult to notice with the naked eye, but if you apply the rule, the difference will become noticeable. It can also be seen when using light paints, provided that light from a window or lamp falls on this place at an acute angle.
Such effects can be avoided by recessing the corner into a layer of plaster. How to do this correctly will be discussed below.
How to properly seal drywall seams with paper tape
To seal the joints you will need:
- Paper tape
- Knife and spatulas of different sizes
- putty
- Medium grit sandpaper
Step 1: Apply putty to the joints
First of all, prepare the putty. Take a drywall knife or putty knife and apply a thin, even layer of putty to the seam. Apply putty on both sides of the joint to the width of the paper. This is so that it then sticks.
Step 2: Adhesive Paper Tape
Measure the length of the seam and cut the paper tape to the same length. Apply the tape to the joint and press it down lightly. Excess putty should come out. This will form a reliable adhesion and prevent the formation of voids from air bubbles, which can weaken the tape after drying.
Step 3: Putty drywall
Leave the paper tape to dry for at least 10-12 hours. Then again apply a fresh thin layer of putty to the surface so as to hide the paper. Now leave everything to dry for 24 hours. Apply the third layer so that it covers the tape even more by 6 cm on both sides.
Step 4: Smooth the Seams
Once everything is dry, you may find that the tape is still slightly visible. In this case, the seams must be puttied again. But now on the sides you will have to grab 10 cm on both sides. After everything has dried again, check to see if there are any lumps of putty on the surface of the drywall. If you find any roughness, knock it off with a knife or sharp spatula. If the roughness is sandy, sand it with medium-grit sandpaper until the surface is smooth.
Step 5: Sealing drywall joints in corners
Before you start on inside or outside corners, you should caulk all the seams at the flat joints. You can seal the seams in the corners in much the same way. The only thing you will need to do is fold the paper tape in half and only then apply it to the seams. All other steps are repeated in the same sequence.
How to properly process seams
It is very important that the paper tape at the drywall joints is centered and lies evenly on the seams on both sides. It is still better to cover the outer corners with metal corners rather than paper. Each subsequent layer is applied only after the previous one has completely dried. It is necessary to putty not only the joints and seams, but also the holes from the drywall fasteners. And finally, if after puttying both the joints and the drywall itself are treated with a primer, then the paint you will use will not be absorbed.
Video: How to seal drywall seams with paper tape 4TkKIErSReY
Complex shapes
To putty complex architectural structures and arches, it is recommended to use a plastic corner that bends in any direction and allows you to form smooth and beautiful corners. Before you begin applying putty, you need to visually inspect the surface and remove protrusions using a plane or construction knife. When finishing drywall structures, you need to run your hand along the edge of the surface and check it for protruding screws. If protruding caps are detected, the fasteners should be tightened.
Then the surface needs to be primed and allowed to dry. Next, you should measure the edge of the corner being formed and measure the arched corner of the required length. You need to cut so that there are no joints throughout the entire rib.
If for some reason the overlay is mounted end-to-end, then the joining ends of the corner should be secured with Fugen glue and additionally secured using a construction stapler.
After fixing the lining, you should begin to putty the curly bends. You need to start drawing the angle from a curved surface, and then move on to a flat one. An important condition is uniform application of the composition. Excessive thickness and inaccuracies in the formation of smooth transitions can be smoothed out by sanding, for which paper marked P120 is recommended. Next, the surface is dusted and primed.
How are they classified?
Spatulas are classified into several types according to their purpose. At each stage of repair, different tools may be needed. Let's look at which ones are used for puttying walls.
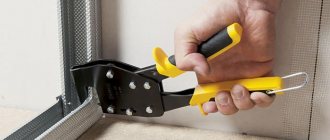
Corner
An angle tool is a metal surface bent at a right angle with a comfortable handle. They use it to line walls in corners. Its shape helps to easily align surface joints between walls and under the ceiling.
Attention Difficulties in working with an angle tool arise if the initial layout of the structure has incorrect angles.
Most often, the problem of incorrect angles is encountered during repair work in Khrushchev buildings. There, the angles between the walls are either too sharp or too obtuse. Such defects make it difficult for an angle tool to access the required area and reduce the quality and uniformity of putty application in hard-to-reach places. The problem in this case is solved by installing decorative corners at the joints where the design allows.
Facade
They are required for covering walls with putty or plaster material during exterior work; they allow you to level the applied mixture and eliminate unevenness. They are used to work on pre-prepared large-scale surface areas. Facade equipment is expensive due to improved basic characteristics.
Tip Facade spatulas are durable and highly durable. The working surface is made of high-quality metal, which increases resistance to deformation under strong pressure.
The working plane is tightly attached to the handle with an aluminum profile, which minimizes the possibility of breakage. The handles are usually rubberized, comfortable, lie firmly in the hand, and do not slip out during operation. The average width of the working blade ranges from 15 to 80 cm.
Serrated
Such equipment can be purchased at any hardware store. It is a working blade with a serrated outer edge, secured in a wooden or rubber handle. Necessary for applying an even layer of glue. You cannot do without a serrated tool when laying tiles, ceramic tiles, and porcelain tiles.
Attention: The larger the tile being laid, the larger the teeth should be. And vice versa - small tiles require small teeth... With a toothed tool, the adhesive mixture is used sparingly and will ensure a high-quality adhesion of the tile to the wall
A spatula with teeth is convenient for removing excess applied glue from working materials.
With a serrated tool, the adhesive mixture is used sparingly and will ensure a high-quality adhesion of the tile to the wall. A spatula with teeth is convenient for removing excess applied glue from working materials.
Painting type
It is similar to a facade tool, but differs from it in design. The dimensions of the working cloth are 20–45 cm. Painting equipment has a thinner edge. Inexpensive, but the quality is low. Therefore, there is a risk of rapid breakdown and short service life under strong pressure or bending.
Advice However, the small thickness of the working surface, its elasticity, and flexibility make it possible to use equipment for applying putty mortar in a very thin layer. This gives an advantage to the painting tool at the finishing stage when processing the final layer of coating.
It will be an excellent assistant for:
- removing old wallpaper;
- covering up cracks;
- eliminating minor irregularities and roughness on the walls.
Made of rubber
Rubber puttying tools are made from elastic, flexible and dense types of rubber. The price depends on the manufacturer, size, and basic characteristics of the material. It can be very small (for working in the most difficult to reach places) or large (for processing large surfaces).
Rubber products with a wide working blade connected to a handle made of rubber or wood are used to process wide surface areas covered with flowing liquid solutions. Smaller ergonomic rubbers are needed:
- for applying thin finishing layers of plaster and putty;
- for caulking seams, grouting joints, eliminating defects on small walls.
Tip Typically, tools are sold in sets of several pieces of different sizes in a set. Such tools are universal, have increased elasticity, and are often made entirely of rubber (without joints with additionally attached handles).
Puttying plasterboard corners
Often, when working with plasterboard walls, a problem arises: cracks form in the corners at the joints of the sheets. To avoid this, you will need:
- Cut and clean the seams.
- Fill with a special adhesive solution using a spatula.
- A 60 mm wide mesh is mounted in the corner.
- After which processing is carried out according to the usual instructions.
The installation of the mesh must be carried out with great care so that it fits well on the site. To prevent the solution from spreading after application, it is necessary to maintain the same temperature in the building until the composition finally hardens.
As you can see from the article, it’s not too difficult to putty the corners with your own hands, you just need to follow the instructions. Thanks to the photos used in the article, you can see how this procedure is performed in practice.
Applying the mixture to internal corners
Now let's see how to putty the internal corners.
Such work is more complex, especially in cases where the dimensions are not ninety degrees.
At the same time, it must be remembered that the applied layer should be no thicker than two to three millimeters. If there are significant differences, they will have to be leveled with plaster mortar.
How to remove such corners with putty? Apply the mixture from the corner to the wall plane. Often the vertical of the corner is piled up towards the ceiling or floor, so during the finishing work you will have to constantly monitor the surface according to this parameter, putting putty on each wall separately.
How to putty a 90 degree corner? It is difficult to carry out such work; applying the solution and leveling the trowel is not enough - each wall will have to be finished with an abrasive mesh.
Execution examples
Strict adherence to installation technology and accuracy when carrying out work allows you to easily make repairs yourself, saving time and without resorting to the services of specialists.
- Finishing the internal wall joint with an angle trowel.
- Decorating the outer corner using a plastic corner.
- Installing a metal perforated corner on an external corner.
- Preparing curved corners for putty using overlays.
See below for expert advice on how to properly putty corners.
Source
Working with seams
Sealing drywall seams has its own characteristics. To do everything correctly with your own hands, observe the following conditions:
- Optimal performance indicators are observed, which are indicated by the manufacturer on the putty packaging.
- Drafts should not be allowed to occur.
- Plasterboard slabs must be checked for reliability of fastening to the wall (profile). Any “walking” of the sheet will lead to the destruction of the layer of putty mixture, even when applying tape (mesh).
Now the puttying of drywall joints begins, divided into several stages.
This process is the processing of the edges of the material. The goal of the event is to obtain a surface that will be as suitable for work as possible. A construction knife is used.
Joining drywall joints with a construction knife
- Where two sheets of drywall meet, remove all excess (cardboard scraps, broken areas).
- They begin to cut the chamfer. Do this at an angle of 40-45 degrees. That is, the joints of the plates should resemble one well-known symbol - a “tick”. It is more convenient to do this before fastening. Although, there is nothing to be done after.
On a note! There is gypsum board on sale, the edges of which are already processed at the required angle.
It is believed that priming is optional, but this is not entirely true. Yes, gypsum board has sufficient adhesive properties that will hold the putty layer and the subsequent decorative layer. But why take the risk? The cost of such compositions is low, they are applied quickly.
It would be correct to choose a mixture based on acrylic. It has good penetrating properties and dries quickly.
If you plan to paint the surface, then priming is a must.
Caulking seams
Sealing drywall joints begins with preparing a dry mixture. It is diluted with water and stirred well. After letting it stand for a while, the procedure is repeated. They prepare a small amount - only for an hour of work.
Attention! Serpyanka tape can be used in the work, and there is also paper reinforcing tape for drywall. They are similar in their parameters, but the latter is used with increased requirements for the resulting seam
For convenience, choose self-adhesive products.
A step-by-step description of the process of sealing seams between sheets of drywall
The process technology is as follows:
- To make it easier to work with joints, you can take a small container and put a little putty into it. So, it will work faster and more conveniently.
- So, take the mixture with a medium spatula; you need to literally hold it on the tip. And smoothly smear it into the seam.
- It is necessary to ensure that the solution completely occupies the volume of the joint.
- Now cut the tape, which is glued directly to the seam. It should go down the middle.
- The serpyanka is pressed a little. Next, apply another layer along the entire joint. Thus, the tape is immersed in the solution and becomes flush with the surface.
- Everything is thoroughly smeared. Check the level.
- When the layer dries, use sandpaper.
On a note! Working with reinforcing paper products is somewhat different. It is immediately cut into the required size and poured with boiling water. Then apply a layer of mortar to the seam. After waiting for it to dry, it is sanded. Then wring out the tape and apply PVA glue to the seam. When gluing the tape to the joint, it is immediately lubricated with the same glue. The surface is smoothed with a spatula. The seam is very thin and strong. The whole process can be easily done with your own hands.
There is another way, it is similar to the one already given. But to seal the joints, you will need a little skill in handling the tool. It goes like this:
- The solution is quickly spread with a medium spatula. At the same time, without smoothing or removing excess.
- Then they take a wide tool, place it at an acute angle, and move it across the surface from bottom to top.
- It would be correct to press down on him.
- It turns out that the putty fills the empty areas and forms a smooth surface onto which the reinforcing product is already glued.
Corners are sealed in a similar way.
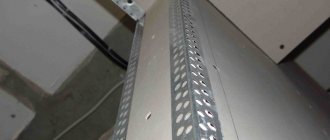
Processing corner joints of drywall using reinforcing tape for corners
The result will be a surface that will remain covered with a finishing layer of putty. If everything is done correctly, there will be no cracks. In any case, the main thing is to do everything carefully and painstakingly, especially if such work has not been done with your own hands before.
Dry mixes
This type of putty is a complex chemical mixture that includes filler, binders, and special additives. Each of these components affects the properties of the putty and its quality.
Before use, this type of putty is diluted with the required amount of water according to the instructions.
Characteristics of this putty:
- waterproof;
- fine grind.
Types of dry mixture:
- basic, which is used for initial leveling of the wall;
- universal – used to eliminate small defects;
- finishing mixture.
The chemical composition of the putty varies:
- The base is acrylic. Puttying as a type of finishing is considered a universal means for external and internal finishing work. Due to acrylic, this type is applied to various surfaces, while it becomes smooth and even. The advantage of this material is that it does not need to be diluted; as a rule, it is sold in ready-made mixtures. Thanks to its properties, it perfectly levels the wall;
- latex based. Suitable for wallpapering and applying paint to surfaces;
- glue-oil. This method is a simple and budget option for wall decoration. It is flexible, dries relatively quickly (only 24 hours), and also adheres well to walls.
This type of putty is prepared using drying oil, and also contains casein glue and chalk. It is used on concrete surfaces, wood, and stone walls.
Using this type you can hide unevenness and cracks in wall surfaces.
The main advantage is environmental safety. The main disadvantage is that it is incompatible with materials that contain oil paint and drying oil.
It is better not to use wallpaper for this coating.
They are also distinguished by the composition of the binder element:
- Cement putties - they are used for facades and also for rooms with high moisture. Durable and hard coating. Especially often used when sealing cracks;
- gypsum putties are used for finishing inside rooms where the humidity is within normal limits. This is the most suitable way to decorate indoor spaces with your own hands. Can be applied to concrete, brick, and plastered surfaces.
Main advantages:
- excellent adhesion;
- has no shrinkage;
- dries quickly;
- environmentally friendly;
- the cost is low;
- acceptable material consumption.
The main thing when working with this material is to avoid moisture and work only in dry rooms.
Polymer putties are needed for finishing and when removing joints. This is a relatively new material for decorating walls with your own hands; it makes the surface flawless. This type of putty should be applied with your own hands before the finishing layer. These are named because of the binding element - latex or acrylic.
Pros:
- high strength;
- without smell;
- ease of application;
- durability.
Expert advice
Use the following expert tips to make your job easier:
- take measures to protect mucous membranes and skin, work in a respirator, safety glasses, rubber gloves;
- follow the coating thickness specified in the instructions on the packaging (within 1–2 mm for different compositions);
- apply several layers of mortar if required, but the total thickness of the coating should not exceed 10 mm;
- if the putty is applied on top of the plaster, then sanding in case of significant differences is better done before starting puttying;
- the depth of the distortion allows you to more accurately calculate the material consumption and determine the optimal coating thickness;
- It is better to plaster uneven walls first and only then putty;
- when puttingtying drywall, do not use a universal self-adhesive mesh, giving preference to profile materials;
- before puttying, check the end between the wall and the ceiling for protrusions, remove them with a plane or knife;
- To level the outside, you can use the construction rule, leveling the mortar along the wall.
You can form right internal angles yourself, without the help of craftsmen or special tools. Set the depth of the distortion - the type of putty used, the thickness of the coating, as well as the material consumption will depend on this. It is optimal to lay the solution in 2-3 layers to completely cover the serpyanka and level the corners. During final sanding, it is especially important to consider eye and respiratory protection.
Main works
Now you will learn how to putty drywall joints so that the entire product retains its excellent appearance for many years, perhaps, if you do everything correctly, even for decades. First you need to dilute the mixture, but keep in mind that you still need to count on another 30 minutes of work, since then it will simply harden and become completely unsuitable for further work. The calculation can be carried out according to this principle; in the case of cement and gypsum putties, you need to use about 1 kg of mixture per square meter. But in order to seal drywall joints more economically, we recommend using adhesive-based mixtures; they can be taken at half a kilogram per square meter.
If you don’t know how to properly chamfer drywall, then remember that this is done using a drywall knife, which cuts the edge from the edge of the gypsum board sheet at an angle of 45 degrees. The finished mixture is applied to a spatula; you don’t need to put too much, otherwise it will simply be inconvenient to work with. Now you need to run the spatula along the seam line, maintaining moderate pressure on the tool and making sure that the layer of putty covers not only the seam itself, but also a distance of 5-7 cm from its edges. If puttying drywall seams occurs over a fairly long area, then divide it into several parts and process each one.
After you have completed the application of the first layer of putty, you need to begin attaching the reinforcing tape, which will contribute to a stronger and better adhesion of the seams. Experts often call it “serpyanka”. It must be laid along the entire length of the seam to give it greater strength. The serpyanka must be applied so that the seam is exactly in the middle of it, that is, the edges of the reinforcing tape should protrude beyond the edges of the seam, and the edge of the drywall should not be visible under the putty layer. The serpyanka needs to be drowned a little in the putty so that it is better fixed exactly in the depth of the seam.
The second layer of putty is applied after the first has hardened and secured. With the second layer you even out the surface, making smoother transitions between the seams. In addition to puttying the walls, it is also necessary to putty the screws, which can go far beyond the height of the plasterboard sheet, so before you putty the screws, they need to be tightened. You can check the level of their height using the same spatula; to do this, run it along the surface in which there are self-tapping screws. If it clings, then you need to tighten it further. You need to putty the self-tapping screws using the cross method: lengthwise, crosswise, this way you can mask the self-tapping screws much better.
For specialists who know how to putty drywall joints, I advise you to use finishing putty to putty internal corners, but in this case you will also need to use a corner, which needs to be attached to the base of the corner, in 1 layer of putty, and then covered with a second one. If the drywall seams have a complex, curved shape, then it is worth using plastic corners, which can also be puttyed so that no one will notice them.
Required tools and equipment
For normal operation you will need:
- two or more spatulas for puttying walls. One should be small in width (3...8 cm), the other should be as wide as possible, with a comfortable handle. Use a small spatula to scoop up the solution and fill in uneven areas in inconvenient places; use a large spatula to carry out the main work. The greater its width, the more convenient and faster it is to level the surface. Additionally, a corner spatula may be required (for puttying the corners of walls, internal and external);
- container for mixing the solution. Sometimes it is convenient to work with two containers. In one, larger one, the solution is mixed, in the other a small portion of it is deposited to perform a certain area of work;
- construction mixer or drill/screwdriver with an attachment for mixing the mortar. Naturally, this is not required for ready-made formulations;
- primer roller. It is convenient to work with the product on a long telescopic handle; the pile height should be medium or low;
- vibration or belt type grinder for grinding the surface after puttying. For small areas and/or hard-to-reach places, a sanding sponge or simply a block of sandpaper wrapped in sandpaper will also work. Special graters are convenient, into which sandpaper or an abrasive mesh is inserted;
- For work on the upper part of the walls and on the ceiling, you also need a stepladder, or better yet, sawhorses. If you don’t have any, you can use a table, stools, an old (strong!) wardrobe and other improvised items.
In addition to the above, of course, protective clothing and equipment are needed. When grinding, it is also advisable to use dust masks and goggles.
A little about the technique of correcting corners
Of course, every master does it his own way. but we will consider the classical way of aligning corners.
- Always start leveling the wall from the corners, because this way it will be much easier to remove them than if you start leveling the walls and only then come to the corners.
- Check the angle often; walls may be crooked at the bottom or top.
- Apply the solution to one wall first, and then move on to another. You should not tackle two sections of walls at once.
- Check the level using a bubble ruler.
It is quite difficult to get the corner perfectly, so it is worth finishing the corner with sandpaper after the putty layer has hardened.
- You can use a mechanical machine on which sandpaper is fixed, because this will make it easier to align the corners.
- Sand one wall first, and then switch to the second. You shouldn't chase two birds with one stone at the same time.
- The movements must be fast and precise to ensure beautiful angles.
Technology: sequence of work
After the gypsum board sheets are fixed to the frame, it is time to prepare the drywall for finishing. Let's consider the case with a full cycle - for painting. In this case, the drywall must be puttied in at least two layers. For other types of finishing that are less demanding on surface quality, we simply remove unnecessary steps. The order of work is as follows:
- Coating with deep penetration primer.
- Sealing screw holes.
- Puttying joints using serpyanka mesh or special paper tape.
- Sealing corners - external and internal.
- Primer for drywall.
- Puttying the entire surface with the starting composition and sanding any uneven surfaces.
- Primer for gypsum board.
- Putty with finishing composition and putty of uneven surfaces.
- Primer coating for finishing.
Do-it-yourself drywall putty - learning the nuances
A few words about which putty is best to use for gypsum board. Any one will do - gypsum or polymer based (latex). Polymer putties are usually finishing - they provide a very thin layer and a smooth surface. There are both starting and finishing plaster ones. Difference in particle size. You can use any, as long as the quality is good.
There are two forms of drywall putty - dry in bags and diluted in buckets. Before use, dry mixture must be diluted with water in the indicated proportions and stirred until lumps dissolve. Compositions in buckets are already ready for use, but are more expensive. But they are guaranteed to have no lumps.
Material selection
On the modern market of construction and finishing materials, putties are presented in a wide range. Their compositions differ in purpose, properties and pot life.
Before you start purchasing material, you need to familiarize yourself with some characteristics of each type:
- Polymer putty is a finishing coating and is used at the end of finishing work. The mixture levels the wall surface well and has high moisture resistance;
- Gypsum is approved for use only in enclosed spaces. Forms a smooth surface, hardens and dries quickly;
- Cement putty has high moisture-resistant qualities and can be used in finishing bathrooms and kitchens. The disadvantage of this type is the likelihood of cracking after drying. To prevent cracks from occurring, the surface should be periodically moistened until the inner layer is completely dry.
According to the form of release, putties can be dry, requiring independent preparation, or ready-made. According to their intended purpose, there are specialized, leveling, finishing, decorative and universal solutions. The choice of material is carried out individually and depends on the type of work performed and the degree of exposure to external factors.
You should also purchase a primer. To form both external and internal corners, it is recommended to use deep penetration solutions. This will ensure good adhesion of the mortar to the wall and prevent peeling and chipping of the plaster.
From the tools you need to prepare three spatulas: two straight ones 25 and 10 cm wide, and an angular one. To obtain a homogeneous solution when using dry mixtures, you will need a paddle attachment on a drill or construction mixer. As a surface leveler, you can use a sanding float with sandpaper or a mesh attached to it, and when preparing the surface for wallpapering, it is better to use an abrasive with a grit level of P100 - P120.
To strengthen the outer corners, you should purchase perforated corners, and to form the inner corners, you should purchase a sickle mesh.
Finishing areas between walls and ceiling
How to make even corners when puttingtying the junctions of walls and ceilings? There are certain nuances related to the time required for work and the materials used.
Please note that the plinth will be attached to the ceiling, so special care is not required in the work. Here it is permissible to apply the starting mixture Acrylic Puts or other acrylic-based material
The solution is applied with a thin spatula blade and rubbed in one layer with a wide tool. The dried surface is primed to improve adhesion. After twelve hours, repair work is allowed to continue.
The corner area, for which finishing with plinth is not provided, is more difficult to putty. This is especially true for new buildings that are slowly shrinking. Initially, the putty is applied in a thin layer; sickle tape or tape with metal threads is attached to the dried surface to create a reinforcing gasket.
Using a serpyanka, it is difficult to achieve an even angle because it lags behind.
With the help of adhesive tape it is easy to draw a right angle, on the surface of which cracks do not even form later. But there is a drawback here - the reinforcing material can swell and change its original shape. This disadvantage is leveled out by liquid nails and the application of an additional putty layer.
Briefly about the main thing
Puttying of corners is carried out for the purpose of final leveling after preliminary preparation using a plaster solution (if necessary).
To reinforce (strengthen) the turn, corner-forming guides made of metal or plastic, paper tapes and metallized analogues, a construction bandage or a serpyanka-type mesh are used.
To work with tools, spatulas, corner-forming trowels are used, as a rule, and in the case of external corners, temporary guidelines may be needed (wooden beams, plasterboard profiles).
Before each stage of installation work, the work site must be treated with one or another primer.
The preparatory stage includes repairing cracks, unfinished seams between sheet materials, degreasing, removing fungal and corrosive formations with subsequent impregnation with protective compounds, dismantling loose and peeling areas, old decorative finishes, and finishing priming.
Principle of operation
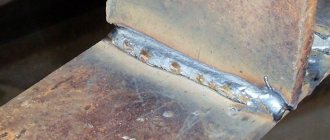
Puttying external corners. Putty is carried out by forming surface joints at right angles. You need to install nozzles on the edges of the wall so that you can correctly apply the putty to the outer areas.
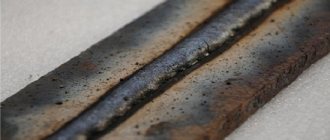
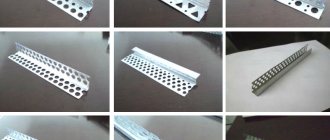
Specialized nozzles can be different:
- Metal. In the production of nozzles, galvanized steel material or aluminum metal can be used. To reduce the weight of the structure so that the product can be buried in putty, perforations are made on the sides. The disadvantages of this type of tool include the possible occurrence of corrosion in galvanized areas.
- Plastic. In shape, such plastic products are very similar to metal nozzles, only the plastic material has the highest service life. This design is often used when processing uneven wall surfaces with significant protrusions or various other defects.
- Flexible. Such nozzles are used for lining corners that are located in openings with arched geometry. Flexible nozzles are also used if it is necessary to plaster curved areas on a plasterboard surface. The special design of the corner will allow you to bend this product at the desired angles without damaging the edges. These overlays are used only when processing rectangular surfaces, but filling of other concrete planes is carried out without the use of auxiliary structures.
Puttying the outer corners of the room should be done in the following order:
- A small amount of solution is applied over the entire surface in an even layer. The area that needs it is processed.
- Then the perforated corners are mounted to drown them in the mixture itself.
- The products are installed according to the level, putty is added if necessary.
- After complete drying, the final finishing process begins.
- Apply a little mixture to the trowel to treat the surface on only one side.
- Then this procedure is repeated - the work is done on the other untreated side, at the same time it is necessary to remove the excess solution.
- The composition must be leveled using uniform movements; furrows should not be left.
- The procedure is repeated until the entire area to be covered is completely treated.
- The area begins to be sanded and primed with a special penetrating solution only after the putty coating has completely dried. If necessary, final puttying is carried out.
- Then sanding should be done again. The procedure should be carried out carefully so as not to erase the first layer of putty.
Putty inside corner. The work must be performed in the following order:
- First, determine the curvature of the processed corners. There are times when it is necessary to pre-lay the plaster.
- They begin to level the flat areas of the wall - such areas will have to be brought close to the joints.
- You need to apply the prepared mixture along the entire corner, and remove the remaining excess as a rule. This tool should be used alternately on each wall.
- To simplify difficult work, experts recommend using an angled trowel - the design of this spatula will help you complete the processing faster, without the need to perform any additional procedures.
- On slopes, the resulting coating can be checked for evenness using a square and level. If any deviations are found, the procedure will have to be repeated, but this time you need to use a reduced amount of solution.
Grouting and sanding corners. Small protrusions may form when the interior lining is finished. Such unwanted defects can be removed by grinding. To do this, follow these simple steps:
- You need to install an emery cloth on a pre-prepared hand grater so that it protrudes 20 mm beyond the edge of the tool.
- With this device, one side of the corner is first processed, then the other. During processing, all movements performed must be made quickly and sharply.
- Due to its plasticity, sandpaper easily removes curves, thereby creating a smooth surface.
Plasterboard corner putty. Often, difficulties may arise when working with walls covered with plasterboard: cracks begin to appear at the joints in the corners. To prevent this from happening, you need to follow the following instructions:
- The first step is to cut the seams, create indentations, and then clean them.
- Then you need to treat the already cleaned seams with glue - this should be done with a spatula.
- After this, a 60 mm mesh is installed.
- Then you should do the processing according to the method described in the instructions.
Methods
In order to properly putty the inner corner, you must first draw a construction square from the ceiling to the floor and mark all deviations with a pencil. The protrusions are cut off using a plane, and the depressions are primed and puttied. After the solution has dried, the surface of the walls forming the corner should be primed, and only after that should the putty begin.
The technology consists of leveling each wall one by one and applying the mortar as close to the corner as possible. Excess mortar is also removed one by one - first from one wall, then from the other. To make it easier for you to form a corner, you should use a special corner spatula, with which you can form a perfectly even joint. After applying the mortar and initial setting, it is necessary to perform a control measurement of the angle using a construction square. The identified depressions will have to be filled again, and the irregularities will be removed during subsequent sanding.
If the joint turns out to be slightly rounded, then the formation of a right angle is achieved by sanding with No. 150 emery cloth. Sanding of the adjacent walls is also carried out one by one until a sharp and even inner edge can be obtained.
When plastering plasterboard corners butt-to-wall, a self-adhesive sickle mesh should be installed. Its width should be 5 cm. The sticker must be applied very carefully, avoiding bending and distortion of the material. Further work is carried out using the technology used for concrete foundations.