One of the most important elements of the front suspension is the ball joint. True, they used to be used on the rear axle, but these were isolated cases when the rear wheels were able to steer in time with the front ones (nowadays this design is practically not used). The support, as a support bearing itself, allows your wheels to deflect (simply turn), without this design this would not be possible. In this article I will talk about the device, how it works and whether it can be repaired to make it last forever. In general, as usual, there will be a lot of useful information, so continue reading...
An important component of a car suspension
The ball joint performs functions that are important for its comfort and safety in every car. It is a suspension element equipped with an iron rod with a ball-shaped tip on one side and a thread on the other end.
The configuration of this part requires the presence of a special casing into which polymer filler can be poured. The casing must have a hemispherical receiving part for attaching the ball part of the pin.
Unpopular reasons for knocking
It would be a good idea to check the anti-roll bar bracket. This part consists of bushings based on metal and rubber, which are turned in different directions and connected by a thin isthmus. Most often it is he who breaks down. On rough roads, on small bumps and on turns, you can hear a knocking sound.
For a correct diagnosis, you need to pull the end of the stabilizer with one hand. This will work better if the wheels are turned to the right.
It happens that the motor mounts wear out. The engine moves actively at increasing speeds and on uneven surfaces. At certain moments, he reaches the body with the generator and oil pan. The result is a knock. This source of knocking is rarely guessed at. Many people change the suspension, but replacing the front suspension does nothing in this case.
Anything can knock in cars. For example, washer barrels. If it is poorly secured in place, the race will knock. There are also many other mysterious culprits behind such sounds.
Strong fixation and dust protection
Thanks to the presence of such a mounting socket, the support can be easily mounted into the casing and will not cause problems in the future in terms of abnormal vibrations and jerks. At the same time, the technically correct location of the ball end allows the finger to oscillate completely unhindered and in different directions.
This entire assembly is protected from dirt by a boot, which is a strong and durable rubber cover with a cylindrical and conical section.
Thanks to the boot, sand, stones, and deicing agents do not penetrate into the suspension unit, which can significantly extend the service life of the articulated joint and thereby reduce the cost of operating the vehicle.
Now about the repair itself.Let's first consider the available types of restoration of ball joints
In-place repair.
Description from company advertisements - The technology can be used to update tie rod ends, steering rods, ball joints, and pendulum arms. It is possible to use the technology up to several times for one part. A special polymer is pumped into the part assembly; after restoration, the quality of the assembly is comparable to the original spare part. Guaranteed mileage of 50-80 thousand km.
In practice, such repairs are only possible if there is no corrosion of the ball, otherwise the effect of the repair will not last long. Perhaps the technology still has limitations, for example, not all designs allow for “blind” replacement of the bushing without losing the parameters specified by the manufacturer, plus the designs of ball joints are also different.
Collapsible repair
.
Collapsible repairs can be divided into three types
1. Replacing the repair kit
provided by the manufacturer
2. Converting the unit into a collapsible one
. The back part of the ball joint is opened, the body is modified into a collapsible one with the possibility of tightening the liner, as a result we get an adjustable ball joint with the ability to independently replace the liner.
3. Replacing the liner.
The back of the ball joint is opened, the liner is changed and the lower part is rolled back.
More details about each of them
Replacing the repair kit
For some cars, there are initially dismountable ball joints; for them you can find a restoration kit for sale consisting of boots, bushings, washers and retaining rings (the composition of the kit depends on the design of the support).
Repair kit for ball joint repair
Converting the unit into a collapsible one
The method is used when it is possible to increase the size of the ball joint or steering tip, since the size of the rear part of the assembly increases. This possibility needs to be clarified in advance, for example, if the rear part of the lower ball joint is too close to the wheel disk or drive housing, then this method cannot be used. But if you look at the tie rod end, the back of which is always “free,” then this repair method will come in very handy. Let’s clarify right away that the design of ball joints is somewhat different from the design of tips. This is influenced by the magnitude and direction of the effort.
Let's look at the repair in practice.
The dismantled part must first be washed from dirt and traces of lubricant; of course, the boot must also be removed and the lubricant underneath must be removed. Afterwards the bottom is cut off and all the insides are removed. The rear part of the body is leveled, and a metal ring with an internal thread is welded to this place by electric welding. The purpose of the ring is to create the possibility of installing a screw-in plug that will secure the new liner.
Next, the ball pin is inspected for traces of corrosion; if there was or is corrosion, the ball is ground to remove the potholes and give a uniform surface. The sphere of the ball has its own requirements for surface roughness. To improve the friction process, the surface of the sphere must be smooth, but if it is over-smooth, then the lubricant will not retain on it and, as a result, we will get increased wear.
A plastic liner is machined to fit the size of the ball sphere and the ball joint body. The liner works as a sliding bearing providing a small rotation force. Previously, a metal-ceramic liner was used, then a filler liner, and now a plastic liner. The liner is made mainly from caprolon, the technical name of which is “polyamide 6”. Caprolon belongs to polymeric materials. In terms of characteristics such as strength, corrosion resistance, lightness, it successfully competes with metals. Low coefficient of friction paired with any metals, easy processing by milling, turning, drilling and grinding. 6-7 times lighter than bronze and steel. In everyday life, caprolon can be found in kitchen cutting boards and in water supply ball valves as a. Caprolon most often comes into production by “folk” turners either in the form of rods of arbitrary size, or in the form of bushings from shipbuilding where they are used as sliding bearings for propellers. Caprolon comes with carbon-containing additives that reduce friction. In general, this is an excellent material for our purposes.
For a collapsible ball, a new liner is made of two parts, an upper washer and a lower seat. This design, with a good fit, allows you to tighten the “pin-liner” gap without disassembling and removing the part from the car.
Design of a dismountable ball joint with a screw-in plug
Before assembly, the hinge is lubricated with grease; before closing the plug, the perimeter of the seal should be lubricated to prevent moisture from entering.
Technological process of converting the steering tip into a collapsible one
· site leveling
· selection of washer with plug
· welding the washer to the body
· production and fitting of liners
· assembly
· painting
The process of assembling the ball joint occurs with control of the tightening torque of the plug pressing the bushing, which affects the magnitude of the moment of rocking of the pin; after assembly, it should bend with difficulty from the force of the hand. Next, the plug is fixed with a pin inserted into the hole drilled in place. The entire rear part of the part is washed from traces of grease and painted with thick paint, which should prevent moisture from entering the threaded connection.
Adjustable ball joints have an increased service life of up to 100 thousand km. If the tightening of the ball pin becomes loose, tighten it without removing the part from the car. If tightening does not help, then it is possible to replace the ball pin and liner with a new one. Since the unit has already been converted into a collapsible one, the repeated repair process takes significantly less time.
Replacing the liner
Unlike converting the unit into a collapsible one, in this case the procedure comes down to replacing the liner and re-rolling the pressure plug (cover). But the method is applicable only to sunroof structures, of which the vast majority are found on modern passenger cars. The roll-up design is distinguished by the presence of a roll-up back cover (there are also solid forged ones that do not contain a back cover because they have a solid body)
The opening of the ball occurs with a minimal cut of the metal rolling the lid. Afterwards, the liner is manufactured and changed, with all the accompanying cleaning procedures.
Unlike collapsible ones, for rolling hinges the liner is made only in one piece. Often, the liner has vertical cuts that serve as channels for lubricant and waste particles.
At the final stage, the assembly is assembled and the lid is rolled with the remaining metal. Of course, the strength of the rolling decreases after repair, but as practice shows, it is not critical.
Technological process for repairing a ball joint from a Honda City car. This ball joint comes complete with a lever.
· Remove the part from the car
· Clean the part from coarse dirt
· Clean the back of the ball joint from rust with a wire brush.
· Carefully cut off the rolling of the ball joint cover
· Knock out the ball pin with liner
· Clean the ball from rust and polish it
· Make a new liner according to the size of the ball and seat
· Assemble the structure and perform rolling
· Paint over the rolling to prevent moisture from entering
Because This ball joint is combined with a lever containing a silent block; the silent block was replaced with a new one.
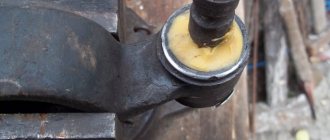
The cause of wear of this ball joint was moisture that penetrated through the boot seal - the ball pin.
Installing the hinge into the suspension
The segment of the hinge assembly on which the thread is provided is mounted in the corresponding receiving holes in the lever, after which it is fixed with a nut.
For the sake of full operation of the unit, care should be taken to ensure that there is 100% mutual mobility of the support part and the lever.
The main purpose of the ball joint
To understand exactly what functions a rubber joint performs, it is enough to study the design of the steering knuckle, which is a component of the front suspension that ensures the wheels are connected to the body.
- The task of the ball joint is to provide the necessary mobility of the fist, thanks to which the machine is able to turn quickly and smoothly at any speed.
- An additional guarantee of comfortable steering is the use of a trouble-free steering system.
Most common problems
Every car enthusiast is quite capable of identifying deviations from the norm that have accumulated in the hinge on their own.
The fact that the current performance indicators of the ball joint no longer correspond to the standard indicators can be guessed by the following signs:
- The appearance of suspicious noises emanating from the suspension, especially when driving on dirt and concrete roads, overcoming ruts, holes and tile joints. Most of all, this sound resembles the effect of plastic fence panels hitting its iron posts during strong winds. In the car suspension, there is also impact contact between plastic and metal;
- In the cold season, car trips are accompanied by continuous squeaking. This development of events serves as evidence of the fact that the boot protecting the hinge has ruptured. In the future, if moisture penetrates into the cracks on the rubber boot body, it is possible that the lubricant will harden in the cold.
How to diagnose a problem
To diagnose a wheel bearing malfunction, you can use the help of a car service center, or you can do it yourself. Diagnosis occurs as follows.
We install the machine on level ground, and then check the vertical play. To do this, jack up the front suspension. Then we put our hand on the top of the wheel and make movements from ourselves to ourselves. The failure of the consumable will be indicated by a clicking sound.
You can use one more method to check. We jack up the vehicle's control arms. We start the car, accelerate the wheels, and then abruptly stop. The failed element will be located on the side where the hum-like noise comes from.
If the problem has already started, then a grinding noise will be heard even if the wheel on a car raised with a jack is turned manually clockwise. In addition, when the wheel spins, strong play will be clearly visible.
The most vulnerable element of the hinge
The car enthusiast should keep in mind that cracks and tears on the surface of the boot are formed with one hundred percent probability. They are an inevitable consequence of long-term use of the machine, its chronic overloads and destructive atmospheric and climatic factors.
In a number of cases, driving style that is merciless to the suspension contributes to the destruction of the boot.
If signs of damage to the integrity of the boot appear, you should stop using the vehicle as soon as possible. Otherwise, the likelihood of debris and dirt penetrating into the support will increase, causing abrasive deformation of the components.
Is it possible to replace the ball joint with your own hands?
As you know, everything ingenious is simple. That’s why for an inexperienced car enthusiast, the best way to fix a damaged ball joint is to visit a branded car service center.
Its craftsmen will not reinvent the wheel, which is what the Kulibins from garage workshops are very prone to, and will restore the unit’s functionality in full compliance with official repair regulations.
- At the same time, in a number of cases it is possible to diagnose ball joint problems without the help of professional car mechanics.
- Car enthusiasts with extensive experience are quite capable of repairing the ball unit on their own.
In order to avoid annoying mistakes, you should find out exactly how badly the boot was destroyed, whether there is noticeable play and long wide cracks in the assembly.
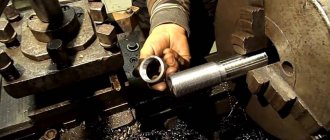
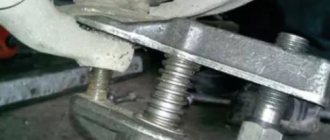
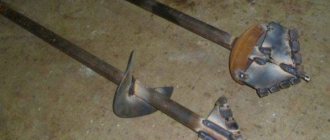
Fork puller
For those who don’t have money, machines, or even good metalworking skills, I suggest making a very simple and reliable puller yourself.
Material: steel rod with a diameter of 18 mm. The puller is welded from three parts in the form of a fork. For manufacturing you will need a grinder (although you can get by with a hand hacksaw for metal and a large bastard file) and a welding machine (if you don’t have one, you can turn to a welder even of low qualifications).
The operating principle of the puller is very simple. First, unscrew the nut from the ball pin. We insert the puller fork between the lever and the rod as far as possible (all the way) and hit the pin with a hammer. If necessary, repeat the blow until the rod of the ball pin comes out of the conical socket of the lever.
Homemade ball joint remover: 19 photos of step-by-step DIY production.
We bring to your attention a homemade device - a puller for ball joints made by craftsman Alexander Pankov.
Correct diagnosis of ball joint
After determining the degree of wear of the hinge, repairs are carried out according to the following scenarios:
- If the boot is cracked, but no play is observed, then the boot is replaced;
- If the boot is destroyed and there are signs of play, then the entire ball joint will need to be replaced, and immediately. Otherwise, every new trip, even with an empty trunk, can lead to dire consequences.
Reviews on ways to repair the mechanism
And there are actually two restoration technologies - either pour something inside, removing the cover, or completely disassemble the ball, pressing out the bottom. At the same time they screwed in the oiler. Or they simply pressed the outer part. But most often the ball dies from a torn cover, then dirt, sand, water gets stuffed inside, grinding down the bushings, the iron, and the ball. So not every ball joint can be restored. And it doesn’t matter how to restore, fill or disassemble, the main thing is that in principle it is possible.
mogui
https://forums.drom.ru/habarovsk/t1151615673-p2.html
I drove restored ball and steering wheels for two years, I won’t say anything bad, really, and good things too... The owner of the service station (according to him) immediately restores even new spare parts, he says that the restored ones last longer... I’m used to drawing conclusions based on an understanding of the process, but I don’t understand how it’s possible to restore a seemingly non-separable part... Service technicians say: the pin is taken out, the wear on the pin is turned, then it’s polished and filled with plastic.
Zhornic
https://www.land-cruiser.ru/index.php?showtopic=120678
There is no point in pouring openly rusty ones, since the geometry of the finger will already be too disrupted, which will lead to an incorrect shape of the poured polymer, and all that follows from this.
ArxivatoR
https://www.drive2.ru/l/1354317/
Give examples of accidents that occurred due to the fault of restored ball joints, and not due to compliance with the distance or speed limit, for example. I do repairs myself, I’ve seen a lot of restored parts, there are regular customers who have driven more than 50 thousand on restored ones and it’s great, the main thing is to restore them on time! And if you are afraid for your life, then buy new cars, not junk, which in Europe is already sent to scrap, and follow ALL traffic rules. PS: Just because you bought a new spare part does not mean that it is good, especially in our markets. New new discord.
maleid
https://forum.onliner.by/viewtopic.php?t=1118334&start=40
To decide how to repair your suspension, just calculate the cost of restoration. In some cases, it makes sense to buy a new unit; sometimes repairs will be more cost-effective. In any case, a variety of options gives you a chance to save money.
Inadmissibility of using damaged hinges
It is important to keep in mind that the integrity of ball joints has a decisive influence on traffic safety, even on smooth city highways.
In the event of a critical rupture of the ball joint, the wheel breaks, causing it to stop rotating.
As a result, the car rushes not along the trajectory given to it by the steering wheel, but along the vector created by the locked wheel.
- If the ball joint is still intact, but there is play in it, then there is a risk of loss of controllability.
- This means that on a road crowded with cars, the driver simply will not be able to avoid a collision or side contact at the right time.
In order to prevent such a development of events, it is necessary to carefully diagnose them at the slightest manifestations of excessive depreciation of the hinges.
Tags: die holder
Comments 27
I like the creative approach, thank you, interesting. And this holder can be further improved by installing a sleeve in front of the die with an internal diameter a couple of dozen larger than the outer diameter of the workpiece. Then the bushing will serve as a guide along the rod and prevent the thread from moving away from the center line of the workpiece to the side
Well done! But I probably posted in the wrong community, it’s more about the “Kulibins”))))
I also had to invent since there was nothing suitable for this work) www.drive2.ru/l/9346896/
I also made such mandrels, now you can climb into many places.
I have this too, but the old heads are welded to the ends of the tubes. Usually they have a whole square left. You can turn it with a ratchet. Small square heads are welded onto the taps, from a Chinese set.
I usually throw everything away... balls, ends, shock absorbers, turbochargers, cylinders... everything...
A die and a lehr are not exactly the same thing. The die is what you made the holder for, and the “die” is actually a metal plate (die) made of carbon steel with a handle and 2 rows of threads cut into it, for example: from M6 to M10. The first row is a preliminary thread, parallel to it in the second row there is the same thread, but already finished (as is the case with taps). Since the dies “sat down” quite quickly, their life was short-lived. Then high-speed steels appeared, they began to make lerks - more convenient to use, and dies became history. I also found such a thing at my father’s, already demolished and therefore useless. And “lerks” are called dies more out of old habit.
It would be clearer in comparison with a photograph.
A die and a lehr are not exactly the same thing. The die is what you made the holder for, and the “die” is actually a metal plate (die) made of carbon steel with a handle and 2 rows of threads cut into it, for example: from M6 to M10. The first row is a preliminary thread, parallel to it in the second row there is the same thread, but already finished (as is the case with taps). Since the dies “sat down” quite quickly, their life was short-lived. Then high-speed steels appeared, they began to make lerks - more convenient to use, and dies became history. I also found such a thing at my father’s, already demolished and therefore useless. And “lerks” are called dies more out of old habit.
I myself started studying to become a turner back in 1983, but I didn’t know this. I asked the mentors why a die and why a lerka - they said the old name. Yes, a photo would be clearer.
But where can I get it now, a photograph? You say: “...back in 83...”, and when I held this die in my hands, it was, in general, the 50s. I tried to cut an M3 thread at the end on spokes shortened from an adult bicycle for my “eagle”. Now not only is this plaque gone, but so is the house itself where it was. And in words, in more detail, she looked like this: narrow met. a plate 10-12 mm thick with a handle forged from the same plate at one narrow end, (the shape resembles a spatula with which housewives turn cutlets in a frying pan), threaded holes are drilled along the entire length in two rows, one row is a rough thread, parallel to it - finishing thread of the same size. And so along the entire length there was a set of threads (I don’t remember exactly how many there were, it seems from M3 to M10, but I remember for sure that among this series there were M3.5 and M7 threads, rare threads for our time). Yes, one more clarification: next to the threaded hole there were 2 through holes adjacent to it for removing chips. The lerka has from 3 to 5 such holes, depending on the diameter. This is what the thread-cutting die looked like. Sorry, but I don’t have enough imagination for a more detailed description.