Valve seat cutters are a tool with which a car engine (or rather, its valve mechanism) is returned to working condition after repairs have been completed. With the help of such cutters, which are also called countersinks, the tightness of the working cylinders of the engine is restored, which is one of the main conditions for its technically sound condition.
Complete set of valve seat repair tools
Rollers for dressing grinding wheels: types and principle of operation
During operation, the profile of abrasive wheels changes, and their granular surface becomes clogged with processing waste, which ultimately leads to a decrease in the effectiveness of this device. In order to return sharpening and grinding wheels to their original characteristics, a tool such as a roller cutter is used to dress abrasive wheels.
Sprocket cutters: blunt-toothed on the left, sharp-toothed on the right
Star rollers, simple in their design, are divided into two types:
They differ from each other not only in the shape of the teeth, but also in thickness and scope of application.
Dimensions of cutters for dressing abrasive wheels
What types of burrs are there?
A burr, a roller bit or just a roller cutter are made of different designs and from different metals.
By design they are:
The shape of the head of this device can also be very diverse - in the form of a cone, cylinder, spherical, oval or semi-oval. The use of one or another cutter depends on the material of the workpiece and the task being performed.
Depending on the material, cutters made from:
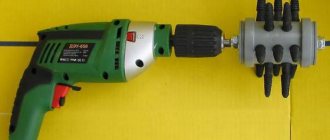
Balls made of carbon steel are most often used when working with a hand drill, electric drill or screwdriver. With the help of such burrs, you can get new clean and smooth holes of various configurations or increase the diameter of existing ones. These tools are the most affordable and, as a rule, are most often used in everyday life.
Diamond-coated cutters are a more professional tool, used for the finest grinding and boring. These cutters are best used when working with materials that are not particularly durable - glass, ceramics. At the same time, a diamond-coated burr is also used when processing high-strength materials, where a carbon steel cutter cannot cope.
A burr with an abrasive attachment is not much different from the previous tool in terms of its area of application. The size and shape of this cutter can be very different. Used in conjunction with an electric drill, screwdriver or hand drill. Can be used with engraving equipment.
Carbide cutters are used mainly in production where processing of hard materials is required - cast iron, heat-resistant steel, titanium alloy, stainless steel and other metals. Carbide cutters are excellent for processing welded seams. These attachments are used when working with powerful tools where the number of revolutions exceeds several thousand.
Application area
Using cutters equipped with sharp teeth, grinding wheels are dressed, the dense structure of which consists of abrasive grains of minimal size. If, with the help of sharp-toothed cutters, you start dressing wheels made of abrasive grains of medium and coarse fraction, then the dressing tool will simply ruin their working surface, causing serious damage to it. In such cases, a blunt-toothed cutter is used, specially designed for dressing medium- and coarse-grained abrasive wheels.
The high efficiency of using star cutters is ensured by the fact that processing with their help is carried out at a high rotation speed. It should be borne in mind that the dressing of grinding and grinding wheels is carried out not with one cutter, but with a whole set of them, placed on a special axis equipped with a lubricating nipple.
Special holder for cutters
Considering the fact that the roller-cone tool experiences serious mechanical impact from the abrasive wheel during use, its working part must be subjected to high-quality hardening.
Tool selection
The high efficiency of instruments of this type is determined by a number of specific parameters. Among the performance indicators, the most important are:
When choosing a device, it is also recommended to take into account the power and number of revolutions of the equipment being equipped. The technical characteristics of the product must correspond to the metric indicators of the tool.
Metal emery with a fine, universal, ultra-fine notch and for working with soft metals can have a head of a specific shape. The effectiveness of the device depends on the shape and location of the cutting part; the tool may have:
Operating principle
The operating principle of a cutter for dressing grinding wheels is quite simple. A set of such tools, assembled into a single unit, is placed on a special axis equipped with a handle for the operator, and is brought into contact with a rotating abrasive wheel. As a result, a set of cutters also begins to rotate on an axis, rolling and sliding along the surface of the circle being processed. Since the working part of the cutters is hardened and has high hardness, when they interact with the wheel, a layer of abrasive is removed from it, which means its surface is leveled.
A dressing tool works on a similar principle, the working body of which is a diamond, or rather, a set of diamonds mounted on a special mandrel in a certain order or randomly. Sets of sprocket cutters can not only be fixed on manual straightening devices, but also used as part of devices installed on a fixed base.
The cutters are assembled into a holder, which is installed on the machine tool rest until it touches the emery stone.
The disadvantages of a roller-cone tool for dressing abrasive wheels include:
- low accuracy of the processing performed;
- a large amount of dust generated during the straightening process.
The problem with dust, even when using hand tools equipped with cutters, can be solved quite easily. To do this, a hose connected to the vacuum cleaner is attached to its hollow handle.
Of course, one cannot fail to note the advantages of straightening using cutters. This should include:
- high productivity;
- eliminating smoothing of the abrasive wheel processed by the dressing tool.
A device based on rotating cutters demonstrates the greatest efficiency in cases where it is used to straighten abrasive wheels used for grinding work.
Method of dressing grinding wheels by rolling
When performing straightening using cutters, the rolling method is used. Its essence lies in the fact that the tool, rolling around the circle being processed, crushes, chips and removes abrasive grains and the material holding them together from its surface. Thus, the surface of the abrasive wheel is cleaned of foreign inclusions and leveled.
Metal cutters with diamond coating
Diamond is the most expensive and durable material on the planet, which is why diamond-coated nozzles are quite expensive. Such attachments can also be used in conjunction with a drill and even a screwdriver for boring, grinding and stripping. In addition to metal, diamond-coated burrs are used for processing ceramics, glass and other fragile materials.
The main advantage of diamond-coated cutters is that they can handle a variety of materials - from wood to plastic, from metal to granite. Diamond sputtering makes it possible to obtain attachments with minimal roughness values. This means that they can be used to finish surfaces.
A simple cutter for editing circles on an emery machine
When using abrasive grinding wheels for a long time, their surface often becomes clogged. For example, after processing gardening tools, sharpening a metal drill is already quite problematic.
To edit grinding wheels on an emery machine, the author suggests using a roller cutter, which you can make yourself.
The basic materials will require special star washers in the amount of 10 pieces (for the standard width of the abrasive wheel) and a piece of rectangular profile pipe with a cross-section of 60*30 mm.
Please note that washers come with sharp and blunt teeth. Using the former, fine-grained grinding wheels are dressed. Whereas blunt-toothed washers are used mainly for dressing wheels of medium and coarse grain.
Homemade drill cutter with replaceable attachments
Hello, dear visitors of the site “Visiting Samodelkin”.
Today I want to tell you and show you how I made a homemade large cutter for a drill or drilling machine, which is convenient for processing metal pipes from the inside, removing the welding seam, or slightly increasing the internal diameter.
I tried different ways. And a round file. And it’s the same, only without a handle, clamped into a drill.)))). (The last method, by the way, is quite effective, but it kills the file very quickly.)))))
This time I felt sorry for both my hands and the file))). So I made a temporary device from a piece of round timber (some unfinished part that I picked up from the scraps of a metalworking company):
..The prototype of my future creation was a grinding drum for an engraver:
This is something like this, but bigger and more authentic, I decided to come up with. Looking ahead, I will say that I succeeded.
And this is what I needed for this:
1. Emery cloth on a fabric basis. 2. Plastic tubes from fax paper. 3. M10 stud trim. 4. M10 bolt. (Not necessary. You can use the same pin.) 5. A piece of DU-8 steel pipe.
I started by making replaceable working elements. Initially, I intended to use sandpaper, so I began to think about what kind of “bulk and unnecessary” material could be used to make the base of the grinding drums. I remembered the plastic tubes from fax paper.
(For those who don’t know, I’ll explain. Fax machines use special paper, which is sold in rolls. The roll is wound, for some reason, not on a paper sleeve, but on a composite plastic tube. When the paper runs out, three tubes like these remain in the compartment:
It was torn, not cut. I probably wouldn’t be able to cut it lengthwise very evenly. Therefore, having made a small incision, then simply tore it apart. So it tears very smoothly parallel to the warp threads.
To make it more convenient to work, I placed the tube on a piece of metal pin:
(Don’t pay attention to the “stencil”.))) I painted something before this.))))
Then I coated the tube and the skin with glue. Clay took the first suitable one he found. I once bought a cheap one at a fixed price store “to have it”)):
And, having secured it, he left it to dry:
I'll tell you about what I secured. I noticed that the tube fits very tightly into a piece of polyethylene “twenty” water pipe:
Then I realized that even when cut lengthwise, it would hardly fit on my tube.
Even on a smooth one. And I definitely won’t wear it with abrasive. Then I cut this “clamp” into many narrow rings and used pairs of these to attach the sandpaper:
In the meantime, while the glue was drying, I started making the drum shaft. Even earlier, I picked up a piece of DU-8 metal tube from scrap metal. My plastic tubes fit tightly onto her. So I decided to make a drum out of it.
The tube was “reinforced”. Its internal diameter turned out to be slightly more than eight mm. (Apparently, this is a piece of an old gas pipeline. Remember, these used to come from gas cylinders on the street?). :
I made a cut at the end of the tube:
Then I cut a piece of the required length and cleaned it up:
At one end of it, I used a grinder to make several longitudinal grooves to the depth of the thread:
Thanks to the cut, the thread was cut to a smaller diameter than required. The tap simply unbent the tube by the fractions of a millimeter that were missing. After that, I took an M10 bolt and slightly sharpened its end:
I twisted it into a tube:
Then, using an angle grinder, I made a slot in the end of the cut bolt for a flat-head screwdriver:
I unscrewed the resulting plug. To prevent the smooth plastic tube from slipping along it, I scratched the surface of the drum lengthwise with a metal blade from a reciprocating saw:
This leaves very deep scratches with sharp edges. Now, even if you just put the tube on, it is almost impossible to turn it. When the glue had dried, I used a knife to evenly cut the ends of the sandpaper on the tubes:
All! We put the tube on the drum:
And screw in the plug. She wedges the tube onto the drum:
Main stages of work
The first step is to cut a piece of profile pipe of a suitable size and drill a hole in the center for a bolt with a diameter of 14 mm.
At the next stage, you need to cut off a piece of profile pipe and weld a piece of round tube (this will be a homemade handle). The result is a fork.
After this, sprockets are inserted between the profile walls and secured with a bolt. There is no need to tighten them too much; they should rotate freely.
For details on how to make a simple cutter with your own hands for editing circles on an emery machine, you can watch the video on our website.
Source
How to make it yourself
The rarity of industrially produced ball-shaped cutters forces many craftsmen to look for a way to make them themselves.
Among car enthusiasts, a whole technology has been developed that allows you to make ball cutters with your own hands. In this case, you will need a simple set of equipment, including an angle grinder, a drilling machine or welding machine and abrasive equipment. The starting material for the cutter is usually balls of the required diameter from ball bearings. Some craftsmen have adapted to processing ball joints from car suspensions. Thanks to the use of hard steels, these blanks allow you to obtain a fairly high-quality result.
The first operation for making a round ball cutter is to form the shank mount. Depending on the capabilities, there are two options. The first involves drilling a hole in the body of the ball and requires the presence of a drilling machine with appropriate equipment and access to heat treatment technologies. The second option is simpler. It is based on welding a steel nut to the ball, into which the shank is subsequently screwed.
After manufacturing the fastening elements, they begin to form the cutting teeth. To do this, use a grinder with a thin disk. Vertical or oblique grooves are made on the surface of the ball, which then form the cutting edge. Using the same technology, excess material is removed to obtain a trapezoidal tooth profile. This operation is the most difficult and requires increased attention and accuracy. Upon completion, the instrument is virtually ready.
The final manufacturing operations are grinding and, if necessary, heat treatment. The finished cutter can be used when processing soft steels. Of course, the quality of such a tool is far from ideal, but in work that does not require great precision and surface cleanliness, they may well find application.
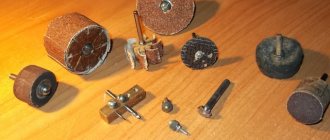
DIY cutters made from ordinary abrasive stone
The presented homemade product will definitely be useful to you, both in the garage and within the confines of a house or apartment, so we recommend that you do not delay with the idea of implementation.
For a new homemade project, we will need a piece of abrasive stone that you have left over after some activity or just happened to come to you, and it is from this that we will implement the whole idea.
So, the first step is to saw off a small piece from a whole abrasive stone , approximately as shown in the photo. We implement this process using metaba and a stone disk.
We process the stone to the required condition, also using metaba and a stone disc. We grind the stone on all sides.
Next, we find a potential center in the stone and visually drill a hole through this point. We make a through hole using a concrete drill, securely securing the stone. If the hole goes a little to the side, then there will be nothing wrong with that.
Next, we insert a bolt with a washer and a nut into the resulting hole , after which we fit it in and give our stone a cylindrical shape.
For convenience, you can clamp the stone not into a drill, but into a specialized machine that will help us grind off the corners using a stone disc. Accordingly, the entire process is implemented using a machine and a metadata with a disk.
With a slight movement of the hands we get an abrasive cylinder.
The next step is to divide the roller into two halves approximately equal in size , also using a metaba and a stone disc. Then we make a conical end shape at one of the ends. After unscrewing the nut and removing the parts, as well as separating them, you will see that you have standard cutters.
After disassembling the structure, we take the cutter and insert a standard bolt, washer and nut into them . We tighten the entire structure securely. We assemble the second cutter in a similar manner.
Such an abrasive cutter will work great on a drill , and it is also important to note the fact that they are of higher quality than store-bought products due to the increased level of rigidity.
Tips for treating various surfaces
Large industries have their own instructions and requirements on how to use burrs, but our task is to tell you, dear readers, how these devices should be used in everyday life.
Stone cutter
When processing stone surfaces, be it natural stone or artificial, which can be ceramic tiles, porcelain stoneware or marble, it is necessary to wet the treated surface with water.
And here it is important to ensure that moisture does not get on the operating power tool in order to eliminate the risk of electric shock. Supply wires, cables and their connections must be well insulated and located away from water.
Wood cutter
When processing surfaces made of wood or similar materials (multi-layer plywood, chipboard, fiberboard), cutters that have large notches or teeth are used.
In addition, it is necessary to choose the correct operating mode for an electric drill or screwdriver, because when working at high speeds, such a side effect as setting the tree on fire is possible.
Each power tool has a dial for adjusting the number of revolutions. If you smell burnt wood, you should quickly reduce the speed.
Roller cutter for ceramics and glass
Working with materials such as glazed ceramic tiles or glass requires special care and attention. First, you need to make the outline of the required hole on the surface using a forma-y cutter, after which the hole is selected with a roller cutter, the head of which is made in the form of a ball.
