Icer
14731 1 0
Icer October 22, 2016Specialization: master in the construction of plasterboard structures, finishing work and laying floor coverings. Installation of door and window units, finishing of facades, installation of electrical, plumbing and heating - I can give detailed advice on all types of work.
The strength and appearance of the wall depends on how correctly the installation of the profiles is carried out. If everything is done efficiently, then in the end you will get a perfectly flat surface that is easy to finish and will be reliable and durable. I will describe the workflow in great detail so that you can understand it as best as possible.
In the photo: a metal frame allows you to create a perfectly flat and strong base for drywall
Tips for choosing
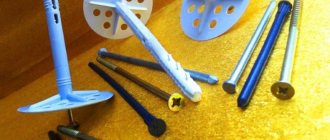
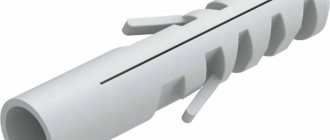
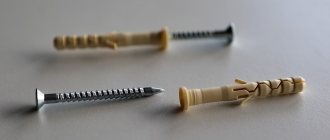
A dowel-nail consists of two elements: a dowel, which is inserted into a hole in the wall, and a nail, which is driven or screwed into the dowel if there is a thread on the rod. The cap has a slot, usually for a Phillips screwdriver. Dowels made of polypropylene are suitable for installation in heated rooms, while dowels made of nylon are able to withstand sub-zero temperatures, so they can be used even outdoors.
You can use a dowel-nail for concrete, brick and foam concrete, it all depends on the design of the dowel. Based on this principle, the following types are distinguished.
- Spacer - fixed due to the expansion of the sleeve in the hole, its relief surface limits the movement of the dowel.
- Universal - fastened in the hole due to the knot that is formed when twisted.
When buying dowel nails, pay attention to their size . The diameter can be from 5 to 8 mm - the larger it is, the heavier objects the fastener can support. The most common dowel nails for fastening plasterboard profile frames into concrete are size 6x40.
The length of the nail can be from 40 to 120 mm - the longer it is, the more securely it will hold the suspended structure. Also consider the amount of fasteners in the package and make your choice based on the amount of work to be done. If you need to display one shelf and several paintings, a package of 6 to 10 pieces is enough. When you need to fasten many items, it is better to take items with a reserve, for example, 100 - 150 pieces.
Types of profiled sheets
Today there is absolutely no point in talking about corrugated sheets as a roofing material. Since corrugated sheeting is used with great success as a finishing material for cladding walls and enclosing structures. Based on this, according to their intended purpose, corrugated sheets are divided into two types:
- roofing sheeting;
- wall corrugated sheeting.
Installation of wall profiled sheets has its own distinctive features. In order for it to be completed at a high-quality level, the entire installation process should be carried out correctly and close attention to the nuances should be paid.
Wall profiled sheet is limited to a ridge height of 8 to 20 mm
So, the higher the ridge height of a profiled sheet, the higher its strength indicators. Hence the conclusion is that corrugated sheets for roofing should have increased strength indicators, which means that the material with a higher ridge is corrugated roofing sheeting. Based on this, there are some restrictions on the height of the wave crest. Wall profiled sheets are limited to a ridge height of 8 to 20 mm. The following grades of corrugated sheets fall under these dimensions:
- C21;
- C20;
- C18;
- C10;
- C8.
The letter “C” means that this corrugated sheet belongs to the category of wall corrugated sheeting, the number indicates the height of the wave crest. The stronger the wind load, the higher this figure should be. Everything is quite simple.
Dowel-nail for gypsum boards
When using drywall, you should choose the right fasteners. Not only the strength of the structure being created depends on this factor, but also the appearance, service life of the structure, its technical characteristics - whether this structure can be weighted with various objects. For installation of gypsum plasterboard frame. The type and number of selected dowel-nails depends on the type of frame, the selected profiles; they differ in the thickness of the material from which they are made, the material of the walls and ceiling. (Foam concrete, shell rock, concrete, brick, etc.)
To install a metal frame, not only self-tapping screws are purchased, but also dowel-nails. These fasteners create the strength of the entire frame for drywall. To use these fasteners, you should familiarize yourself with their characteristics. Improper use may have a negative impact on the metal frame.
Which self-tapping screws are of better quality?
Some sellers may sell screws of poor quality to a person who knows little about construction. How do you know that the screws for window profiles you buy are of high quality and reliable?
You just need to know the signs of quality products.
Good self-tapping screws are:
- Self-tapping screws in one batch must be absolutely identical. Even minute deviations in thickness are unacceptable.
- The cross-shaped slot on the cap should be free of chips and irregularities and located strictly in the middle. Remember that low-quality screws can damage screwdrivers and make the work poor quality.
- The black coating, which helps protect the screw from corrosion, should be uniform.
Before purchasing, inspect several fasteners from the same batch - they must be identical.
Classification of dowel-nails
In order to purchase dowel nails, you should consider the following factors:
- Estimated load on the fastening element, on the surface itself.
- The base into which the dowel-nail will be attached is concrete, brick.
- Surface – ceiling, wall.
The fastening element is not uniform and is available in different sizes and structures.
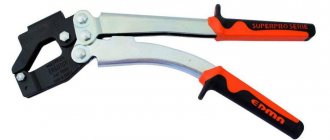
Installation differences
Depending on the structural structure of the dowel, nails should be worked with different tools.
Manual fixation of the dowel-nail - in this case, 2 types of dowel-nails with different structures are used. Nails without threads are driven in with a regular hammer. Threaded - you will need a screwdriver or screwdriver.
Fixation with a construction gun. For this type of installation, dowel-nails with a metal sleeve are used. They are manufactured to carry more weight.
Dimensions of dowel-nails
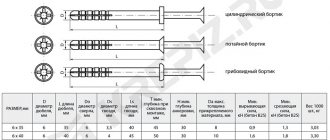
The fastening element is produced in various sizes. Depending on the purpose, you should purchase a dowel-nail of the required size. Fasteners are marked with two numbers: the first indicates the diameter, the second indicates the length of the fastener.
| Size diameter/length | Dowel length | Nail length | Min depth for through installation | Max thickness of mounted material | Weight 1000 pcs. per kg. |
| 6/40 | 4 mm. | 42mm. | 50 mm. | 10 mm. | 3.3 |
| 6/60 | 4 mm. | 62mm. | 70 mm. | 30 mm. | 4.89 |
| 6/80 | 4 mm. | 82mm. | 90 mm. | 50 mm. | 7.28 |
| 8/60 | 5 mm. | 62mm. | 70 mm. | 20 mm. | 8.5 |
| 8/80 | 5 mm. | 82mm. | 90 mm. | 40 mm. | 11.02 |
| 8/100 | 5 mm. | 102mm | 110 mm. | 60 mm. | 13.78 |
| 8/120 | 5 mm. | 122mm | 130 mm. | 80 mm. | 16.53 |
| 8/140 | 5 mm. | 142mm | 115 mm. | 100 mm. | 19.3 |
| 10/100 | 7 mm. | 102mm | 150 mm. | 50 mm. | 15.32 |
Technical parameters of dowel-nail
According to GOST 28457-90, dowel-nails are produced. They undergo processing - hardness 53-56HRC. But they may have a deviation of 51/5HRC.
- The rod can be bent according to factory settings: with a length of 50mm. – 0.1mm curvature; length is more than 50mm. – 0.15mm.
- There should be no ripples or cracks on the nail. The nail must be sharp if the dullness is 0.8 mm. – it is considered unsuitable.
- The nail point can be multifaceted.
- There may be a washer on the nail. A force of 0.3 kN is required to shift it.
Dowel nails are made with an anti-corrosion zinc layer. It must be no less than 6 microns.
Advantages of metal profiles
The advantages of products made from metal profiles, in comparison with wood, plastic, ceramic and other analogues, have allowed them to become the main building material in their segment. The following positive properties of the material are distinguished:
- Reliability, durability and strength. These qualities of the metal were inherited by products made from it. In addition, frame materials are distinguished by the presence of stiffeners, and sheet panels have a metal thickness sufficient to withstand significant loads.
- Resistant to corrosion, sunlight and other external influences. Almost all products that are intended for outdoor use have a protective coating made of zinc or polymers. If it is not damaged during transportation or installation, the metal profile will last for decades without losing its original appearance.
- Convenience and ease of installation of metal profiles. Fastening metal products does not require special knowledge. Any craftsman who knows how to use universal tools can handle this work: a screwdriver, a grinder, a hacksaw.
- Price/quality is the best indicator among analogues. Low cost with all the variety of choice distinguishes metal profile products from alternative options.
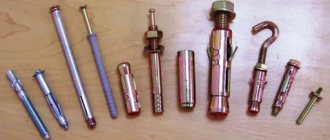
What is a metal wedge dowel?
This fastener is commonly called a metal wedge anchor. It is made from metal. The word "anchor" is translated as "anchor".
The metal dowel for drywall has a different installation technology. The moving part of the fastener is driven in with a hammer, due to which the dowel is wedged into the surface.
According to GOST, 2 types of metal dowels for drywall are produced: 6/40 and 6/60, where 6 is the diameter in mm, 40(60) is the length in mm. Wedge anchors are available for sale in packages of 100 and 200 pcs.
How to hammer a metal dowel wedge quickly with a hammer drill, watch the video.
Video:
Features of using a wedge anchor
The wedge anchor is made of galvanized steel or stainless steel. Carbon steel is used and coated with white or yellow zinc. On the head of the anchor there is a manufacturer's mark indicating the density of the metal used.
Basically, these metal wedge fasteners are produced for fastening profiles or hangers to the base and are the recommended fastening.
The wedge anchor is produced in the form of a metal rod. There is a locking cap at one end, and a wedge-shaped spacer end at the other. When mounting, an anchor is placed in the hole made and the moving part is driven in with a hammer. In this case, the wedges diverge in different directions, thereby fixing the fastening element in the ceiling. The wedge anchor is particularly reliable when attached to the base.
Factors affecting structural strength
In order for the wedge anchor to have a long shelf life and also maintain strength, there are some factors that influence these indicators:
- The wedge anchor is driven into the base, which has no voids. This ensures fastening strength.
- With high humidity, the concrete base will constantly absorb moisture, which can cause premature corrosion of the metal.
- If there is constant pressure (movement, vibration) on the base into which the wedge anchor is mounted, the wedge will soon break out.
- If there is a moving part left above the surface - the rod, this means that the anchor has not fully opened. However, the service life is limited.
- Chemical solutions should not be allowed to come into contact with the fasteners. They will destroy the fastener.
Comparative table with which you can determine the strength of the anchor wedge:
| Name | 6/40 | 6/60 |
| Diameter of wedge anchor, mm. | 6 | 6 |
| Wedge anchor length, mm. | 40 | 60 |
| Max thickness of fixed material, mm. | 5 | 8 |
| Drill diameter for hole, mm. | 6 | 6 |
| Min depth of hole for anchor, mm. | 45 | 65 |
| Pull-out force minKN from concrete B25 | 3.60 | 5 |
| Weight 1000 pcs, kg. | 10.70 | 16.05 |
Separately, it should be noted that for fire safety reasons, all suspended structures must be secured with metal wedge anchors.
Horizontal
Horizontal fragments are, in fact, jumpers between vertical profiles. They strengthen the overall structure, giving it additional rigidity, and are not attached directly to the wall. When installing cross-sections, you can also use the principle of attaching a profile under drywall, only here the calculation is carried out according to the length of the gypsum board.
Nuance! It is more advantageous to install gypsum board sheets in a checkerboard pattern, that is, on the first opening there is a whole sheet from below, and on the second - a whole sheet from above. This design helps prevent the formation of long horizontal seams and, to a certain extent, strengthens the overall structure.
Installation
After the calculations, we proceed to installing the transverse profiles, for this we will need:
Which is better: heated floors or radiators?
Warm floorBatteries
- screwdriver;
- metal screws;
- metal scissors;
- pliers;
- crabs;
- marker.
In places where two diameters and a vertical form a cross, crabs are used. This is a very practical device and I think instructions are not necessary.
Where the cross does not work, a slightly different approach is needed.
- We take a measurement between two verticals, measure from the middle to the middle of the other profile.
- We cut the workpiece and put it in its place.
- Use a marker to make marks on the sides so that the profile fits between the verticals.
- Using metal scissors, we make longitudinal cuts along the corners of the profile up to the marks, maybe a little deeper.
- Using pliers, we align the cuts and bend the sides ninety degrees, according to the markings.
- We install the profile in place and fasten it with screws.
- After installing all the profiles for fastening the drywall, check everything carefully again. As soon as the first sheet of gypsum board lies on the plane, alteration of the metal frame will become more complicated.
Attention! Don’t skimp on the screws: if it’s deformed, it’s better to throw it away; if the screw on the fastening has turned, tighten an additional one. By saving screws, you reduce the strength of the structure as a whole. The price that such parts will cost you is several times less than a new repair.
Base for dowel nails and wedge anchor
In order for the fastener to have a long service life, you should know what the base should be:
- Reinforced concrete ceiling slabs in apartment buildings.
- Concrete – the floor in an apartment or poured concrete in a private house.
- Solid brick. There are several types of this material: ceramic, silicate, clinker bricks. Each material has its own density, which determines the service life of the fasteners. Such material can be encountered in private buildings.
- Foam concrete blocks. If there is no cavity in them, you need to know the density of the foam block.
Dowel-nails and wedge anchors are not mounted in a wooden base, as well as in walls made of foam blocks and other hollow materials. Since the spacer elements will not be fixed in the base, but mainly in the void, which will not provide the required strength.
Correct use of fasteners
To begin with, it is worth considering the above-mentioned disadvantages of the foam block:
- Hygroscopicity . This interesting property of the foam block can be considered both an advantage and a disadvantage when the material becomes saturated with moisture;
- Low density . There are also two opinions here: the advantage is that the weight on the foundation is reduced, and the disadvantage is that choosing a fastening for foam concrete becomes an exciting task.
Now let’s talk in more detail about the last point.
How to properly attach a profile to the wall
Before attaching a metal profile to the wall, you should have a set of tools and materials:
Profile – guide profile is mainly galvanized. This gives reliability to the created structure. The calculation is made using an online calculator or on your own. Material must be taken in reserve.
Dowel and nails for fastening the profile - for a solid wall measuring 6/40. If the base is wood, then 25mm self-tapping screws are applicable.
Drill with 6mm drill bit. and a screwdriver. Before using electrical tools, it is necessary to calculate the load on the electrical wiring.
Scissors for cutting metal. When installing a guide profile, it is sometimes necessary to make an incision on a metal product or cut it off.
Installation of the guide profile
To install the guide profile, a prepared surface with ready-made markings is required. How to fix the profile to the wall? Installation is carried out in the following algorithm:
- First of all, the guide profile is applied to the marking (the line can pass both from the inside and from the outside - depending on the nuances that arise)
- Next on the profile you need to mark the places for future fasteners. Basically, you need to retreat up to 15 cm from the edge of the profile. Maximum, the second fastener is located at 25 cm. from the first and so on - every 25cm.
- If there are no holes in the profile, they are made independently. Even if there are these places marked by the factory, according to the craftsmen, one should be made exactly in the middle between the holes for the strength of the structure.
- The diameter of the drill should be 6 mm and its length 50 mm. if the drill is longer, you should mark a boundary on it; this can be easily done with electrical tape or tape.
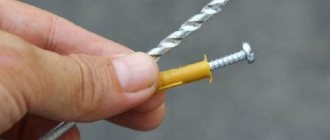
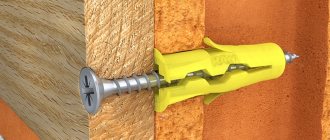
- A plastic dowel is inserted into the hole made both in the base and in the profile. It is hammered into place with a hammer. This should be done carefully, as deformation may occur during installation. Then the plastic part will become unusable.
- After installing the first plastic part of the dowel, a threaded nail is installed using a screwdriver. The deeper the nail enters the component, the more it opens, fixing all the fasteners with special tendrils.
- If the profile is longer than required, it is cut off with metal scissors.
- If you need to sharpen the profile, then you can use special extensions.
- You should retreat 15 cm from each end to the border of the profiles and fix the guide dowel with nails.
The screwdriver should not be set at high speed, so as not to drive the nail into the plane more than it should be, thereby bending the profile.
The guide profile is an integral part of the entire metal structure for plasterboard, so its fixation must be strong and of high quality.
Fastening a profile to the ceiling or fixing a wall frame under gypsum boards are similar in technology.
Video:
Perimeter marking
The first thing you need to do when mounting a frame from metal profiles is to correctly draw the plane. A plumb line will be required. Secure it with a nail to the ceiling. It should go all the way down to the floor. We perform exactly the same procedure on the other side, lowering the second plumb line along the second edge of the wall. To ensure the vertical is accurate, make sure that nothing touches the plumb line. Foreign objects may slightly bend its direction. Next, you need to stretch three fishing lines along the wall. We stretch the first fishing line just under the ceiling, but it should not touch the surface of the ceiling. We stretch the second line just above the floor, but at a fairly low height. The third line is stretched in the middle of the wall. At intersections, all three lines should lightly touch each other.
To determine the level at which we will install the frame, we need to find the point of the wall that sticks out the most. It is at this level that the frame is mounted, since we need the wall to acquire a perfectly flat surface after covering. From the most protruding point we retreat a distance according to the size of the frame profile and check the breakdown.
Parallel to the fishing line located near the side wall, we pull another fishing line. We take a ruler and place it across the lines to make plane marks on the adjacent side wall. The same procedure must be carried out on the other side, that is, on the other side wall, as well as on the ceiling and floor. Using chalk, draw a perimeter.
It is very important to remember that all the lines should only touch lightly and not push each other. If one fishing line helps to change the position of another, then the plane turns out to be uneven. This defect may not be visible to the naked eye, but its consequences will be clearly visible after installation.
Attaching hangers to the ceiling under plasterboard
How are hangers attached to plasterboard structures? Many will answer this question “dowels and nails are used.” This is wrong, because the suspension takes on the load of the entire plasterboard ceiling. When weighing heavily, over time the dowel and nail cannot withstand it and comes out of the surface. The result is sagging and deformation of the suspended ceiling. According to experts, the best fastener is a wedge anchor. How to attach profile hangers? To ensure the strength of the structure being built, a metal wedge anchor, size 6/40, is fixed in the side holes of the suspension. Installation is carried out as follows:
- According to the intended markings, a hole with a diameter of 6 mm is made on the ceiling, the depth of the hole is 40 mm.
- This hole is cleared of dust (you can blow it out yourself).
- A hanger is attached to the holes made.
- The wedge anchor is inserted into the suspension eye and hole until it stops.
- Afterwards, the protruding rod is driven in with a regular hammer. With each blow he goes deeper into the concrete surface. This indicates that the anchor elements are straightened in different directions, thereby fixing the entire fastening element.
Installation of one anchor takes 10 seconds. This fixation of hangers is the most durable compared to the use of dowel-nails.
At what distance should the profile hangers be attached? The strength of a plasterboard suspended ceiling directly depends on the hangers. The hangers are attached to a marked line intended for the ceiling profile. On this line, every 40-60 cm, suspensions are attached with anchor wedges. The distance depends on the material used to make the suspension. If the metal is thin, then the distance will be 40cm.
Distance of fastening of direct hangers along the cord
It is allowed to use dowels when creating a box on the ceiling. This design does not burden the dowel-nail due to the low weight of the plasterboard box.
Distance for attaching hangers to the wall
Video on how to properly attach the suspension
Video:
Video:
Conclusion
Building a frame for drywall on a wall is not as difficult as most people think. Of course, you will have to tinker, but you can be sure that you will get a result no worse than the professionals. The video in this article will tell you additional information and clearly show important points of the work process, but if something is not clear, then write all your questions in the comments below.
Did you like the article? Subscribe to our Yandex.Zen channel
October 22, 2016
Plasterboard systems, Walls
If you want to express gratitude, add a clarification or objection, or ask the author something, add a comment or say thank you!
Installation features
When installing a profile with dowels and nails to the walls, certain difficulties may arise. To avoid this, you should familiarize yourself with certain nuances:
- When installing into a brick wall, you should determine the location of the dowel-nail. If the fastener gets on the boundary (in the mortar) between the brick, then there is a high probability that it will pop out. Because the solution may crumble.
- Before drilling into the wall, you should know for sure that there are no electrical wires going through there. Otherwise, a short circuit will occur.
- If there is metal reinforcement running through the wall, this will also have a negative effect on making the hole.
- To properly install the dowel-nail, you need to make holes with the same diameter as the dowel (6mm).
- You need to drill the wall at low speed so that the material does not come out from the surface in one piece, which will create a large hole.
- When driving the dowel, the limiting collar will prevent the fastener from falling into the hole. Therefore, the dowel should be driven in carefully.
M4 screw
Along with other fasteners, screws combined with metal expansion elements can be used for fastening into a gas block. They are also suitable for dense gas and foam concrete. The installation process is simple. A hole is drilled. The fastener is inserted and tightened. At the moment of tightening, the metal part expands the material. This allows the hardware to be securely fixed in the wall.