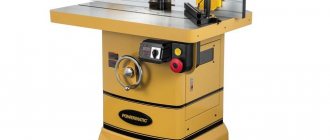
For a long time, tenon joints have been used when assembling drawers, doors, windows and other frame structures. To accurately and quickly obtain such complex elements in wooden structures, a wood tenoning machine is used.
This equipment is used both in business and in large-scale production. It is indispensable in the manufacture of furniture, as well as in house construction and woodworking enterprises.
Types of tenoning machines
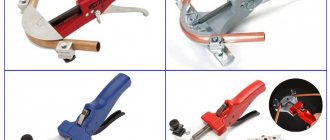
A tenon saw is a type of woodworking machine. There are samples of both imported and domestic production on the market. The fixing elements on it can be processed for subsequent connection of products at an angle, as well as for their merging (dovetail folds are used).
Machines for milling tenons are divided into frame machines and box machines according to their intended purpose.
In this case, frame units are:
- unilateral. In one pass, the tenons are processed on one side of the workpiece;
- two-way automated. The design of a tenoning machine involves placing supports on two columns and, accordingly, processing the workpiece on both sides.
Naturally, the productivity of double-sided tenoning machines is much higher than their analogues. There are several types of units, which differ in length, and they come in 2, 2.5, and 3 meters.
The cutting tools for them are cross-cut saws and cutters (disc and end) for processing straight tenons, lugs on frames and frames of various wooden structures.
The formation of box and dovetail tenons is done on specialized machines, mainly in large-scale and mass production. At the same time, there are two types of dovetail fixation: with rounded and sharp corners.
The first category is produced on multi-spindle tenoning machines. Such shaped protrusions are processed simultaneously on the mating surfaces using modular cutters. It is this connection that guarantees the durability and reliability of the fixing unit.
When producing the most complex oval dowels (small tenons) and those with a round shape, automatic tenoning machines with numerical control are used.
DIY accessories for a wood router: stops, templates, guide rails
For accurate operation, a milling cutter requires auxiliary devices; at the same time, the sales package of the device includes a limited set of such items.
The market for milling attachments extends from protractors to numerous attachments. The user, for whom this is not enough, can make auxiliary devices himself.
Rip fence
The list of useful accessories for a wood router is quite long. Many tool owners are able to make them from scrap materials or, if more convenient, simply buy them separately.
One such device is a rip fence. This is a component of the basic set of any router, and the owner of the tool does not have to make the stop himself. It is needed to directly follow the cutter along the surface of the base, which can be the smooth edge of a part or a workbench.
The stop allows you to process edges and grooves, firmly fixing the part.
This useful addition to the milling tool consists of the following parts:
- rods entering the recesses on the router;
- screw fasteners that tighten them in the desired position;
- adjusting screw for fine adjustment of the distance of the cutter axis from the edge;
- the supporting part that holds the structure to the base.
To make the wood router stop ready, the rods must be positioned in the recesses on the tool body and tightened with a stopper. By loosening the stopper, you can use the adjusting screw to make minor adjustments if necessary.
With a little addition, the rip fence allows you to make, in addition to straight cuts, more complex ones. This addition is a wooden block with one flat side. The other side has an angular or round notch. The block is inserted between the supporting part and the edge of the material, which has a curved shape.
The block is in contact with the support with its smooth edge. The side where the notch is is in contact with the curved base. A tool with such a device should be manipulated with extreme care, since the block introduces an element of instability.
Guide rail
Having a similar purpose to the rip fence, the tire is responsible for the accurate movement of the cutter in a straight line. The time spent on work is noticeably reduced due to the use of the tire. It also allows you to guide the tool on the table at any angle to the edge.
Note! You can secure the tire to a tabletop or material using clamps.
Some mass-produced tires include a separate component - a shoe. It is connected to the router by rods and, passing along the bus, moves the milling head along a given path.
The tire is best combined with a tool whose base stands on retractable legs. This eliminates the height difference between the guide rail and the router.
It happens that the functionality of commercially produced tires is not suitable for the user. You can always create an individual version of the router guides with your own hands. The most elementary one is a long, even beam - in other words, a ruler. The master only needs to provide it with fasteners, and the tire is essentially ready. To make a simple device, you don’t even need a drawing.
Of course, such a homemade version will not be stable. The combination of a plywood base with a board nailed to it will be more stable in operation. The edge of the router base will rest against the board, and the edge of the base will mark the processing area. This design is used when using cutters of the same diameter.
Another option works when wood cutters can be of different sizes. Here the board acting as a ruler is not nailed to the base, but is reinforced with clamps. Thanks to this, it can adjust the distance from the working area according to the diameter of the cutter.
Templates and copy sleeve
The copying ring is a circle with a protrusion that slides along a template, guaranteeing accuracy of processing. The ring can be screwed to the base of the router or secured with antennae. The diameter of the device is selected so that it does not come into contact with the working part of the tool.
The ring template is fixed on the material being processed, firmly adhering to the tabletop. Reliable clamping is provided by double-sided tape and clamps. Having finished the part, you need to make sure that the sleeve fits tightly along the edge of the template when working.
A self-made template for a router can also be used for processing the corners of a part, when it is necessary for them to be round. Depending on the location and dimensions of the template, the radius size of the rounding can be any.
The template design often includes bearings or rings. If this is a ring, then it should be selected according to the size of the cutter. If there is a difference in diameters, it is necessary to add stops to the template design, with the help of which you can move the device away from the edge of the part.
Among the auxiliary devices for the router, the most flexible templates, in addition to processing the edges of the material, also allow you to cut complex grooves. The special design of the accessory makes it possible to effectively create recesses for door hinges. Using a template, you can even carry out decorative work with a router, for example, cutting out wooden patterns.
Compass
This auxiliary tool is designed to create round and oval cutouts. The basic compass design includes a rod with a pin fastening at the end. By inserting the fastener into the hole in the center of the circle along which the groove is made, you can change the size of the circle by simply moving the rod.
Note! The convenience and reliability of the design is increased by adding a second rod.
There are various auxiliary elements that work on the circular principle. They offer the advantage of creating different radii of circular grooves. A mandatory component of such auxiliary devices is a pin with a screw for adjusting the length of the radius.
If a small hole is cut, the compass structure must be adapted for mounting on the base of the router. When processing a part, the pin is located directly under the tool.
A wood router, in addition to round ones, is also capable of cutting elliptical holes. The device for this can be assembled with your own hands from the following parts:
- base with fixation on material made of screws or suction cups;
- shoes moved on crossing guides – 2 pcs.;
- rods for installation – 2 pcs.;
- bracket for connecting the structure to the tool.
The fastening bracket, thanks to the grooves intended for this purpose, allows the frame of the structure to be in the same plane as the base of the router.
Cutting round openings is done using one shoe. If you need an oval hole, both are used.
This auxiliary design makes it possible to make holes more accurately and faster than other tools, such as a band saw or jigsaw.
For grooves on narrow surfaces
Recesses for locks or door hinges can be made with a drill and chisel, but a router is much better suited for this. You just need to equip the tool with a certain device.
It consists of a flat plate that is attached to the base of the device. The shape of the plate can be round or rectangular.
2 pins are made on it, ensuring smooth movement of the tool during operation.
The main parameter that must be adhered to when manufacturing such an element is that the axis of each pin must be on the same line as the center of the cutter.
If this parameter is observed, the groove will be cut exactly in the middle of the workpiece, regardless of thickness.
If it is necessary to shift the groove to the right or left, a sleeve of the size needed for the desired shift is put on the corresponding pin.
Using this design, the router is driven with the pins tightly pressed to both sides of the workpiece.
The same effect is achieved if you use two parallel stops with a router.
Even one stop may be enough. It is necessary to strengthen the workpiece between two surfaces, for example boards, so that all three elements are in the same plane. In this case, the problem of insufficient part width is eliminated.
When you often have to work with narrow surfaces, a good solution would be to build a special table of two halves. By pressing the material between them, the master can easily achieve the effect of one plane.
Bodies of revolution
When working with round workpieces, such as posts or balusters, a structure is made up of a frame into which the part is placed, a carriage for the router and a rotary disk. The part is inserted into the frame, securely fixed, after which the carriage with the tool is pulled out to the processing area. The position of the part in the frame can be changed using a rotary disk.
The same frame with a router in the carriage can serve as a lathe. You just need to turn the disk while simultaneously operating the milling cutter moving along the guides. This can be done by a master’s assistant or a drill connected to the disk.
Tenoning devices
Such devices ensure the creation of joints based on spikes. Such profiles, which require high precision in processing the material, are easily made with a milling machine.
Using a hand router, the master moves it freely to the material. Therefore, the material needs to be securely fastened for error-free tenoning.
Such conditions can be created by a simple device made from the following parts:
- rigidly fixed guides, lower, upper and side;
- a bar with one degree of freedom that will limit the sample.
The parameters of the parts depend on the specific tool for which the device will be assembled. The assembly procedure is as follows.
Along the edges of the plywood base, vertical ribs of equal size are installed with cutouts in the center. Rails are attached to these ribs on which the tool will move. To ensure safe movement of the router on the rails, they are locked with limiters, which can be simple wooden slats.
A moving part is attached to the plywood base - a regulator for selecting the edge of the part. The lock can be a wing screw or another fastener of the technician’s choice.
Regardless of the manufacturer, a hand router with the addition of such a structure can easily cut out a simple tenon profile.
Another means for producing spikes is a conductor. It consists of a base, stops and a moving part in the form of a slide. Experienced users begin to manufacture and use it for very fine and precise work.
Hidden Features
The listed case of auxiliary tools may seem unnecessary when the master performs only the simplest operations with a router. But if you look at this tool from the angle of its potential capabilities, then a number of directions appear before the user.
Those works that the master did not even think that he could carry out turn out to be quite accessible - you just need to build several auxiliary structures. As if this is not a simple manual milling machine, but a CNC coordinate machine.
Article rating:
(2 4,00 of 5) Loading...
Specifications
The operator’s functions when working on an automatic machine are reduced to loading and turning workpieces, starting or stopping the cycle. Important indicators of tenoning units are:
- largest peg size;
- the smallest thickness;
- groove height;
- width;
- maximum workpiece size;
- spindle speed;
- engine power.
In addition to the characteristics for classifying the machine, the parameters of the cutting tool are indicated: saw diameter, type and size of cutter.
Often on large production lines such equipment is installed to the ceiling. The machines are additionally fixed with clamping devices, where the workpieces are processed by scoring saws, followed by the formation of tenons on milling supports.
The feed is adjusted smoothly using a variator. To create a high-quality surface of the mating elements, the spindle speed should be about 700 rpm.
Principle of operation
When forming pegs, a sawing and milling procedure is usually used. An appropriate cutting tool is used to obtain the tenon joint surfaces.
Attention! Whatever the shape of the tenons, the initial operation is to trim the workpiece.
For the most common models that use milling during processing, the machines are equipped with four spindles - three milling and one sawing. One or more workpieces can be loaded onto the carriage table, and they are aligned with their edges along the ruler and their ends along the stop bar.
The tenon is formed as a result of end milling. When the cutting tool comes out, chips may appear on the edges, so to prevent them, a support block is mounted on the ruler, and some machines also provide for the application of glue to the surface being processed.
After turning on the feed mechanism, the product is automatically fixed due to the side and top hydraulic clamps. The carriage with the workpiece begins to move at a certain speed along two guides relative to the cutting tools.
In this case, during the movement of the carriage, a spike of the desired configuration is formed on the structure, then the device, having reached the stop (limit switch), returns to its original position. Here the finished product is replaced with a blank, and the cycle repeats again.
If the machine is double-sided, the process of forming tenons occurs on both sides of the workpiece.
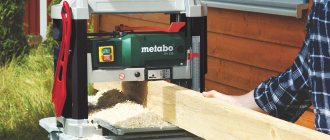
How to make a tongue and groove connection
How to make a tongue and groove connection?
Tenon and groove - what is it?
First of all, you need to define what a tenon and groove is. This is nothing more than a way of connecting parts.
It is used most often in carpentry, as well as in other types of production. There are many types of grooves and tenons, but we'll talk about that another time.
Properly executed tenons and grooves are sufficiently firmly connected to each other. This connection is considered one of the strongest.
Tongue and groove connection method
First you need to determine for what purpose this connection method is needed. If this is a table, then the jumpers in it are usually connected to the vertical legs.
Consequently, the wood fibers run vertically and horizontally. If this is a wall table or a bedside table with drawers, then the jumpers here will be located a little differently. They will be horizontal relative to the legs.
In any case, such a connection will be the most reliable. When making a large number of tongue-and-groove joints, special machines are used. If you need one or more tongue and groove joints, and there is no carpentry equipment at hand, then it would be advisable to do this manually. To do this you will need a set of carpentry tools, including:
- hacksaw;
- clamp - 2 pcs;
- measuring instrument;
- pencil for marking.
- First we will make a spike for the future connection.
- To do this, you need to take a bar and mark the dimensions of the future tenon on it.
Homemade tenoning machine
Today there are all opportunities for entrepreneurial activity, while many are engaged in the manufacture of furniture, wooden doors and windows, where connecting tenons are indispensable when assembling the product. And since tenon cutting machines are not cheap, at first a homemade unit is quite suitable for obtaining fixing elements.
It is easy to make on your own, which will save a lot of money when organizing production. Moreover, there are different options for the manufacture of such machines, where the basic element can be a stationary engine, an angle grinder, a jigsaw, and even an electric drill.
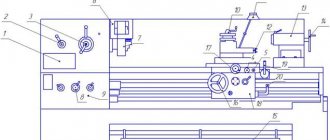
Let's consider making a do-it-yourself tenoning machine based on a grinder with a disk cutter positioned in a horizontal position.
As in a factory machine, here, in addition to the engine and cutting tool, there are two components:
- bed;
- tabletop.
The frame must be strong and stable, since it is the base part of the unit on which the device for fastening the workpiece and the grinder with the cutter are installed. This component of the tenoning machine can vary in design and be manufactured without drawings. For example, it can be made from metal corners, and a sheet of chipboard can be fixed on them.
The size of the tabletop must correspond to the intended workpiece. It also contains clamps and a control ruler.
The bed guides must be strictly perpendicular to the movement of the tabletop when milling connecting elements. The quality of the connection between the studs and lugs depends on this.