Owners of country cottages, who heat their homes using a solid fuel boiler or stove, annually prepare up to 12 cubic meters of firewood, depending on needs. It will take several days to prepare such a volume. To speed up the process, you can make your own cleaver - a special device for mechanized chopping of wood.
A mechanized cleaver will speed up the time of chopping wood and also save your energy
Classification of devices for chopping wood
The cleaver has an extended handle (maximum 1 m). The angle is obtuse, reaching 70 degrees. It usually weighs from 2 to 3 kg. Its purpose is to split wood along the grain. There are several varieties of cleaver.
Spring cleaver
A spring model with a lever enhances the blow. A stand is placed under the blade. All materials are laid out on it. This tool is quite simple to use. Place a log under the blade with one hand and split it with the other.
The device consists of:
- frames based on a profile or round pipe with a horizontal elongated support;
- a lever that connects the support to the cutting element;
- lever spring fixed to the frame. With its help, the blow is strengthened;
- weight attached to the other side of the lever.
Mechanical spring cleaver.
Cleaver with electric motor
Tools with an electric motor have a higher cost. There is a need to purchase an electric drive with all the necessary components. These models can be:
- screw - the cutting element is made in the form of a metal cone with a blade. The thread is cut in the opposite direction from the movement of the shaft. The cone gets deep with the help of a screw and can split in half;
- having rack and pinion transmission. The design and operation of such devices is much more complex than the previous version. The blade is installed horizontally on the surface. A log is placed on one side, the gear rotates, compresses the blade and the block. A split occurs.
Hydraulic cleaver
The hydraulic model is the most expensive. The base frame is taken as a basis. The structure consists of:
- electric motor - hydraulic cylinder having high pressure;
- oil pump;
- oil tank with filter;
- cross-shaped blade;
- iron pusher.
Diagram of a hydraulic splitter.
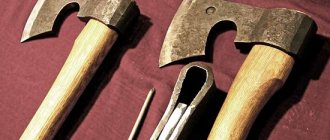
Subtleties you should know when making a hand cleaver
It is worth considering the following nuances:
- the angle located at the handle should be sharper, and on the reverse side – obtuse;
- The sharpening angle is often combined.
Thus, the splitting becomes effective.
The sharp zone enters the wood. The thicker side penetrates deeply and increases the sliding impact.
By making a small number of blows, a large number of splits occur.
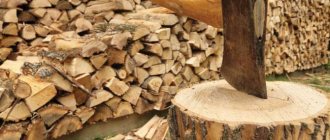
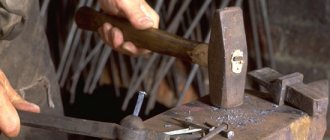
How to chop wood correctly
Many summer residents chop firewood by placing a log on the ground, but experienced woodcutters categorically do not recommend doing this, and here’s why:
- This is dangerous because you can hit your leg with an ax and get seriously injured.
- This is inconvenient because the woodcutter has to bend low. It is especially difficult for obese people to bend over.
- This has a bad effect on the quality of firewood, since a log lying on the ground instantly becomes damp.
It is best to use a special metal structure for splitting, which resembles a machine in its shape. In the middle of the machine there is a groove in which the log is placed: here it is securely fastened and does not jump out. When the log, or “block,” lies flat in its place, the woodcutter takes the cleaver and raises it up to strike and with a sharp movement lowers it onto the log. If the blow is made correctly, the block splits into pieces. The main thing is to correctly calculate the impact force, then these parts will turn out smooth and neat, but this comes with experience.
You should never raise the cleaver too high, because this will not increase the force of the blow, but, on the contrary, will weaken it. Also, you should not swing the ax before making a blow: the woodcutter does not need to waste extra energy.
Materials
For the production of chopping parts it is appropriate to use:
- old ax (cracks are not allowed);
- spring element.
Hard wood is suitable for the handle.
The materials are prepared in advance. It is best to wait until the tree's sap flow stops. This will prevent tearing when drying.
The following tools are used in the work:
- grinder;
- sandpaper or file;
- hacksaw;
- hammer;
- knife;
- sometimes the inverter is welding.
How to make a homemade cone-shaped cleaver for firewood
Let's consider one of the working models of the device, tested by many masters.
Manufacturing of shaft and cone. A steel shaft (steel 20, but ideally 40) 30 cm long and 3 cm in diameter is turned on a lathe. The cone is screwed onto the shaft along the thread, but it is better to pin it with your finger, drilling through the shaft and cone.
The optimal power of the electric motor is more than 3 kilowatts, preferably 4 kilowatts, so that there is enough power for thick lumps. The cone should rotate at a speed of 900-1000 rpm. At higher speeds, working with a wood splitter is difficult and dangerous, since it will be impossible to control the process. It is possible to work, as practice shows, at lower speeds, but at speeds less than 300 the performance is low. The performance of the wood splitter depends on the rotation speed.
The photo shows a drawing of a screw cleaver.
Drawing of a screw cleaver shaft
drawing of a screw cleaver cone
The thread on the cone is made exciting, that is, the inner side of the thread is cut at a right angle to the axis of the cone. You need to make the tip of the cone as sharp as possible. The thread on the cone should not be drilled, but should grip the wood and screw in. For hard rocks, you can lightly lubricate the cone with grease to prevent it from jamming.
The process of making a cleaver from an ax
Many people wonder how to make a cleaver from an axe. In preparation:
- The old ax is reflected on paper, maintaining all dimensions.
- All additions are applied.
- Draw out a suitable handle shape.
A piercing instrument is made using various methods:
- To split soft wood (for example, small-diameter logs), it is enough to change only the sharpening angle. They make him stupid. This makes it possible to move the block apart;
- cutting hard rocks involves increasing the weight of the metal part of the device. It is mandatory to weld the metal thickenings - “special ears”.
Welding can be made from:
- springs;
- metal blanks;
- fittings.
Suitable fittings must have a diameter greater than 15 mm. Two pieces of reinforcement are welded thoroughly to each other, and then to the base. Next they grind, narrowing. There are 2 wedges on the sides.
The spring is also welded. Sometimes it is given a shape identical to an axe. The edges that protrude should not interfere with the process. The sharpening is made conical. When sharpening, the weld and the edge become one.
The ax handle is mounted in two ways:
- pass it through the handle. It will not fall off thanks to the thickening at the end of the handle. This is similar to the pick-axe mounting system;
- put the ax handle into the device. The item is pre-sharpened for secure placement. The device is fixed using spacer wedges. To use them, you need a cut in the thickened part with a depth of 1 - 1.5 cm less than the width of the butt.
Design
Rating 2 out of 5
Anyone who has been reading us for a long time probably knows that the author of the invention, Mr. SunY. rarely paints his handmade instruments
, But not at this time.
Despite the fact that the reinforcement itself looks quite stylish, and it could have been left without painting, it will rust after 2-3 months on the street, so the author made the right decision by painting the structure black.
- If I were the author, I would cover the firewood column made by myself
with ordinary transparent varnish.
We recommend: DIY 4 in 1 machine
For the appearance of the product now, I give it 4 out of 5 points.
Recommendations for making your own cleaver
The design and type of device are influenced by:
- working conditions;
- availability of materials;
- financial resources.
Some tips for economical manufacturing:
- they prefer a simple budget model with a manual drive (relevant in case of power outages);
- for the option with an electric drive, a motor with a power of up to 3 kW is suitable;
- For people without physical training, a hydraulic tool is suitable (the only drawback is the expensive components).
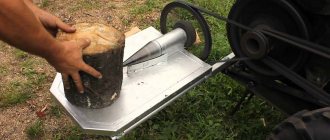
Example of a foot splitter
Now let’s look at an example when you don’t want to pay for electricity and for gasoline or other fuel, but you want some simple hydraulic splitter. How to make everything work using human power? It's actually simple.
Materials and tools for assembly:
- hydraulic jack;
- profile pipe 40x50;
- corners;
- steel plates 6-8 mm thick;
- rubber band;
- a piece of metal at least 30 mm thick (to create a wedge that will split the wood);
- M12 bolts;
- welding, grinder, measuring tool, drill, etc.
Manufacturing process
Step 1. Making the frame.
The base is a profile pipe with a diameter of 40x50 mm. But she can’t cope alone and may bend. There is option 2. Either we take a thicker pipe, or we strengthen the existing one. Everything is clear with the first option, but how to do the second can be seen in the photo. A simple farm is being made.
To make a slider you need to use a corner. We cut into the required lengths and weld. The main task is to make it slide freely along the guide, but make sure that there are no strong backlashes. To strengthen the place where the hydraulic jack rod will subsequently rest, the bevel of the plate is welded.
Step 2. Making the base for the jack.
A hydraulic jack with a lifting power of 10 tons is required. But you can choose a lower power, for example, 6 tons also copes quite well. But it is necessary to prepare a good support. To do this, take strips of metal 6–8 mm thick and weld them under the heel of the jack.
Step 3. Handle.
As planned, the jack is powered by the foot, so the handle has to be modernized. To do this, we simply weld the parts to obtain the necessary bend that is comfortable for the leg. You can also weld a special pedal to prevent your foot from slipping. To return the handle to its original position, you can use a spring. But the author took a more complicated route and welded the roller and tied a tourniquet to the handle.
Step 4. Knife.
The cutting part is made of steel of at least 3 mm. We sharpen it in the form of a wedge. For fastening to the guide we use M12 screws. Screws require periodic inspection.
At this point, the foot press for chopping wood is ready. Its main advantage is that it does not require many resources; all suitable material can be found in the garage.
Nuances of the work
If you decide to make a hydraulic splitter, then first you should find all the parts and take care of making the mold. It is made of metal, and the base is a cruciform shape. Its sizes can be selected individually, because there are no clear restrictions. The main condition for this is that the power of the cylinder is sufficient to split firewood when its size is too large.
The form must be fixed on the frame, its transverse axis must coincide with the shaft of the hydraulic cylinder. It is installed along the frame and connected to the pump, using the pipes. Such a mechanical cleaver can be mobile; for this, wheels should be attached to the frame.