Do you want to install a water supply system on your property by drilling a well yourself? Agree that the presence of water supply and sewerage significantly increases the level of comfort when living in a private house or country house. But calling specialists to install a well or borehole will not be cheap.
Have you decided to make a drill for a well with your own hands and are looking for a simple homemade option? We will help you in this matter - the article contains useful information about the process of making a homemade spiral drill and a spoon drill.
A list of necessary tools and materials is provided, thematic photos and useful video recommendations for constructing a homemade drill are selected.
Our detailed instructions, equipped with step-by-step photos, will help even a beginner make a simple and uncomplicated drill.
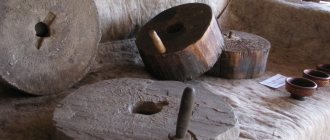
Type of drill
A spiral drill is an auger-type tool for drilling by cutting into the ground with special cutting plates welded to the tool shaft.
In addition to the drill itself, in order to build a well, you need: a holder and additional detachable tubes to increase the required length of the structure.
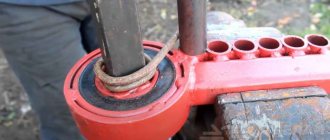
Do-it-yourself auger and drilling machine for wells
A drill for percussion-rope drilling or a drill bit is a massive tool consisting of a pipe with a bailer located on the lower part. It can only be used if there is a tripod that provides a lifting height of the drill of 2–2.5 m.
A spoon drill is a device with which rotary drilling is carried out, as in the case of using an auger tool, only it is equipped with a large metal cylinder at the end of the rod. This design ensures the effective accumulation of very loose or wet soils, which a conventional auger drill cannot handle well. It is equipped with a holder and additional detachable tubes for adjusting the length of the tool.
Ways to improve the tool
When drilling holes, the master may encounter a large number of plant rhizomes that lie tightly in the soil. The sharp edges of the blades will make working with the drill much easier. For ease of use, you can cut several teeth on the sloping area of the blade or round off its cutting area.
You can improve the design and make removable cutters for the drill. Thanks to them, it will be possible to drill holes of any diameter. In addition to the manufacture of spare parts, it is necessary to provide for their attachment to the collar. The easiest way is to connect them with two iron plates, which are secured by welding.
In the mounting plates, as well as in the blades, you need to drill two holes for the sides. The cutters are fastened with M6 bolts. To ensure that the bolts do not interfere with work, they must be screwed in with the threads facing up.
There is another way to improve your homemade pole drill. You can increase the efficiency of the lower end of the knob. To do this, you need to cut out a narrow metal plate (10x2 cm) and grind it into a cone shape using a grinder, making a kind of point.
There is no need to make cuts in the collar; turned metal plates are inserted into its end, fixed by welding and flattened. The result should be a peak.
There is another method for making a pike. A metal plate is cut to a length of about 17 cm and a screw is made from it, similar to a corkscrew. Further, the algorithm of actions is the same as in the described first option.
A suitable drill can act as an auger, which can easily handle wood as well as metal. Such a tool will penetrate the ground much easier and will drill a hole to the required depth without any problems.
Builders who work on dense deep layers of soil will need one piece of advice. Between the pick and the cutter you need to weld a small flat cutter. Thanks to this design, it will be possible to loosen the earth and center it when drilling. For such a part you will need 2 metal plates 3x8 cm. This trick will significantly speed up working with the tool.
Milling cutters can also be made from grinder discs, which are designed for working with stone. The circles need to be cut along the radius and the hole in the center should be expanded according to the diameter of the knob. Bending the disk with the sides apart gives the appearance of a corkscrew or auger. All that remains is to weld the part in the manner described above.
The cutter is very easy to make from a circular saw blade. The teeth of this model can easily cope with plant rhizomes and hard soil.
The master can choose how to modernize his drill independently. It is worth saying that making a drill for poles with your own hands is not a complicated process at all and requires minimal physical and financial costs from the master. The entire manufacturing process takes two hours at most.
Finally, there is one important piece of advice: before the drilling process, it is best to loosen the soil with a shovel, then the device will fit into it more easily and the work will go much faster. The recommendations given will certainly help the master make a functional and effective tool that will serve him for decades and become a very good assistant.
Final assembly
Before drilling wells, a deep drill is assembled gradually, plunging deeper into the underlying layers of soil. Before further drilling, the master will check whether the next section is securely fastened: if it is accidentally unscrewed, it will be extremely difficult to get it (and other sections, including the drilling section) without special tools from an already drilled shaft
Disassembling the drill is carried out in the reverse order, being careful not to drop the undisassembled part to the bottom of the channel
Each of the extension sections (pipes) is welded to its coupling on one of the sides of the latter: this will facilitate and simplify assembly and reduce the likelihood of unscrewing during deep drilling. Before the first use, the drill is ground: the resulting irregularities, for example, after welding, are removed in order to reduce injuries.
Distinctive features of the method
The method involves extracting waste rock with water pumped under pressure into the mine cavity. Drilling tools are not used to remove destroyed layers.
The technology consists of a combination of 2 processes:
- the formation of a vertical well in the ground through the alternate destruction of soil layers;
- extraction of crushed soil fragments from a wellbore under the influence of working fluid.
The process of mixing mud for drilling.
The creation of the necessary force required to immerse the cutting tool into the rock is facilitated by the own weight of the equipment, consisting of a string of drilling rods and equipment for pumping fluid into the well.
To make a washing solution, mix a small amount of clay suspension in water in a separate pit and stir it with a construction mixer until it reaches the consistency of kefir. After this, the drilling fluid is directed into the wellbore by a motor pump under pressure.
During hydraulic drilling, the liquid medium performs the following functions:
- removal of fragments of destroyed rock from the body of the water shaft;
- cutting tool cooling;
- grinding the internal cavity of the pit;
- strengthening the mine walls, which reduces the likelihood of the mine collapsing and the well shaft being buried by the dump.
From pipe sections 1.5 m long, connected by threaded fasteners, a column is formed, which lengthens due to the growth of fragments as the well deepens.
Hydrodrilling technology is optimal for rocks with a high concentration of sand and clay. It is not advisable to use this technique for arranging an autonomous source on rocky and swampy soils: massive and viscous layers of soil are difficult to wash out with water.
Drilling a well using an ice auger
There is a drilling method that will require minimal financial investment. This is manual drilling of wells using an ice drill. The tool is used as a drill, and homemade rods are used to build it up.
The knife of the ice ax will serve as an auger, and steel pipes with a diameter of up to 25 mm can be used as extension rods. To make the process go faster, reinforced cutters are welded to the winding edges of the improvised auger
Among other things, the work will require casing pipes to form the wellbore, a shovel and a device for removing cuttings from the site.
Drilling with an auger made from an ice drill includes the following operations:
- Preparation. We dig a guide hole: a hole two bayonets deep.
- We lower the drill into the resulting recess and begin to screw it into the ground, using the rule for tightening the screws. It should be remembered that after every three or four revolutions the tool is removed to the surface and cleaned.
- After the first meter has been penetrated in depth, we begin to form the trunk. To do this, a casing pipe is lowered into the well; its diameter should be slightly larger than the diameter of the drill. It is best to choose lightweight plastic parts equipped with threads for connection.
- When the drilling tool begins to descend into the face to its full height, we attach an extension rod to it. This can be done in two ways: screw the part if there is a thread, or add it using a steel pin-rod if there is none.
- During the work, we continue to form the casing string. As soon as about 10-15 cm of pipe remains on the surface, we attach the next one to it. The connection must be strong. This is usually done by threading or soldering.
- We periodically check the verticality of the trunk. If the drill begins to hit the walls of the casing, we level the structure using wooden wedges. They get stuck between the soil and the casing.
- After water appeared in the well and the decision was made to stop work, we install a filter and carefully fill the gap between the soil and the casing with gravel.
The casing can be installed after completion of drilling work. In this case, plastic pipes are inserted into the well and connected in series after the previous part is lowered down. This is not the most rational way, since you will have to clean the face of sludge again.
Plastic pipes are very light, quite durable and inexpensive, so they are most often chosen for constructing a well casing
Experience shows that drilling a well with your own hands is quite possible, although quite labor-intensive. You should take the matter seriously: choose the right drilling method, select the necessary materials, study the instructions and then get to work. The result of your efforts will be clean water from your own well on the site.
Let's start drilling
If we talk about step-by-step instructions for drilling a water well with your own hands from A to Z, it looks like this:
- A pit is dug one and a half meters long and the same width. Depth - from 100 to 200 cm. This is necessary to prevent the collapse of the upper layers of soil. The walls are lined with plywood sheets in the manner of formwork. The bottom is covered with boards. A wooden shield is mounted on top of the pit, on which you can safely walk without fear that the walls of the pit will collapse.
- Technological holes are made in the bottom and coating to carry out the work. A drill rod attached to the drilling rig is threaded through them.
- The drill is driven by a special motor with a gearbox or manually. If we are talking about a puncture, a support is installed on the pin, which is struck with a sledgehammer.
- If the technology involves parallel installation of casing pipes, work is also carried out through technological holes in wooden panels.
- The soil removed from the well is selected manually. If it is sludge, you need to install a mud pump that will pump it directly out of the casing.
- After drilling is completed and the casing is installed, you need to install the electrical equipment and start the pump, which should run until the water from the well becomes absolutely clean.
After all stages are completed, a caisson is installed instead of the enclosing box. The head, pumping and filtration equipment are installed, and the pipeline is connected. The system is being tested. The equipment depends on the type of well.
Abyssinian
The upper water layers are suitable for irrigation, but are not used for domestic use. This is all due to pollution that penetrates the soil with floods. Such a well has a depth of less than 10 meters. Water must go through a multi-stage filtration system. Only in this case does the liquid turn from technical to drinking.
A hand pump can be used as pumping equipment. The use of any type of electrical equipment (submersible, surface) is allowed. The pumping station does not have to have a lot of power, and this makes the well the most inexpensive. It is advisable to install a storage tank into which a daily supply of water is pumped.
Well on sand
At a depth of 10-40 meters there are layers in which water undergoes natural filtration. Passing through the sand, it is cleared of some impurities. It does not contain large inclusions, clay or a number of chemical compounds. This water can be used for domestic purposes and for irrigating agricultural crops, but additional filtration is required to make it suitable for food use.
The best option for electrical equipment is a pump. Surface pumping stations are also used. If the depth is more than 10 meters, it is possible to use an ejector, which will increase the pump's performance by accelerating the flow of produced water in the pipeline.
Artesian
These are wells with absolutely pure water, enriched by nature in the limestone plates of the soil cut. The depth can vary from 100 to 350 meters depending on the location of the site, the geological features of the soil and the terrain. Water does not require filtration. The threat comes from contaminants that can enter the casing from the outside. The minerals contained in the solution are beneficial for humans.
It is necessary to install a submersible pump for the well. This can be a centrifugal or vibration type device. The latter is preferable, since it breaks less often and has better performance. The main thing is that the pump has a coarse pump that prevents solid particles from entering the working chamber.
Advantages of do-it-yourself manual drilling
Manual drilling with self-made devices has the following advantages over automatic drilling methods using special drilling equipment by individuals and organizations:
Cheapness. Making a drill with your own hands from scrap materials and drilling a well without the involvement of third-party assistants, specialists, or organizations is the most profitable option from a financial point of view if other methods of employment in your free time do not bring monetary income.
Versatility. Independent manual drilling work is universal due to the following features:
- Manual drilling in many situations is the only possible option for carrying out work, if entry into the site of special equipment is impossible or the well is located in a built room.
- Narrow borehole channels are laid manually without the use of casing columns of standard diameter, which significantly reduces the cost of organizing and equipping water supply on an individual site.
- Drilling is carried out manually to a depth of 5 to 35 m, which corresponds to the characteristics of an Abyssinian and sand well.
- The drill made can be used for other economic purposes, if it is necessary to make holes in the ground - when constructing fences, planting garden plants, installing pile foundations and other household work. If it is no longer needed, the structure can always be disassembled and used on the farm at your own discretion.
Complete set of manual spiral drill, factory-made. Flexibility of use.
Depending on the depth of the water layer, the quality of the soil and the dimensional parameters of the borehole channel, various drilling technologies, designs of drilling devices or combinations thereof are used. With individual manufacturing, there is always the opportunity, through experimentation, to independently make a drill for a well, the most convenient and effective for specific conditions. Work can be carried out at any time convenient for the owner, without reference to the season, time of day, weather, hired specialists or organizations. If electricity is not supplied to the area being developed, wells can be drilled manually and mechanically without its presence.
Of course, you will have to pay for the low cost of the manual method in the speed of work and intense physical labor, the latter being to some extent useful in terms of improving health.
Pipes and couplings for threaded connections
Bringing the rotary drill into working condition
It is not enough to learn how to make a drill for a well yourself. It is necessary that the finished drill can be used to perform the work. To do this, it is necessary to equip it with a handle or handle, as well as a detachable drill pipe.
Making a comfortable handle
The handle is an important structural element. It is necessary so that the drill can be rotated comfortably. The design of the handle is also not as simple as it seems.
It can be envisaged that it will be operated by one person, but sometimes more people may be involved in drilling operations. The complexity of the process depends on the quality of the soil and the depth of the future well.
Before you make the handle of your drill, you need to decide whether you will rotate it yourself or invite someone to help you
The handle is made of rolled metal, which has a decent margin of safety. After all, this part of the drill needs to withstand significant loads without springing or damping the applied forces. Welding is used to connect the handle and the upper edge of the split pipe.
Construction of a detachable drill pipe
The drill is a multifunctional tool. With its help, you can not only build a well, but also, for example, dig a pole. If you use it for gardening, you can do without a drill pipe. A one and a half meter base will be enough to dig shallow holes.
But we need a drill in order to drill a deep enough well with it. What to do in this case? There is no point in leaving the barbell in one section and simply lengthening it.
The length of the rod and the ability of the metal to resist torsional forces are inversely proportional. It will be impossible to work with a long single-section rod.
The drill is a multifunctional product that will not gather dust without work when the well is already ready. With its help you can make the life of a gardener much easier.
There is only one way out: you need to make a drill pipe that will consist of detachable sections. The length of one section, a detachable rod, should be 1 meter or a little more. There are so many such sections that need to be built in order to eventually reach the planned well depth.
You may also find useful information about choosing a pipe for a well, set out in our article: Which pipes are best for a well: types, which one to choose and why.
The length of the string of rods attached to the drill will be increased gradually as the drill moves deeper.
There are several options for connecting rods into a long drill rod, these are:
- Threaded coupling . To create such a connection, a thread is cut inside each section that will correspond to the dimensions of the connecting element. The threaded coupling is made to the required length. All we have to do is exclude the possibility of spontaneous unscrewing of the connection. For these purposes, a cotter pin clamp is used. This method is simple and reliable.
- Nut and bolt. They are welded to rods made of small diameter pipes. This is a fairly simple, but not reliable option. You will have to weld on a thin-walled pipe, on which such a connection is unlikely to be strong. In addition, in order to fix such a threaded connection of the rods, additional efforts will have to be made.
- Welded couplings. Cut from a pipe whose diameter is larger than that of the rod. Then tightly weld the coupling to the pipe at one end of the section. Insert the next section freely into the same coupling on the other side. Now you need to secure the sections so that they do not rotate. To do this, you can insert a bolt across the pipe and secure it with a nut on the other side.
To make a drill for a deep well with your own hands, several rods are connected. Moreover, it is better if their connection is extremely simple. After all, during the drilling process, the tool will rise to the surface so that it is freed from the ground.
Each rise of the drill is accompanied by its division into its component parts, and each subsequent descent is accompanied by new assembly and extension.
Gas pipes with an internal Ø 33 mm can serve as drill rods for digging shallow excavations (up to 25 m) (the use of Ø 42 and 48 mm is acceptable). The length of the pipes of individual rod links is 1-3 m. Before purchasing pipes for rods, they should be carefully inspected. Material with poorly welded seams is not suitable for drilling
In addition to the drill itself, other tools are used to create a well manually, which are worth mentioning in this article.
For example, if the well is already ready, but pulling the tool to the surface of the earth is not so easy, you can use a lifting mechanism that works on the principle of a lever.
When choosing a method for connecting a detachable drill pipe, you need to remember that during operation the pipe will have to be repeatedly disassembled and reassembled
When the drilling procedure is delayed, and the drillers themselves lose strength, they would be greatly helped by devices that help turn the drill inside the well and screw it in as it deepens.
Details of the pit drill and features of its operation
Areas of application for garden augers:
- planting trees and shrubs;
- installing fence posts;
- installation of street lamps;
- arrangement of a drainage system;
- creating a well;
- drilling a water well;
- drilling holes for winter fishing.
Productivity directly depends on:
- product design;
- what cutting element is used;
- diameter, depth of the hole in the ground.
It will take about 2-3 hours to make a hole up to 3 m deep with a diameter of 25-30 cm using a standard earth drill.
For deeper drilling, special equipment in the form of drilling rigs is used.
The manual design contains the following parts:
- Pen. It is customary to make it from steel. Has the same diameter as the shaft. For ease of drilling, they are welded perpendicular to the shaft (rod) in the shape of the letter T. Rubber pads are put on both handles so that there is no friction when moving, the hands do not slip and get less tired. The minimum length is 40 cm, the recommended length is from 50 to 60 cm.
- Rod or shaft. Material: round or square profile pipe. Diameter - from 0.5 to 1 inch. It is not worth making the bar thicker, as this will require a lot of effort. A handle is welded on one side of the rod, and a cutting part with a lance is welded on the other.
- Screw (cutting head). The key element of the earth drill. Responsible for loosening the soil and pushing it to the surface. Excess soil is removed when removing the tool from the well. The most popular option is the one with two steel semicircles sharpened at the edges. The diameter is selected according to the purpose. To improve the convenience of operation, the blades are made removable.
- Crowbar (spike). Made in the form of a large drill or blade. It is located at the bottom center of the product under the blades. Sets the direction of the shaft. In a strictly vertical position it enters the ground. Loosens the soil in the center, making it easier for the blades to work.
- Extension cords. These are additional nozzles or sections of the rod, with the help of which you can increase the drilling depth to 15 m. They are fixed with screw connections. Used when necessary.
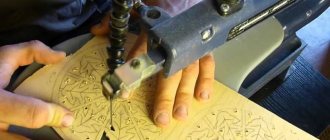
Welding and finishing
The general sequence of actions for making a welded drill can be as follows:
- mark pipes and steel sheets according to the drawing (using a construction marker);
- cut them according to these marks using a grinder;
- make marks at the joints of the handle, axle and blades (the axle pipe of the future drill should fit into the newly cut blades without noticeable effort);
- Using a welding machine, weld these parts in the required sequence, observing the drawing proportions and dimensions.
The final processing of a homemade drill is as follows:
- Sand the drill - remove any burrs, straighten the welds (if any irregularities remain). The tool, when put in order, is easy to use, does not hurt your hands and does not cling to work clothes.
- Place pieces of hose onto the handle (if the drill is manual). The ends of the horizontal crossbar (gate) must fit into the hose with force.
- Sharpen the cutting edges. This will allow you to drill the soil more efficiently.
- Paint the instrument after production.
Any paint dries in a maximum of two days. The product is ready for use.
Model overview
TISE FM 250 is an excellent hand drill for poles. This product is equipped with a pair of high-quality blades. The description notes that the control of the expansion mechanism has been brought to perfection. One of the plows is placed on the side. As a result, the drilling process is accompanied by the appearance of asymmetrical loads.
The side walls of the storage device largely compensate for this pressure. The second blade of the expander appeared, however, only after modernization in 2011.
The technical parameters of the 250th version are as follows:
- passage with expansion up to 2200 mm;
- passage without expansion up to 3000 mm;
- dead weight 9.5 kg;
- cross-section 250 mm (hence the name);
- handle width 700 mm;
- option for independent rotation of the plow (independence in relation to the movement of the head is most effective when driving with expansion of the lower zone);
- increased productivity;
- the ability to lay holes for fences and under piles for the house, even where there are pebbles with a cross-section of up to 50 mm;
- production of blade rods with the expectation of the least resistance during drilling;
- suitability for drilling work under pillar and pillar-strip foundations, regardless of the degree of load that the constructed house will exert;
- suitability for the Far North and seismically unfavorable areas.
In many cases, TISE FM 200 is used. Its intended purpose is drilling using technology with the expansion of holes in the ground for strip-pillar and pure pillar foundations. Standard dimensions are 1.34x0.2 m. Product weight is 9 kg.
For the most serious work, it is better to choose the reinforced drill TISE FM 300. It will cope even if you have to prepare the foundation for a stone or brick private house with concrete floors. The well itself is drilled strictly with the plow removed. The expansion in the lower part of the channel is provided with equal power and quality, regardless of the type of land on the site. The depth of the excavations reaches 3 meters.
But drills for excavation work are needed not only by builders. Such devices are also very valuable in garden plots, since no other tool allows you to prepare holes as well. It will be possible to successfully:
- put up a strong and solid fence;
- prepare to plant a bush or tree;
- feed tall plants;
- prepare drainage systems for work.
Theoretically, you can take drilling tools of other brands. However, TISE has a clear advantage over them - it does not cut through, but delicately plows the soil. A special cup makes it easier to remove the crushed soil mass. It also significantly increases the stability of the tool.
Features of application
The main purpose of using a drill is to help make holes of the required diameter. This is much easier than digging a shapeless hole with a shovel, while spending a colossal amount of time and effort to fill it up at the end of the process.
The drill is useful in such cases as:
- mounting pillars under the foundation during the construction of a house;
- holes for planting trees and bushes in large quantities;
- help for loosening the soil at great depths near growing plants;
- digging straight or inclined tunnels;
- well or pit for compost.
These are just the most common types of work for which a drill is used. The peculiarity of this tool lies in its design, which includes a rod, many blades or a spiral system that allows you to loosen and retain the earth on them . After this device is completely inserted into the ground by rotation, it is taken out without reverse rotation so that the earth remains on the spiral. The result is a hole of even diameter and the required length.
Unlike the industrial type, you can make a drill with a collapsible design with your own hands. That is, for drilling holes, it will be possible to easily select the required diameter and length by simply replacing several parts.
The industrial type of drill is distinguished by the high strength of its parts, the possibility of choosing mechanical types that do not require manual action, but the cost of the equipment is sometimes simply scary, and this is especially true for cases when the drill is needed only for single jobs.
Split Drill Pipe
This is a structure that can lengthen as the drill goes deeper. Consists of separate detachable sections. One part can be up to one meter long. The number of sections should be equal to the expected depth of the future water well. This element is connected in several ways:
Threaded connection with coupling. An external thread must be cut on each pipe
It is important to select the coupling of the required length and prevent it from turning on its own. For this purpose, a cotter pin clamp is used. Nut and bolt connection
A nut/bolt is welded to the rod. The method is simple, but not reliable. A thin-walled pipe may not withstand the load and will simply burst in the area near the weld. Clutch fastening. It is welded to a pipe of the appropriate diameter. The fixation should completely eliminate the possibility of turning.
One section is used first. As it sinks into the soil, the next element is added using a special compound. And drilling continues according to this pattern.
Design of a hand-held water drill
You need to take into account the nature of the soil in your area. The simplest design is auger. It consists of a spiral, which is a drilling element, and a handle.
The design must have:
- Cutting element.
- Barbell.
- Handle.
Depending on the design, its configuration may vary slightly.
Types of drills
A homemade drilling rig, depending on its purpose, is equipped with various drills:
- spoon drill;
- coil drill;
- bit.
A spoon drill is used to penetrate a layer of plastic soil (a mixture of sand and clay). Typically, the drilling tool is made in the shape of a spoon. The cutter is placed on the left side, and on the right there is a transverse projection. The spoon can also be made from an ordinary steel pipe having a suitable diameter.
The coil drill is used for passing through dense soils. This tool works on the principle of a corkscrew. The drill blade is made in the shape of a dovetail. It is formed from hardened steel to provide increased strength. Making a coil drill with your own hands is quite difficult. To do this, you should use the services of professionals.
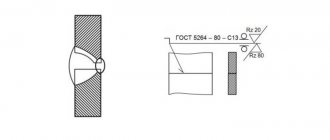
The chisel can destroy rocky rock
When creating a chisel, special attention should be paid to its point angle. The functionality of the drill depends on this characteristic. To resolve rocky soils, the sharpening angle should be 110-125 degrees, soft - 35-70
To resolve rocky soils, the sharpening angle should be 110-125 degrees, soft - 35-70.
Homemade drilling rig
Conclusions and useful video on the topic
This video clearly and clearly explains how to make a reliable and functional spiral drill using available materials and easy-to-use tools.
Obviously, a person who has skills in working with a welding machine and the most common plumbing tools will be able to make a drill with his own hands.
Using a homemade projectile, you can manually perform drilling work on your summer cottage. Which will significantly reduce the total costs that were planned for providing water to your territory .
Have you made a homemade drill of a different design? Or do you know the secrets of improving the projectile? Perhaps you do not agree with the theory and recommendations outlined in our article? Please write about it in the comments below.
Manufacturing of drilling tools
As mentioned earlier, drilling devices can be made independently, borrowed from friends, or purchased industrially produced products.
Sometimes a drilling rig can be rented. However, the goal of do-it-yourself drilling is usually to keep costs as low as possible. The easiest way to drill cheaply is to make tools from scrap materials.
The diagram shows the structure of various drilling tools. Using a chisel, particularly hard soil can be loosened, and then it is removed with a drill, bailer or other device
Option #1 - spiral and spoon drill
Hand drilling can be done with a twist or spoon drill. To make a spiral model, take a thick, pointed rod to which knives are welded. They can be made from a steel disk cut in half. The edge of the disk is sharpened, and then the knives are welded to the base at a distance of about 200 mm from its edge.
A self-made auger drill can be of different designs. Its mandatory elements are knives with pointed edges and a chisel installed at the bottom.
Knives should be positioned at an angle to the horizontal. An angle of about 20 degrees is considered optimal. Both knives are placed opposite each other. Of course, the diameter of the drill should not exceed the diameter of the casing pipe. Typically a disc with a diameter of about 100 mm is suitable. The knives of the finished drill should be sharpened sharply, this will make drilling easier and faster.
Another version of the twist drill can be made from a rod and a strip of tool steel. The width of the strip can vary between 100-150 mm.
The steel should be heated and coiled, hardened, and then welded to the base. In this case, the distance between the turns of the spiral should be equal to the width of the strip from which it is made. The edge of the spiral is carefully sharpened. It is worth noting that it is not easy to make such a drill at home.
A spiral auger for drilling can be made from a pipe and a steel strip, however, it is not always easy to correctly roll the tape into a spiral, weld and harden the tool at home
To make a spoon drill you will need a metal cylinder. In self-production conditions, the easiest way is to use a pipe of a suitable diameter, for example a 108 mm steel pipe.
The length of the product should be about 70 cm; a longer device will be difficult to work with. A long and narrow slot, vertical or spiral-shaped, should be made on this body.
The easiest way to make a homemade spoon drill is from a piece of pipe of a suitable diameter. The bottom edge is folded and sharpened, and a hole is made along the body for cleaning the drill
Two spoon-shaped knives are mounted in the lower part of the body, the cutting edge of which is sharpened. As a result, the soil is destroyed by both the horizontal and vertical edges of the drill.
The loosened rock enters the drill cavity. It is then removed and cleaned through the slot. In addition to the knives, a drill is welded at the bottom of the drill along the axis of the device. The diameter of the hole made by such a drill will be slightly larger than the device itself.
Option #2 - bailer and glass
To make a bailer, the easiest way is to also take a metal pipe of a suitable diameter. The thickness of the pipe walls can reach 10 mm, and the length is usually 2-3 meters. This makes the tool heavy enough to effectively loosen it when it hits the ground.
A shoe with a petal valve is attached to the bottom of the bailer. The valve looks like a round plate that tightly closes the lower section of the pipe and is pressed by a fairly powerful spring.
However, a spring that is too tight is not needed here, otherwise the soil simply will not get into the bailer. When pulling out the bailer, the valve will be pressed not only by the spring, but also by the soil collected inside.
The lower edge of the bailer is sharpened inward. Sometimes sharp pieces of reinforcement or sharpened pieces of triangular-shaped metal are welded at the edge.
A protective mesh is made from thick wire on top and a handle is welded to which a metal cable is attached. The glass is made in a similar way, only a valve is not needed here, and a slot should be made in the body to clean the device.
Some tips
Some recommendations will help you make a high-quality drilling device. When working, you should consider the following:
- It is necessary to correctly calculate the diameter of the screw. The fact is that during operation the hole will differ slightly from the size of the cutting part. For example, a 200 ml element will provide a well of 240-250 ml.
- You can replace the grinder discs with regular sheet steel, the thickness of which will be about 2 mm. But it will have to be further bent and sharpened to give it the ideal shape.
- When working with the disk, you must follow safety precautions. It should be carefully and securely secured in a special vice, and cut only with safety glasses.
- To calculate the auger feather, you can use the special program “Compass-3 D”. She will do everything necessary, just enter the initial data and wait for the finished drawing. All this will significantly save time.
To extend the service life of a homemade auger, you need to clean it after each job. Remove soil from metal parts, adjust blades and sharpen them if necessary. In addition, for storage, choose rooms with low humidity.
Kinds
The most commonly used drills are hand-held drills. There are several types of them.
Screw
It performs drilling by cutting the soil layer with specialized plates that are located at the base of the structure. The plates are welded at an angle of 90 degrees. This way, the soil is partially removed from the wellbore, so it is cleaned out manually with a shovel. With drills with knife-plates welded at an angle of 30 to 70 degrees, all the soil easily comes out. Such tools are suitable for drainage systems.
Coronal
The design of such a product includes a pipe and a crown, which is located at the bottom. The crown is made of particularly durable material in the form of pointed incisors. This gives you room to maneuver.
Drilling with a core drill is only possible if you have other additional tools: bits, rods, fasteners. When drilling in this case, a bit is used first, and only then a drill.
Shock-rope
This is an unusual large-sized instrument consisting of a pipe with a bailer. To use this type of drill, you need a tripod. It is installed at a height of about 2 meters.
With this type of drilling, the task is to produce a well. A heavy pipe with a sharp end, tied to a tripod with a thick rope or cable, is thrown into it from a height. The soil layer is loosened and falls into the pipe. Then it is pulled to the surface using a winch and cleared of the ground. Only one person can be involved in such work.
Spoon
It includes a long metal rod with a cylinder at the end. The cylinder has 2 components, which are located along or in the form of a spiral. There is a sharp cutting edge along the bottom of the cylinder. While drilling a well, the cylinder is filled with soil and then removed to clean it. This type of drill is suitable for areas with dense, moist soil that is not prone to crumbling. This tool is often used to make water wells.
Spiral drill or coil
It is used for drilling in dense clay and loamy soils that contain pebbles or small gravel. The components of such a drill are: a threaded head, spiral coils with blades and a rod. They work with such a drill slowly, calmly turning it deeper. The soil sticks to the coils; when they are completely filled, the drill is taken out and cleaned.
Chisel bit
This option is great for dry clay or loose sandy and sandy loam soils. A piece of steel is used to create it. Drilling is carried out using the impact method, followed by rotating the tool by 15-20 degrees. Chisels are also used for crushing small stones.
Rod
Rotary or percussion drilling can also be performed with a rod drill. For its manufacture, pipes with a length of 1 to 3 meters are required.
Diamond
In particularly strong foundations (concrete, stone), drilling is carried out using diamond drills. They come in two types: electric and hydraulic. Electric tools are used to drill small-sized wells. They require electrical current. Certain types of electric diamond drills run on gasoline or diesel fuel. The use of hydraulic ones requires the use of a special pump to make large holes.
In the description of the technical capabilities of each type of drill, you can find the following data: maximum drilling depth, hole diameter, tool weight. The ease of work performed by a drill directly depends on its weight. The larger and heavier it is, the more difficult it is to work with.
Materials and tools for creating a drill
The materials and tools for any hand drill are the same, with the exception of a few differences:
- Sheet steel;
- pipe;
- rental;
- welding;
- Bulgarian;
- file;
- electrodes.
Where to buy and estimated cost
All materials can be purchased at the market, at a hardware store, or found on your site.
Below are the approximate prices for purchased materials:
- steel sheet (2x1250x2500) – 1800 rub.
- pipe - from 30 to 50 rubles/p. m.
- electrodes – from 80 to 120 rubles/kg.
The procedure for carrying out drilling work
Following the sequence of work ensures excellent results:
- Assemble the hand drill according to the instructions. Equip the main element with a handle (the initial stage of drilling takes place without the use of an extension rod).
- Remove the surface layer of soil 10-15 cm.
- Place the TISE foundation drill on the formed platform.
- Start rotating clockwise, avoiding significant force - a hand drill goes deep quite easily. Avoid side loads to avoid deformation of the rod.
- After filling, remove and completely empty the storage tank from the soil. Remove any large stones by hand, after loosening the soil. Chop large plant roots and trim with pruning shears.
- Compensate for the lack of depth with an extension rod. Repeat the procedure until the required depth is achieved.
- Start widening the bottom of the pile hole. Set the required position of the folding paddle. Use a special cord that lifts the device upward. Downward movement occurs under the influence of its own weight. Lowering causes cutting of the soil filling the soil receptacle. Repeat the operation many times.
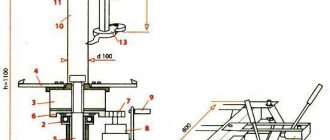
Blueprints
A self-made drill is good because its design is “tailored” to its owner. During the manufacturing process, everyone makes their own changes, then many more refine the product. But it can be difficult to do without basic drawings. This engraving contains several drawings with the sizes of various drills. As you understand, the dimensions are arbitrary; they can and should be changed, adjusting them to the size of the required wells.
Shovel drill
There is no point in making a serious structure for planting plants. In this case, you can make a garden drill from a shovel. Choose a high-quality shovel made of good steel, apply markings as shown in the drawing. According to the markings, you will need to cut out two small fragments and saw the lower part in the middle to a depth of 30 cm (pictured).
Shovel drill
Next, the edges are bent one forward, the other back, and the petals formed in the lower part are folded towards them. The resulting seams are boiled outside and inside.
Drill for soft soils
If the ground is soft, the conventional design does not work very well. For such cases, there is a special drill with an extended cutting part. It is a kind of glass with slits on the sides. The cuts are equipped with cutting edges. They are best made from well-hardened steel.
Drill for soft soils
This drawing shows an interesting handle design - it can be rearranged as the length of the rod increases.
Basic drawings of auger and garden auger
Both of these units work well, but the garden one has to be taken out often, and the auger one is harder to rotate. Choose according to your own preferences.
Auger and garden auger for soil of different densities Detailed drawing in projections of an auger auger Drawing of a garden auger
Spoon drill
Another type of homemade structure for performing independent rotary drilling of water wells is a spoon drill, or spoon drill. It is used for making water wells in low-density soils, in particular in sandy soils and mixed sandy-clayey soils.
Spoon drill
It looks like a cylindrical metal structure with bottom and side cutting edges. The soil they cut falls into the internal cavity of the steel cylinder of the drill and is held inside due to the internal compaction of the soil and its adhesion to the walls of the cylinder. After each excavation cycle, the entire structure is lifted up and cleared of soil on the surface. At one time you can go deep into the ground to a sufficient depth (up to 40 centimeters).
In order to make a spoon drill for drilling water wells, you need a piece of steel pipe about 70-80 centimeters long. The diameter of the pipe is selected depending on the planned diameter of the future well. A slot is made in the lower part, the width of which depends on the quality of the soil in the area: for loose soil with a predominance of sand, the slot can be 6-8 millimeters, for clay soils - somewhat wider.
There is also an option to make your own spoon drill of a slightly different design - with a slight (10-20 mm) displacement of the axis of the lower bucket relative to the main axis, the so-called eccentricity. The axis of the welded drill must coincide with the axis of rotation, which makes it possible to make the borehole diameter slightly larger than the size of the spoon structure. A larger drilling diameter is convenient because if there is a risk of wall collapse due to loose soil, the well can be simultaneously cased. The drill itself will go inside the casing.
At the top of the spoon structure, a piece of pipe or metal rod is welded to attach the drill to the rod and then to the handle for rotation. The drill string is expanded in the same way as when performing auger drilling for water.
Spoon drill manufacturing process
In order to make a homemade spoon drill, you should prepare a simple set of tools:
- metal pipe of the required diameter;
- metal corners;
- angle grinder;
- bench vice;
- roulette
You can even make a spoon drill from an old gas cylinder if its diameter is suitable for making a water well. The lower part, about 250 millimeters long, is cut off from it, and cuts must be made at the end, which will perform the function of loosening and cutting the soil.
At the next stage, narrow vertical windows are cut out in the walls of the cylinder, through which the soil that gets inside during operation is removed. The size of the windows is 50x200 millimeters.
A hole is drilled at the top of the cylinder for welding the future rotation handle, the fastening of which can be strengthened by attaching jumpers welded between the pipe and the upper surface of the cylinder.
At the next stage of work, a working drill is welded from a metal strip 200 millimeters long and 35 millimeters wide. The thickness of the metal is 3 millimeters. The strip is bent in a bench vice in the form of a spiral, its lower part is cut at 45° and sharpened. The resulting drill is welded to the drill.
Drill handles can be made from fittings on which short sections of pipes must be secured for ease of operation.
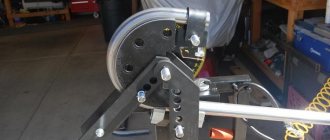
Drill for percussion-rope drilling
You can drill a well on a site not only by rotating the drill, but also by the percussion-rope method. This type of work requires a special installation, which can also be made independently from scrap materials.
Having such equipment, all work can be performed without any assistants at all, so we will also consider the process of making an impact drill.
To drill a well using the percussion-rope method, you don’t need much: a stable tripod frame, the impact drill itself, a strong cable and a winch
To understand what and how we will make, let us consider in general terms the essence of shock-rope work.
From a great height, a projectile pipe—a bailer for a well—is dropped into the location of the future water intake point designated with a shovel or auger. An eye for the cable is welded to the drill at the top.
A hole is cut in the top side to extract the drilled rock.
Image gallery
Photo from
Pipe for a homemade bailer
Ball Valve Shoe
Upper part of the bailer
Window for unloading drilled rock
The lower edge is sharpened or equipped with teeth that optimize soil loosening. At 5 - 7 cm above the nominal bottom, a ball or petal valve is installed inside the pipe to capture and hold loose rock.
A bailer is an indispensable tool when digging through loose sand, pebbles, and gravel deposits. It is often used in combination with other drills. They alternate with an auger or glass, which is not capable of removing loose and water-saturated deposits.
Loose soil particles are retained inside the bailer thanks to a valve located at the bottom of the housing. The auger, bell, and glass do not have such advantages.
Rarely is only one drill used to drill a well. Most often they are used in combination: clayey rocks are drilled with augers or glasses, loose and water-saturated rocks are drilled with a bailer
The procedure for dropping the drill is repeated many times. The result of the process is a body that is one-third filled with soil and a hole in the ground that increases by 30-40 cm.
The filled bailer is removed from the barrel using a winch, turned upside down with the hole and cleaned with blows of a heavy hammer.
Then the process of percussion-rope drilling is resumed and repeated until a well of the depth that was planned to be obtained is formed at the site where the drill fell.
It is not necessary to buy a ready-made installation - you can make your own bailer for drilling and cleaning.
If you make such an impact drill heavy enough, then with this bottom it will cut the soil like butter and will not allow it to spill out of its cavity back
In this case, there is no point in creating one drill, so we will tell you how to build the entire drilling rig along with the projectile.
- We choose a place where, according to our calculations and assumptions, the well should be located. We mark it out by making a small depression using a regular shovel.
- 2-3 meters high above the hole We equip the top of the tripod with a well-fixed block for the rope. You will also need a winch, which we attach to the supports. It's good if you have an electric winch, but a manual one will also work.
- We prepare the impact drill itself . For this purpose, we will need a thick-walled pipe, the diameter of which corresponds to the size of the shaft of the future well.
To make a drill, we take a strip of thick metal and weld it to the upper end of the pipe, placing it perpendicular to the longitudinal axis of the projectile.
Along the center line of our pipe, in a welded metal strip, we drill a hole corresponding to the thickness of the rope on which the projectile will be attached.
The lower end of the pipe also needs processing: you can make a serrated or ring sharpening on it. If you have a muffle furnace, you can harden the drill in it after the sharpening procedure.
The drill for percussion-rope drilling is not so easy to clean from the soil that has accumulated in it. To speed up this routine operation, you can make not a window-hole, but a vertical slot passing through almost 2/3 at the top of the pipe.
The bell is part of the impact drill. It is easily cleared of soil and can be replaced, for example, with a chisel if a stone is encountered while drilling a well
The heavier the drill, the faster you can achieve the desired result, but it is also necessary to take into account the power of the winch, which will have to pull the drill with soil from the wellbore.
So, if its power still allows, the projectile can be made heavier by placing removable metal weights in the upper part of the pipe.
You may also be interested in information on well construction, flushing after drilling and winter insulation, discussed in our other article.
A simple means of small-scale mechanization for the garden
It is easiest to make such a tool yourself. Its design includes:
- cutting part made of steel sheet;
- drill tip;
- a rod made of round or square pipe;
- handle.
The cutting blades of the drill are made of two steel semicircles with a thickness of 4 mm and pointed edges. Their diameter is calculated according to the size of the required wells. In the center of the semicircles, a recess is cut out in the shape of the rod for a better fit. Blades are usually welded to a rod with a diameter of ¾ inch or 20×20 mm, but it is more convenient to make several replacement pairs and bolt them to the rod. To do this, you need to weld fastening shelves made of strong steel at the desired angle and make holes in them.
A 0.5 meter long handle is attached perpendicular to the rod, the length of which is made up of the depth of the hole and an additional 60 cm. A drilling tip is attached to the other side. It is needed for stability and initial loosening of the earth. If the garden auger turns out to be too long, you can make a collapsible, folding or telescopic rod.
Blade knives can be made from two round halves or from an open circle with offset edges. In any case, the edges of the blades should be separated by 30°. This is necessary for successful work on dense soils. Angles or stops made of thick steel will enhance performance.
Do-it-yourself drill for wells
The drill for wells is made of metal. The drill itself is a structure made of a metal rod with a sharpened end. Knives are attached to the sides of the drill. For the knife cavities, you can use halves of a metal disk about 15 cm thick. Then the knives must be welded to the rod with an inclination of approximately 22 degrees. The halves of the disk are placed opposite each other. Between parallel knives the slope should be 44 degrees.
You can make a spoon drill for wells. It has the shape of a cylinder with a longitudinal cut on the side. The length of this drill is about 800 mm. This drill can be made from sheet steel, which must be rolled to the required size and fixed by welding.
To make it easier to overcome various layers of soil, the following drills are used:
- Spoon drills are used for sandy soil;
- the drill bit is used to loosen hard rocks;
- spiral auger (also called coil auger) is used for clay soils;
- The bailer makes it possible to lift the earth to the surface.
Advantages of hydrodrilling wells
Hydrodrilling technology has the following advantages:
- simplicity, allowing even non-professionals to do all the work with their own hands;
- small dimensions of the equipment used;
- minimum number of technological processes;
- no restrictions on the depth of the well, it is possible to drill to an aquifer located 200 m from the surface;
- affordable price;
- high productivity, allowing, under favorable conditions, to travel up to 10 m per day;
- environmental safety and harmlessness to the surrounding landscape.
Many people prefer hydrodrilling to other methods of creating an autonomous well on their own due to the absence of design violations in landscaped areas - there is no need to improve the area upon completion of the procedure.
Scheme of the process of hydrodrilling a water well.
Features of drilling with homemade devices
Drilling with homemade projectiles is possible under the following conditions:
- the aquifer lies at a depth not exceeding 20 m;
- the soil is sandy or clayey, but not rocky.
They make attachments for percussion-rope or rotary drilling - only these methods are suitable for constructing a well yourself. The first method does not require the creation of complex equipment. They build a simple drilling rig from materials that are available on the farm. The method is also attractive because you can work without assistants.
When rotary drilling, a tool is used that, going deep into the soil, lifts it up. 2 people stand on the sides of the bar and rotate it, applying force to the transverse handle. Spiral or spoon type drill bits are used.
Necessary equipment for work
The basic unit of equipment is a small unit (SBU). The small size of the device is optimal for its use in limited spaces of private areas.
To create the pressure necessary to remove crushed rock from a mine shaft, a borehole pump or motor pump capable of pumping raw media is used. When choosing a suitable model, they are guided by the power of the pump equipment.
In some cases, the penetration power of the drilling fluid is increased by adding sand or coarse shot. To grind large fragments of pebbles found in sandy layers of destructible rock, it is recommended to use roller or cutter bits.
Drilling wells in areas with boulders or large pebbles requires additional reinforcement of the starting rod with a special drill.
The MBU is a prefabricated structure with a diameter of 1 m and a height of 3 m.
Elements of a drilling rig.
The installation consists of the following elements:
- metal frame body, easy to assemble and disassemble;
- well gate or winch;
- an electric motor driving the drill;
- swivel providing sliding fixation of structural parts;
- well pump or motor pump;
- drilling tools, incl. exploration drill;
- pipe rods for extending the column;
- control automation units;
- hoses connecting the water supply pump unit to the swivel.
For stable power supply, it is recommended to include an electric current converter in the list of necessary equipment. The use of a special lifting mechanism makes it easier to raise and lower casing strings and extension rods; a winch is considered the best option.
Since the technology is based on removing waste rocks from the well body with high water pressure, a motor pump should be selected with increased power.
To work, you will also need plumbing equipment: a pipe wrench, a transfer fork and a manual clamp.