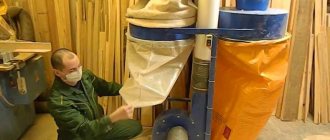
Various kinds of crafts made of plywood and wood, made by skilled craftsmen, are highly valued all over the world, causing universal admiration. Undoubtedly, carving is creativity and art, but you can certainly master it with effort and constantly honing your skills. This optimal hobby related to wood and plywood will not require too much free time from you and equipment that is not very expensive. Of course, this means carving plywood using jigsaws!
Openwork carving
It is rapidly gaining popularity: who doesn’t want to make an excellent piece of decoration for themselves, decorating their home, furniture, and creating an artistic ambience! Cut-out products of different thicknesses are optimally integrated into many existing decorative styles, and we get, for example, frames for photo cards with ornaments, words, individual letters, figured shelves made with jigsaw carving on plywood. In addition, such creativity is an action that is accessible to anyone interested in the process, even a beginner. You just need to get an idea of “how it works.” And you can start creating!
Using a hand jigsaw is quite easy
Video to get started:
What is artistic carving?
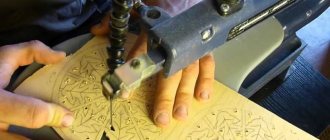
This is one of the types of wood carving. Its main difference is not superficial, but through curved cuts that make up ornaments, figures, product details, etc. The photo shows a simple example of such work:
Obviously, this kind of work can only be done effectively with a jigsaw. Of course, you will need auxiliary tools.
If desired, the slots can be made without a jigsaw. For example, punch with chisels, straight and rounded, use cutters for semicircles and circles. But such work options are slower and of poorer quality than using a jigsaw. Therefore, this method of wood processing is called “sawing with a jigsaw”, because this tool is the main one.
Why does a jigsaw cut crookedly?
Initially, a jigsaw was intended for cutting out patterns and circles. The straight sawing function is not available on all models. The price of such a tool is many times higher.
You can achieve a straight cut with a regular jigsaw. To do this, you should use a ruler, which should come with the kit. To make it easier to control the sawing process, you need to reduce the speed.
Beginning craftsmen often encounter a problem: when cutting, the jigsaw moves to the side, and the cut is made at an angle. To cope with this, you need to study in detail the process of correct and even cutting.
There are several reasons for an uneven saw blade:
- the saw is dull;
- too much pressure is used;
- There is a cross grain in the wood.
One of the reasons for a crooked cut may be that the material is too thick. As a rule, thin wood is easier and easier to saw. The jigsaw may have poor mechanics - in this case it needs to be changed. You can check the quality of the jigsaw by moving it from side to side. If it's loose, it's a cheap tool for rough work. To get an acceptable result, you should cut with a margin, and decorate the edges with a hand router.
Another effective way to learn how to cut smoothly with a jigsaw is to draw not one line on the workpiece, but two parallel ones. This way the cut will be smoother.
Some people recommend using the pendulum function. There is no need to press on the jigsaw - it should move on its own. You can try changing modes.
Where to start studying
It’s best to start learning this craft by becoming familiar with the full range of different products that are made in this way. These include small items that are closer to jewelry, and large-sized details of small architectural form - verandas, gazebos, etc.
The average between them is furniture and interior items. What is chosen is what is closer, in demand, more accessible to the possibilities of the workshop space, what there is a market for, what there is a desire to do with your own hands for the soul or as a business start-up.
After selecting the item to be made, it is studied how it is made and what is required for it.
Work examples. The products in the photo below are simple artistic ones.
To begin with, you need simple motives. Then you can move on to more complex ones.
An example of another direction: carved moldings for exterior or interior interiors, flat balusters for stairs, fences:
What tool is needed
All tasks are performed by different tools. There are 3 main groups of tools that work on the principle of a jigsaw.
Manual
This is the simplest option, files of different sizes that are held within a frame. In principle, a jigsaw can be called both a metal file in a frame and a small bow saw for wood. But classically this is the name of a jewelry jigsaw, a short thin file in a high frame.
Manual electric
A jigsaw has a number of advantages and disadvantages compared to a simple hand tool. It cuts quickly and easily. The craftsman's only effort is to accurately guide his saw.
The downside is that this tool is quite clunky. The file is fixed at only one end in the rod. Therefore, it tends to move away from the markings. Visual control of the progress of the saw is somewhat difficult.
Therefore, the finest and most precise work is performed with hand tools, while coarser work is performed with electric tools.
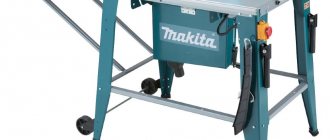
If you need an electric jigsaw, then before purchasing we strongly recommend that you familiarize yourself with 9 tips that will help you choose a jigsaw.
Tabletop electric
This is a version of a mobile (manual) jigsaw. The only difference is that it is stationary. If a hand tool moves along the workpiece, then in a stationary tool the workpiece is dragged under a file. For this reason, it is more difficult to work with large parts.
At the same time, among the desktop options there are highly efficient and productive tools. Especially those that work on the principle of a band saw. Instead of a saw, they have a closed saw blade running in a circle on two guide wheels. In its pure form, such a tool is not called a jigsaw, but rather a tabletop band saw. But it is quite possible to perform jigsaw tasks on it.
There are also stationary jigsaws of varying power and classic design, where the file makes reciprocating movements. Moreover, on some models it is fixed not at one end in the driving rod, but also at the other end in the passive (driven) rod, which makes cuts more accurate.
Christmas decorations in stained glass style
You can add a little variety to the standard cutting technology and make one of the proposed options for New Year's decor that imitates stained glass style.
The decorations in the foreground are made using pseudo-stained glass technique.
The essence of this technique is quite simple: you need to cut out two stained glass frames and place a sheet of cardboard between them, painted on both sides. In order to avoid the tedious adjustment of two parts, it is better to immediately cut them in series, placing the blanks in a stack one on top of the other. Of course, it is much more convenient to do such work on a jigsaw.
Cutting templates
What plywood to use
Plywood is a popular material for such carvings. Externally, it imitates wood. At the same time, it is less prone to drying out, cracking and warping. This is achieved by the fact that the individual layers, when gluing, are laid alternately along and across the fibers. In this case, the fibers of one layer work in transverse tension, the others in longitudinal tension, which keeps the material from cracking.
Plywood is selected according to grade and thickness . On sale you can find sheets of five grades, from first to highest (elite) grade. Photos of samples:
The choice of quality depends on the type of product to be made. When selling, plywood sheets are not cut. From a sheet of plywood of 2-4 grades measuring, for example, 1.5x1.5 m, you can cut the highest quality pieces. At the same time, you need to ensure that low-grade plywood does not peel.
It doesn’t always make sense to buy sanded sheets, since after manufacturing the products are most often sanded with “zero” emery.
The second selection parameter is sheet thickness . On sale you can find sheets with thicknesses from 3 mm to 30 mm. Special plywood up to 50 mm thick is also sold.
Plywood with a thickness of 5 mm or more is more difficult to saw, but gives greater strength to the product. The thickness is selected based on the optimal ratio of “sufficient strength X possibility, ease of cutting X price.
The cost of a sheet increases almost in direct proportion to its thickness.
Which file to choose
For manual jewelry jigsaws, standard universal files for metal and other materials are used. Selection principle: the more complex the profile, the narrower the canvas. A wide blade “maneuvers” in the slot less easily.
The blade cuts metal accurately and does not tear the material, but it can cut too slowly. When speed is needed, files with larger teeth are selected.
In addition, craftsmen recommend purchasing Russian-made canvases. In extreme cases, not the cheapest “good quality China” under the brand of a respected corporation from the EU or the USA.
For manual electric jigsaws, Bosch T101AO files are recommended; they are made with straight teeth made of HCS steel. It is noteworthy that the manufacturer recommends other blades with oblique teeth for figured carving, but they tear the edges of the cut more strongly.
Read more about the types of jigsaw files and their choice in our detailed guide here.
Tapes and files for stationary machines are selected depending on the design, manufacturer’s recommendations and tasks. Sometimes you need to cut not just one, but a whole stack of blanks according to one template. The most suitable option for such tasks is selected during real work through trials.
Gingerbread men
The whimsical design of these New Year's wooden figurines in the form of a popular holiday treat will amuse and delight lovers of non-trivial design.
Material: oak cuts, 5 mm thick. Finish: Clear oil finish
Sawing and processing wooden toys
Print the proposed sketch to the desired scale. Cut the pre-selected piece of wood to the required size. Considering the many curved cuts and small shaped slots, it is better to choose workpieces of small thickness - 3-5 mm. Transfer the template to a wooden base, then use a 1.5 mm drill to make a series of holes through which the blade will pass (don't forget to drill a hole for hanging the figurine).
Start by sawing out the internal elements, and then trim the figures around the perimeter, this will reduce the risk of breaking the fragile toy. Given the amount of fine work involved, it is best to use #3 reverse tooth files for this project, which in addition to a more controlled cut will reduce the likelihood of chipping on the back of the piece. Remove the paper template: If adhesive was used for transfer, sand off any remaining paper using P180 sandpaper. If you plan to apply a clear finish, add a final sanding with P280 grit.
How to choose plywood for sawing A successful project begins with the right choice of material. How to choose high-quality plywood for sawing - read our article.
What else do you need for creativity?
First, you need a sketch of the future product. When choosing profiles, designs and ornaments, you can use both traditional sources, books and magazines, and Internet tools. There are a huge number of photographs of finished products, as well as drawings and patterns on the Internet. You can use three types of prototypes and sketches:
- completely finished sketches, patterns or drawings;
- ready-made sources, modified at your discretion;
- completely unique own sketches.
In addition to the jigsaw, you will need many auxiliary tools and tools. It is impossible to give an exact list; it all depends on the technology and size of the future product. But you can make a mandatory list of what you need, here it is:
- drill or screwdriver with drills or cutters. If the slot is closed and does not start from the edge of the workpiece, holes are drilled to insert the file;
- marking tool: compass, ruler, square, tape measure, pencil, awl for pricking the center of holes, etc.;
- a set of round and flat needle files and files or emery devices for finishing the internal planes of the workpiece.
For the combined technology, jigsaw plus surface carving or lathe processing, separate tools are required.
Volumetric pendants in an openwork frame
The main feature of these New Year's decorations is a beautiful openwork frame with a slight three-dimensional effect. This simple effect is achieved in a simple way. The oval center of the pendant is carefully cut out according to the template, moved back and fixed with glue. Thus, the openwork frame protruding to the foreground gives additional volume and makes the ornament more interesting.
The rest of the project assumes a standard cutting algorithm. Separately, we note that if you work on a machine, it is better to use #2 or #3 spiral files for this project; they will be easy to cut out not only the openwork frame, but also the main ornament of the decoration. As for the finish, the frame and middle look more beautiful in a contrasting design, painted in different colors. For such decorations, it is best to use alkyd or oil paints, which provide good coverage and color saturation.
Preparing the tool for work
When preparing a manual jigsaw, the most important thing is to insert the file correctly and ensure the tension of the blade using the threaded fastener. A weakened file will dangle, bend, will not be able to provide an even cut and may break. If it is overtightened, it may burst immediately.
The tension is determined by trial sawing. At first it’s better not to hold out. If the blade bends during sawing, it is tightened a quarter turn of the screw fastening. You may need to do this several times until the file starts cutting consistently. With some experience, the master immediately accurately adjusts the tension.
Files with an oblique tooth are inserted so that the tip is directed forward, as the sawing progresses. Straight-toothed files are inserted on either side, except when the sawing direction is indicated by an arrow on the blade.
There may be jigsaw frames without screw tension adjustment. In such designs, the frame itself is spring-loaded. Before installing the file, the frame is compressed with a special eccentric clamp, which should be included in the kit, or using a handy vice, clamps, or clamps. Then the file is inserted and the clamp is removed. The spring-loaded frame opens and provides optimal tension force.
Complex power tools are prepared in accordance with the Operating Instructions, or by generally known methods.
Carving techniques for beginners
Organization of the workplace is important. The master must work while sitting in a comfortable position, without bending or reaching with his hands to the place of work. For small parts, a sawing table is used.
They are on sale. But to gain first experience, it is better to cut it out with your own hands from a piece of thick plywood or board according to the following drawings:
The table is attached to a large work table with a clamp or self-tapping screws.
In some cases, it is more convenient to clamp the workpiece vertically with a clamp, then you will have to cut not from top to bottom, but horizontally, which is more convenient.
Rating of jigsaw machines
When purchasing productive, convenient and reliable equipment for cutting sheet blanks, it is advisable to first familiarize yourself with the expert assessments of specialists and reviews of real carpenters. We invite you to look at a short but clear TOP; there are several varieties of jigsaw machines for production and home purposes.
List of successful jigsaw machine models for 2022:
- BISON ZSL-90
– compact, with a 45° rotary table, there is a conveyor with a side stop to ensure precise angular cuts. DIY jigsaw machineHaving appreciated the convenience of the simplest equipment, home craftsmen are increasingly trying to make a similar device for their home using old household mechanisms and waste materials. The easiest way is to convert a homemade jigsaw from a ready-made manual jigsaw with a working engine:
- The bed and table for a homemade stationary jigsaw can be easily made from plywood.
- We polish parts.
- We assemble the frame.
- We fasten the elements using self-tapping screws and glue.
- We make a work table with a hole for the tool to move.
- We are preparing a mount for a jigsaw.
- Making the upper arm.
- The jigsaw is used as a drive, and on top the file is fixed in a spring-loaded metal rod.
- Don't forget to install the lower roller stop for the rod.
- We fix the canvas and check the device in operation.
We cut the blanks.
Common problems
When working with different materials and tools, various problems arise, but there are also some common to all types of work.
Why does the file stick and how to fix it
If the saw gets stuck immediately at the beginning of work, this means:
- the fabric is loosely stretched;
- the file is not suitable for this material;
- The material is too thick for this tool.
When it starts to get stuck after a smooth and even cut, this means:
- the canvas has weakened and needs to be tightened;
- the teeth have crumbled or become dull, all or part of them;
- gets stuck on a turn - the blade is too wide for a sharp turn in a semicircle of small diameter;
- The structure of the workpiece has changed, a branch has been caught.
Why do chips appear, how to cut without them
For artistic cutting with a jigsaw without chipping, suitable files are used. Most often, the material is torn by blades with large teeth or with an incorrect angle. Also, the appearance of chips can be affected by jerky sawing or a defect in the workpiece, peeling of wood or a layer of plywood.
Basic rules for cutting with a jigsaw
- Laying under a sheet of rigid backing. It is to ensure the hardness of the surface under the plywood that a stand is used. A sheet, even a small one, bends quite easily (under pressure), so without this device a high-quality cut, strictly along the line, will not work.
- The working body of the jigsaw (file) must be strictly perpendicular to the end of the sheet. And constantly, throughout the entire process of cutting the material.
- The tool is fed along the line in a forward motion, but without effort. Otherwise, the file will break immediately. The same goes for when it deviates from the “vertical”.
- Sawing out “blind” holes, that is, somewhere along a sheet of plywood, indented from its edge, is done as follows. A “hole” is drilled at any point on the outlined contour with a slight offset towards the center of the fragment. The diameter is chosen so that the file can easily fit into it. After attaching it to the tool frame, you can cut in any convenient direction.
- A figured cut in plywood involves sharp turns, smooth bends, and so on. First, at the point of change of direction with a jigsaw, without changing its position, you need to make a small hole in the material. To do this, you need to continue cutting with a file, strictly maintaining the orientation of the tool, and at the same time rotate the piece of plywood. As soon as the plane of the cutting part coincides with the required direction for further cutting, it can be carried out along the intended line.
Having mastered the production of fairly simple crafts from plywood, you can take on more complex options. As an example, self-assembly of furniture (racks, bookcases, original hanging shelves). With a skillful approach to business, plywood makes excellent countertops, cutting boards, window trim, and so on. It’s easy to make a folding chair from this material, in various modifications. For those interested, all the details are presented in the article.
Plywood also makes excellent frames for paintings and photographs. Those who have a plot of land will be able to engage in artistic design of outbuildings; the same gazebo, a house over a well or something else. There are many options. The main thing is to want to learn.
In the process of preparing for cutting with a jigsaw, you should not forget that all drawings and drawings are nothing more than the basis for developing your project. A little imagination, time, effort, and you can make a truly real masterpiece from plywood.
Wood instead of plywood
With all the advantages of plywood, this material has its drawbacks. This is an industrial material, and not completely natural, like pure wood. Additionally, plywood is made primarily from birch, which does not have the beautiful texture, grain patterns, and colors that some other woods have. Therefore, even highly artistic products made from plywood do not have the same attractiveness and charm as purely wooden ones.
Before mass production of plywood began, all carving was done on wood. Many antique products are still intact, so wood is also well suited for artistic cutting with a jigsaw.
In this case, you must be prepared for the fact that the workpiece will crack or warp during work or immediately after it. To avoid this, you should use only well-prepared wood:
- completely and evenly dried throughout the entire massif;
- maintained in a period sufficient for all internal stresses to manifest themselves in the form of cracks and warping.
Set of decorations in Christmas style
A set of three ornaments inspired by traditional Christmas motifs. The set includes a pair of stylized angels and an openwork Christmas tree assembled from two halves. The latter can be used as a pendant or as a free-standing decoration.
Such toys look good in their natural form, with an open wooden texture. Therefore, linseed, mineral or any other non-tinted oil is best suited for finishing.
Stencils for cutting
The width of the central slot should correspond to the thickness of the workpiece used. To ensure a good fit between the two halves of the plywood Christmas tree, cut the groove a little smaller, then carefully file it with a file or sandpaper until it fits snugly.
Examples of crafts or what you can do with your own hands
Here, endless opportunities open up for amateurs who can then become professionals. The technology allows both to give the external shape to the product and to create ornaments on different surfaces, from boxes to openwork stair railings or carved platbands.
Let's look at simple examples of work. The photo below is a purely artistic product that has no practical value.
An arts and crafts product, a hanger for the hallway, kitchen or bath.
Artistic carving for children
A complete description of artistic cutting with a jigsaw for children and beginning adults, including a practical task, can be found in the textbook “Technology” for the 5th grade.
A simple and clear illustration from the course:
However, the compulsory school curriculum inevitably carries a connotation of coercion. If a child does not enjoy the activity, he may lose interest in it for life. Conversely, even at an earlier age it can captivate the child.
The lesson trains hand motor skills, artistic imagination, and the habit of creation. Something made with your own hands gives you self-confidence and raises the bar for assessing your capabilities. Therefore, you can try to show your child a simple product and offer to make something similar yourself.
We must not forget about safety precautions. A child is less aware of the likelihood and possible source of injury than an adult. Safety comments for the illustrations above.
Left: the pose is chosen correctly, the eyes are far from the file. If the canvas bursts, it will not cause harm.
Right: The thumb is too close to the file. It is safer to clamp the workpiece with a clamp and keep your hand away.
In addition to the school course, starting knowledge can be supplemented by video, lesson 1 and further:
In our age of continuous conveyor production, any unique piece of product arouses interest. Of course, you won’t be able to earn much from one copy; from a business point of view, you should again set up continuous production. However, artistic sawing with a jigsaw can be promising for those who are interested in it, simply as a useful hobby, making gifts for loved ones, or making a first prototype.
Transferring the diagram to a wooden piece
There are various ways to transfer sketches of designs for cutting with a jigsaw onto plywood:
- Prick the key points of the design with an awl and connect the holes on the plywood with a pencil. Suitable for the simplest drawings.
- Translate via carbon copy.
- Glue the sketch onto the plywood with double-sided tape or glue. After cutting, the remaining paper and glue are removed with sandpaper.
Scheme for cutting out a toy motorcycle