At the same time, work is underway in different parts of the world to create a metal detector without a central control unit. The main remote control, screen, audio source in this detector is your smartphone. Wireless or wired, it doesn't matter. Roughly speaking, the entire metal detector is just a coil for a smartphone. So that you understand the prospects of the idea, the manufacturer XP Metal Detector (France) is working on it. And it doesn’t just work, it covers key points with patents. In the future, the French will rule metal detectors, this is already clear today. In the meantime, use the developments for free, or for pennies.
BRIEFLY ABOUT THE CAPABILITIES OF THE APPLICATION
This application will allow you to detect metal (steel, iron). Unfortunately, it does not identify precious metals, but believe me, you have not yet realized the full potential.
You are changing the wiring or just starting a house renovation (let’s say the walls), but you haven’t even seen the old wiring. What to do and how to find it? a SMARTPHONE METAL DETECTOR comes to our aid
. You just move parallel to the wall and “voila” - the phone starts beeping and the arrow twitches. Interesting?
Then let's move on.
How does the metal detector program work on Android? Review of the Metal Detector program for Android OS
The Metal Detector app is a metal detecting tool using a built-in magnetic sensor. Typically, in nature, the magnetic field intensity is about 49 μT or 490 mG (1μT = 10 mG). The presence of metals in the sensor's sensing area may increase this value. This is the principle of the program.
When you start the application, an on-screen display appears on which all the data output by the program is located.
In the middle, in large numbers, there is a magnetic field intensity counter, below it there is a graphic intensity slider, which changes its color depending on the field level. Below is a graph that reads the amplitudes of magnetic field oscillations.
The tool is very easy to use. Launch the app, then move your device around and monitor the readings. The accuracy of the metal detector depends entirely on the type of mobile device you have. The magnetic sensor reacts to electronic devices (TVs, computers) because they emit electromagnetic waves.
When you press a function key on the smartphone itself, a menu appears containing a list of function keys that allow you to optimize your work with the Metal Detector program.
The “Manual” function key allows you to proceed to working with the program’s reference data.
The “Calibration” softkey allows you to proceed to calibrate the magnetic field sensor.
The “Smart Tools” function key allows you to go to the Play application store website.
The “Settings” function key allows you to move on to working with the main program settings. The program settings allow you to set the expected signal level of the mobile field, the alert sound and initialize the settings. To initialize the sensors, point your device up and move it in space as if you were drawing a big figure eight in the air.
The “About the program” function key allows you to view information about the program and its developers.
In conclusion of the review of the Metal Detector application, it should be noted that the program copes well with its functional purpose. The disadvantages include the annoying advertising line at the top of the screen display. In general, the program’s measurements are quite accurate and it can be easily installed on any smartphone.
Andrey:
RE: And who has a metal detector in their smartphone?
(16:51 09.11.2017)
"is a unique Android application that will help you in metal detecting. It is necessary to clarify the presence of a magnetic sensor, without which this useful program will not function. The presence of various metals increases the intensity of the magnetic field. It is the principle of measuring this indicator that underlies the operation of the application.
It is also perfect for renovations: you can find wiring in the walls. Now you have the opportunity to find hidden treasures or simply valuable metals.
Simple metal detector Malysh FM at home - diagram, installation
Malysh FM is one of the simplest metal detectors available today. The circuit is perfect for creating a pinpointer.
Malysh FM works on the principle of a frequency meter (previously it was used in the Koschei FM MI). The circuit of the metal detector is simple; the search coil is also easy to make with your own hands at home. It is for this reason that Malysh FM has found popularity among radio amateurs, despite minor shortcomings, which we will discuss below.
The new idea that arose among the creators of Koshchei FM also had its pitfalls. The operation of the metal detector was unstable due to constant drift, and the search depth was relatively small. However, in Malysh FM they tried to eliminate these problems programmatically and something came of it.
Diagram of the Malysh FM metal detector
All details are simple and accessible. The main thing is to use thermostable capacitors, they can be taken from a burnt multimeter or Soviet K71. But ceramic capacitors are not suitable.
The Malysh FM metal detector board is very simple and looks like this:
To power the metal detector, Krona batteries or another power source from 9 to 12 V are suitable. The metal detector board itself consumes only 10 mA, and only a powerful speaker can cause an increase in power consumption. For this reason, it is better to use piezo speakers or headphones.
The board and firmware for the Malysh FM metal detector can be downloaded below.
Making a coil for the MALYSH FM metal detector
The coil for the Malysh FM metal detector is as important as high-quality capacitors. Together with capacitors, it forms an oscillatory circuit with a frequency of 19 kHz.
The Malysh FM metal detector circuit can be used as a pinpointer or a beach metal detector.
Data for winding the coil: a wire with a cross section of 0.1–0.18 mm (95 turns) is used on a rim with a diameter of 70 mm.
The photo below is an example of commercially produced Malysh FM pinpointers:
For beachgoers: PET 155 0.1–0.18 (55 turns) wire is used for a rim with a diameter of 180 mm.
Next, the turns are removed from the rim and tightly wound together with thread, then aluminum foil is wound onto the coil to shield the coil, and a screen break is made at the point where the ends of the coil come out (Gap without foil). Then tinned copper wire is wound into a spiral onto the foil, and we connect it with a cable to the minus on the metal detector board. To connect the coil to the metal detector board, a microphone wire (2 wires in a common screen) is well suited; we solder the wires to the ends of the coil, and “screen to screen”.
Video of how the Malysh FM metal detector works:
Main settings
Like any technical device, a metal detector has certain parameters that characterize its functional properties.
Detection depth
In the first place is the depth of metal detection. By the way, many companies producing such devices do not indicate the maximum depth at which their products can detect metal products. And if such a figure is indicated, then most likely this is data obtained during laboratory tests. That is, real field conditions differ significantly from laboratory (test) conditions.
This means that when doing real work with your own hands, the detection depth will be slightly less than indicated in the passport. Why is this happening? The fact is that the composition of the soil has a significant impact on the capabilities of the metal detector. In fact, it is one thing to search in river sand, and another in soil with a high iron content. Metal products, especially those that remain at depth for a long time, oxidize and change their properties, and this affects the ability to detect an object.
Metal detector detection depth
Most modern metal detectors can find metal objects at a depth of up to 2.5 m; special deep products can detect a product at a depth of up to 6 meters.
Operating frequency
The second parameter is the operating frequency. The thing is that low frequencies allow the metal detector to see to a fairly large depth, but they are not able to see small details. High frequencies allow you to notice small objects, but do not allow you to view the ground to great depths.
The simplest (budget) models operate at one frequency; models that fall into the middle price range use 2 or more frequencies. There are models that use 28 frequencies when searching.
How to make a metal detector with your own hands - MI CHANCE diagram, detailed instructions
We present to your attention the circuit of a pulse metal detector with metal discrimination CHANCE. Compared to other similar devices, it has the huge advantage of the relative ease of manufacturing the search coil.
A self-assembled CHANCE metal detector with a coil with a diameter of 25 can find a wedding ring at a distance of 18 cm, and a helmet at a distance of 40–45 cm. The maximum search depth is 1 meter.
Metal detector circuit CHANCE
We also provide a diagram of the metal detector control buttons:
The scheme has a medium level of complexity. To assemble a metal detector with your own hands at home, you will need some experience.
Necessary components for assembling a metal detector CHANCE with your own hands
The MI CHANCE circuit contains a microcontroller, so to successfully assemble it you will need an in-circuit programmer. The circuit also contains a number of rather expensive components: a screen, a processor and an ADC.
In terms of assembly itself, the device is no more complicated than Tracker PI-2 and Clone PI-W, and in terms of setup it is even simpler, since it does not even have a traditional trimmer for balancing the op-amp.
Particular attention should be paid to the MCP3201 ADC; only after purchasing it can you proceed to further assembly of the device, since it is very difficult to find.
According to the scheme - MCP3201, but there are also analogues - ADS7816, ADS7817, ADS7822, LTC1285, LTC1286, SP8528 (they may differ in some ways).
After this, the next important item is the LCD indicator, as the most expensive part, its price is about 10 dollars. Any indicators on the built-in HD44780 controller are suitable (almost all of them are exactly like this); they are produced by many companies, so it is very difficult to give specific markings. It is best to simply choose an LCD indicator with a built-in controller for two lines of 16 characters. Whether it supports the Cyrillic alphabet or not is not important. Whether it has a backlight or not is also not important if it is not planned to be used in the dark or in basements/catacombs. But in any marking of the required indicator there will be “1602” - indicating that this is a sign-synthesizing indicator with two lines of 16 characters each.
If you are holding such an indicator in your hands for the first time, it is better to “get to know it better” right away. It’s good if you find a datasheet for it, but you can do without it if you carefully examine it. We connect +5 V from an external source to pin 2 of the indicator, and the ground to pins 1 and 5. Usually, the holes and the screen of the indicator itself sit on ground, and the printed power conductors are wider than the signal ones - this will also help to understand it better and more correctly.
We connect pin 3 of the indicator to ground through a 22 kOhm trimmer resistor (as in the device diagram). Turn on and rotate this adjuster to achieve a beautiful display of the entire top line of the indicator. It is advisable to also understand the backlight - it is displayed on the opposite side of the indicator by two separate pins, and can be duplicated on pins 15 and 16 (usually). We find where the “plus” is, where the “minus” is, and try to power it from +5 V, preferably through a 200 Ohm resistor (as in the diagram). Now you are well acquainted with the indicator, you have adjusted the contrast and you can be sure that you will no longer have problems because of it.
Download Metal Detector v1.2.2 for Android OS
Andrey: RE: And who has a metal detector in their smartphone? (16:51 09.11.2017)
I bought an Alcatel phone model 4013 D. Does anyone know how you can download a program to this phone so that it functions as a metal detector? Reply
Yes, almost all smartphones have Android. Only it is called in the characteristics - an electronic compass. It's essentially a magnetic field strength sensor. answer
looking for hidden wiring is a godsend!! answer
Finds iron at a distance of 5 cm. If you poke someone in the face with iron, then you can understand even without this “chic program” that there is iron in front of you. Metal detector. A toy for schoolchildren! answer
Greetings to all Samodelkins! I present to your consideration another home-made device, the tests of which can be viewed on the YouTube website - the “Iskander AP” channel.
The initial source for this homemade product was our favorite site – “usamodelkina.ru”. Only in contrast to the previously published article, the “Butterfly” metal detector, where the author posted a description of the manufacture of the metal detector from several articles, I manufactured and tested the device.
Review and demonstration of the metal detector:
According to established tradition, the assembly of the device was carried out from available materials:
paper, sheet plastic, fishing line, thread, slats, tree branch, electrical tape, wires, PVA glue. In the store I only had to purchase radio components and two sets of USB connectors. Stereo headphones can be taken from a cell phone.
Tools used for work:
- ruler; – wire cutters; - scissors; – metal scissors; – mini drill; – electric soldering iron; – clamps; – thermal gun; – marker, etc.
As mentioned above, the diagram is taken from a previously published article.
Metal detector Clone PI at home - diagram and detailed instructions
Clone PI is a non-metal detection pulse metal detector that can handle a variety of coil sizes. When using a ring with a diameter of 20 cm, MI Clone can find a coin at a depth of up to 25 cm, and large metal - up to 1 meter.
The Clone is based on the circuit of the Tracker PI-2 metal detector with some changes made to it.
The Clone PI metal detector has the following differences from the original (Tracker PI-2 Metal Detector):
- Using an AVR microcontroller instead of a PIC controller.
- Using an LCD screen without LEDs for indication.
- Availability of fast and slow auto-tuning.
- All controls of the metal detector are push-button (without variable resistors).
Clone PI metal detector circuit diagram
Clone PI is a pulse metal detector of average complexity; for a beginner it will be difficult to manufacture. However, a person with some experience in assembling metal detectors or other electronics will be able to handle it.
The Clone metal detector circuit contains several expensive elements: an LCD screen, an MCP3201 ADC and a microcontroller. Before you start making a metal detector, be sure to purchase an ADC, as purchasing one may be difficult!
Also, the metal detector circuit contains a programmable microcontroller, so to make it you will need a programmer with support for programming microcontrollers - PIC18F252 and the ability to use it.
On the screen, the Clone Pi metal detector displays the following information:
- Response level (“fast” and “slow” sliders).
- Supply voltage.
- Threshold (the inverse value of sensitivity).
- Volume.
- A sign that auto-tuning is active (the response exceeds the threshold in any direction).
- A sign of slow auto-adjustment (response deviation in the positive direction) coincides with the sound alarm.
- Indicator that the display backlight is on.
The Klon metal detector performed quite well in operation. With high-quality assembly, the Clone practically does not differ in search characteristics from Tracker PI and other pulse metal detectors.
DIY metal detector assembly Clone PI
The assembly of the Clone PI metal detector, as mentioned above, should begin with the search and purchase of parts for the manufacture of a printed circuit board. After this, you can proceed to the direct process of manufacturing and assembly.
First of all, you need to etch the printed circuit board:
After manufacturing the printed circuit board, it is necessary to solder all the radio components into it. It is better to install microcircuits on sockets. We also connect control buttons, a screen, a speaker and connectors for the coil and power supply of the metal detector to the board. After soldering is completed, the board must be washed with alcohol and dried thoroughly.
Then we carefully inspect the board to identify unsoldered areas and “sticks”. If everything is good, you can start programming the microcontroller.
Firmware, printed circuit board drawings and other materials that you may need when creating a Clone Pi metal detector with your own hands at home can be downloaded below.
Files for download: klon-pi.rar
After programming, we install the microcontroller on the board, and you can already see the first fruits of your labor.
If the metal detector turns on, shows everything on the screen, makes sound and responds to control buttons, then you can proceed to making a search coil. If something doesn’t work, then we return to the stage of visual inspection, checking the board according to the diagram and identifying assembly defects!
Manufacturing a search coil for the Clone PI metal detector
A simple search coil for the Clone PI metal detector can be made with your own hands from winding enamel wire with a diameter of 0.6–0.8 mm, winding 25 turns on a mandrel with a diameter of 25–27 cm. You can use a saucepan or other suitable round object as a mandrel.
The simplest homemade metal detector
Not everyone can afford to buy a metal detector.
And to search for iron, it is not at all necessary to purchase an expensive device. It is enough to assemble it yourself. And he will find it too. By the way, I will say that I saw a report on TV about how a man who had assembled a metal detector and was looking for scrap metal with it found a box of ammunition from the Civil War in the forest.
I myself have been trying to assemble such a device for a long time and it even worked! But you won’t be able to search for coins with it, since it reacts mainly to large metal objects.
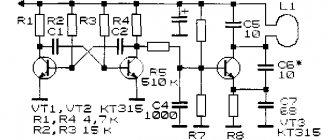
And so, to assemble a simple metal detector we need:
two KT315 transistors or similar;
two 1000 pf capacitors;
two 10,000 pf capacitors;
two 100 kOhm resistors.
In addition, the following will be useful: a 3.7-5 volt battery, headphones, enamel-insulated wire with a diameter of 0.5-0.7 mm.
The assembly diagram is simple!
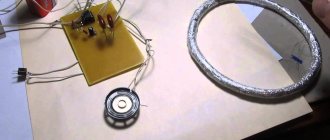
The coils can be wound on a regular pan. After ten turns, a loop is made and the winding of the remaining twenty turns continues.
Cardboard metal detector board
Its downside
The body is made of any material, preferably sealed. The bar can be made from pipes. The coils are placed on the same plane at a distance of 10 cm.
If, when you turn on the device, a squeak appears in the headphones, then it means that you need to adjust the device - change the distance between the coils. Or customize with ferrite.
Thus, you can make money by searching for scrap metal for a good branded device. And a good deed will be done - the earth will be cleansed. Well, the metal will be reused.
The photos in the article are mine, taken back in 2014. And the first picture with the diagram is taken from open sources.
How to make a metal detector with your own hands: instructions and principle of operation
In today's review by the Homius editors, we will talk about how to make a metal detector at home. This device is quite common among novice archaeologists and treasure hunters. The device has a fairly high price, which is why many radio amateurs try to assemble the product themselves. To know how to make a metal detector with your own hands, you should familiarize yourself with the general recommendations.
Design and principle of operation of the device
Metal detectors on the market operate on different principles. Many believe that they use the principle of pulse echo or radar. Their difference from locators lies in the fact that the transmitted and received signals act constantly and simultaneously; in addition, they operate at the same frequencies.
The principle of operation of the metal detector
Devices operating on the “receive-transmit” principle record the signal reflected (re-emitted) from a metal object. This signal appears due to the exposure of a metal object to an alternating magnetic field generated by the metal detector coils. That is, the design of devices of this type provides for the presence of two coils, the first is transmitting, the second is receiving.
Metal detector circuit
Devices of this class have the following advantages:
- simplicity of design;
- Great potential for detecting metallic materials.
At the same time, metal detectors of this class have certain disadvantages:
- metal detectors can be sensitive to the composition of the soil in which they search for metal objects.
- technological difficulties in the production of the product.
In other words, devices of this type must be configured with your own hands before work.
Other devices are sometimes called beat metal detectors. This name comes from the distant past, more precisely from the times when superheterodyne receivers were widely used. Beating is a phenomenon that becomes noticeable when two signals with similar frequencies and equal amplitudes are summed. The beat consists of pulsating the amplitude of the summed signal.
The signal pulsation frequency is equal to the difference in the frequencies of the summed signals. By passing such a signal through a rectifier, it is also called a detector, and the so-called difference frequency is isolated.
This scheme has been used for a long time, but nowadays it is not used. They were replaced by synchronous detectors, but the term remained in use.
A beat metal detector works using the following principle - it registers the difference in frequencies from two generator coils. One frequency is stable, the second contains an inductor.
The device is configured with your own hands so that the generated frequencies match or at least are close. As soon as metal enters the action zone, the set parameters change and the frequency changes. The frequency difference can be recorded in a variety of ways, from headphones to digital methods.
Devices of this class are characterized by a simple sensor design and low sensitivity to the mineral composition of the soil.
But besides this, when using them, it is necessary to take into account the fact that they have high energy consumption.
Typical design
The metal detector includes the following components:
- The coil is a box-type structure that houses the signal receiver and transmitter. Most often, the coil has an elliptical shape and polymers are used for its manufacture. A wire is connected to it connecting it to the control unit. This wire transmits the signal from the receiver to the control unit. The transmitter generates a signal when metal is detected, which is transmitted to the receiver. The coil is installed on the lower rod.
- The metal part on which the reel is fixed and its angle of inclination is adjusted is called the lower rod. Thanks to this solution, a more thorough examination of the surface occurs. There are models in which the lower part can adjust the height of the metal detector and provides a telescopic connection to the rod, which is called the middle one.
- The middle rod is the unit located between the lower and upper rods. Devices are attached to it that allow you to adjust the size of the device. On the market you can find models that consist of two rods.
- The top rod usually has a curved appearance. It resembles the letter S. This shape is considered optimal for attaching it to the hand. An armrest, a control unit and a handle are installed on it. The armrest and handle are made of polymer materials.
- The metal detector control unit is necessary to process the data received from the coil. After the signal is converted, it is sent to headphones or other display devices. In addition, the control unit is designed to regulate the operating mode of the device. The wire from the coil is connected using a quick release device.
Metal detector design
All devices included in the metal detector are waterproof.
It is this relative simplicity of design that allows you to make metal detectors with your own hands.
How to make a metal detector with your own hands
Today, many treasure lovers try not to purchase metal detectors, but to assemble them themselves. For some reason, it is generally accepted that something made by hand is significantly worse than finished products.
Perhaps such a product will look slightly worse in terms of aesthetic parameters, but in terms of technical indicators it is practically not inferior to professional ones.
How does a metal detector work - principle of operation
A metal detector is an electronic device that consists of a primary indicator and a secondary unit. Devices for detecting metals are divided into the following subtypes:
- reception and transmission devices;
- induction;
- pulse;
- generator
Most models in the mid-price range are considered transmit-receive devices. The operating principle is quite simple and is based on the arrival of magnetic waves. The main part of the device will be two coils.
If a metal object meets in the path of the magnetic wave, it will be reflected from it, and the device will receive a reflected beam. A signal will sound indicating that a target has been detected.
Induction metal detector PHOTO: besplatka.ua
The operation of an induction metal detector is similar to that of a “receive-transmit” type device. The main difference will be only the presence of one coil that sends and receives the impulse.
Pulse metal detectors are immune to soil mineralization. The magnetic field will create eddy currents on the top layer of the metal object. The device will pick them up directly.
Generator metal detectors can be of various types. However, each of them is based on an LC oscillator. Such devices are not very sensitive and are often designed to detect only one type of metal.
Bonus. 3D model for printing a coil
Here you can download a 3D model for printing on a 3D printer. The frame consists of 7 fragments, you can download and print on a 3D printer, which will greatly facilitate the assembly of the DD coil.
Thanks to Elektrodych for the news!
↓↓↓ Now let’s move to the comments and find out the opinion of the experts. Scroll the page down ↓↓↓, there are reviews from diggers, MD specialists, additional information and clarifications from the blog authors ↓↓↓
Functional and technical parameters of metal detectors
Before purchasing a high-quality metal detector, you need to decide on the search environment. It is necessary to take into account the potential dimensions of the desired objects and the depth of their occurrence. Key indicators that are emphasized when purchasing a device:
- principle of influence;
- frequency;
- susceptibility;
- weight;
- soil balancing;
- target designation;
- discriminator;
- auxiliary functionality.
The operating principle and operating frequency are the main indicators that determine the capabilities of the device and show which class it can be classified into.
Metal detector without chips
If a novice “treasure hunter” has no desire to get involved with microcircuits, there are circuits without them.
A simple circuit using transistor oscillators
There are simpler circuits based on the use of traditional transistors. Such a device can find metal at a depth of several tens of centimeters.
Which metal detectors are suitable for making at home?
The simplest products that you can assemble yourself include devices that operate on reception and transmission.
There are a large number of instructions on the Internet with detailed guidance on how to assemble a simple metal detector PHOTO: electrikmaster.ru
The most popular types of devices:
- metal detector "Pirate";
- “Butterfly” detector;
- emitter without circuits;
- metal detector "Terminator".
But, despite the fact that some craftsmen offer to assemble a metal detector from a telephone, such designs will not be able to pass the “combat” test.
Metal detector with metal discrimination
Modern metal detectors are equipped with a function such as metal discrimination. It allows you to distinguish the type of material located at depth. In this case, when ferrous metal is detected, one sound will sound in the search engine’s headphones, and when non-ferrous metal is detected, another sound will sound.
Such devices are classified as pulse-balanced. They use frequencies from 8 to 15 kHz in their work. Batteries of 9 - 12 V are used as a source.
Devices of this class are capable of detecting a gold object at a depth of several tens of centimeters, and ferrous metal products at a depth of about 1 meter or more.
Metal detector with metal discrimination
But, of course, these parameters depend on the device model.
How to assemble a “Pirate” metal detector with your own hands: detailed instructions
The “Pirate” models are quite expensive, which is determined by the device’s ability to detect objects at a depth of 0.2 m (small) and 1.5 m (large). You should consider the design features and settings for metal detecting.
Materials needed to assemble a powerful metal detector with your own hands
The Pirate metal detector is considered a pulse device. To make the device, you will need to buy:
- IC KR 1006VI1 to create a transmitting unit;
- transistor IRF 740;
- IC K 157UD2 and transistor BC 547 to assemble the receiving unit;
- NPN transistors;
- PEV 0.5 wire to create a coil;
- materials to make the body, etc.;
- a plate covered with copper sheet to make a printed circuit board;
- the wire;
- electrical tape;
- soldering iron;
- scalpel;
- screwdrivers;
- pliers;
- different types of fasteners.
Assembly tools PHOTO: youtube.com
DIY metal detector circuits
The standard circuit of the “Pirate” metal detector is based on the NE555 chip. The operation of the device will depend on the comparator: 1 output is connected to the IC generator, 2 to the coil, and the output to the speaker. When detecting metal objects, a pulse from the coil will go to the comparator and then to the speaker.
The board is placed in a junction box, which can be purchased at electronics stores PHOTO: youtube.com
DIY printed circuit board
If spare parts are purchased, there is a diagram, then you need to put everything together. To place the radio components, a printed circuit board is used, which you can easily make yourself. You will need sheet getinax covered with technical copper foil.
The selected pattern is transferred to the workpiece, the tracks that connect the parts are marked, holes are drilled PHOTO: youtube.com
The tracks are coated with a protective varnish, and after drying, the board is lowered into ferric chloride for etching.
When the product is ready, it is possible to install and solder the radio components. The next stage will be checking the circuit using measuring instruments.
DIY coil for metal detector
The Pirate metal detector is considered a pulse device, so accuracy during coil assembly does not play a key role. For the base you need a ring with a diameter of 20 cm, on which 25 turns of wire are wound. To increase the depth of metal detection, the coil frame should be approximately 26-27 cm, and the number of turns should be 20-22.
Then the mandrel with the wire is thoroughly wrapped with insulation. The finished coil is placed inside a dielectric housing. You can use materials that fit the dimensions of the housing of faulty household appliances. This will make it possible to protect the coil from damage when working with the device. The ends of the winding are soldered to a stranded wire with a diameter of 0.6 mm.
Making a coil PHOTO: youtube.com
How to make a simple metal detector for searching on the beach
In this article I will tell you how to build a simple metal detector for searching for coins and jewelry on the beach. It consists of one chip - the NE555N timer, a coil and several other radio components.
Expect to spend up to 300 rubles to build this metal detector!
Required materials
To assemble the metal detector you will need:
- NE555N timer chip, in DIP package;
- resistor 47 kOhm;
- two capacitors 2.2 µF, 16 V;
- piece of contact breadboard;
- 9 volt battery, switch, battery socket;
- electromechanical sound emitter;
- 100 meters of copper wire with a diameter of 0.2 millimeters;
- some thick cardboard and glue.
Instead of an electromechanical sound emitter, you can use a 10 µF capacitor and any speaker with an 8 Ohm impedance, connected in series.
Metal detector circuit
The idea for the metal detector was taken from the book “ 499 circuits based on the NE555 timer”
"
I just added a switch between the battery and the chip, and I also use an electromechanical sound emitter from an old electronic alarm clock instead of a speaker. Read also: How to start a chainsaw after a long period of inactivity
Search coil
The most difficult part of a metal detector is its coil. I calculated that a 90mm diameter coil would have approximately 260 turns of 0.2mm diameter varnished copper wire. In this case, its inductance will be approximately 10 millihenry.
I wound the coil carefully, turn to turn. To prevent the wires from unraveling, I wrapped the winding with white electrical tape on top.
If you want to make a larger diameter coil to increase the target detection range, then there are several online calculators on the Internet with which you can calculate it.
Circuit board
I placed all the electronic components on a piece of breadboard. The connections were made using the most ordinary wire that was at hand. Soldering the board itself took no more than 15 minutes.
The size of the board turned out to be approximately equal to the size of a matchbox.
Frame
To simplify things, I decided to make the handle of the metal detector out of cardboard. The handle contains a circuit board, a switch and a battery.
All this was cut out of thick cardboard and glued together with PVA glue. After the glue had dried, I made holes in the cardboard for the board and wires.
Next, I glued the search coil to the handle with hot glue. The last step, also using hot glue, I glued the board and battery inside the handle.
Conclusion
The metal detector works as follows: as long as there are no metal objects near the coil, the sound emitter beeps at the same frequency; when a metal object is brought up, the tone of the sound changes towards a higher one.
The detection range of a large coin through the air, according to my measurements, was 5 – 7 centimeters!